In this tutorial , we will integrate Spring with Hibernate using annotation based configuration. We will develop a simple CRUD oriented web application containing a form asking user input, saving that input in MySQL database using Hibernate , retrieving the records from database and updating or deleting them within transaction, all using annotation configuration.
Testing part of this post is covered in detail in Next Post where we perform unit/integration test using TestNG, mockito, spring-test, DBUnit & H2 database. To know more about testing with TestNG in general, please refer our TestNG Tutorials. Let’s get going.
- Spring Boot+AngularJS+Spring Data+Hibernate+MySQL CRUD App
- Spring Boot REST API Tutorial
- Spring Boot WAR deployment example
- Spring Boot Introduction + Hello World Example
- Secure Spring REST API using OAuth2
- AngularJS+Spring Security using Basic Authentication
- Secure Spring REST API using Basic Authentication
- Spring 4 MVC+JPA2+Hibernate Many-to-many Example
- Spring 4 Caching Annotations Tutorial
- Spring 4 Cache Tutorial with EhCache
- Spring 4 Email With Attachment Tutorial
- Spring 4 Email Template Library Example
- Spring 4 Email Integration Tutorial
- Spring MVC 4+JMS+ActiveMQ Integration Example
- Spring 4+JMS+ActiveMQ Integration Example
- Spring 4+JMS+ActiveMQ @JmsLister @EnableJms Example
- Spring MVC 4+Apache Tiles 3 Integration Example
- Spring MVC 4+Spring Security 4 + Hibernate Integration Example
- Spring MVC 4+AngularJS Example
- Spring MVC 4+AngularJS Server communication example : CRUD application using ngResource $resource service
- Spring MVC 4+AngularJS Routing with UI-Router Example
- Spring MVC 4+Hibernate 4 Many-to-many JSP Example
- Spring MVC 4+Hibernate 4+MySQL+Maven integration + Testing example using annotations
- Spring Security 4 Hibernate Integration Annotation+XML Example
- Spring MVC4 FileUpload-Download Hibernate+MySQL Example
- Spring MVC 4 Form Validation and Resource Handling
- Spring Batch- MultiResourceItemReader & HibernateItemWriter example
Following technologies being used:
- Spring 4.0.6.RELEASE
- Hibernate Core 4.3.6.Final
- validation-api 1.1.0.Final
- hibernate-validator 5.1.3.Final
- MySQL Server 5.6
- Maven 3
- JDK 1.7
- Tomcat 8.0.21
- Eclipse JUNO Service Release 2
- TestNG 6.9.4
- Mockito 1.10.19
- DBUnit 2.2
- H2 Database 1.4.187
Let’s begin.
Step 1: Create the directory structure
Following will be the final project structure:
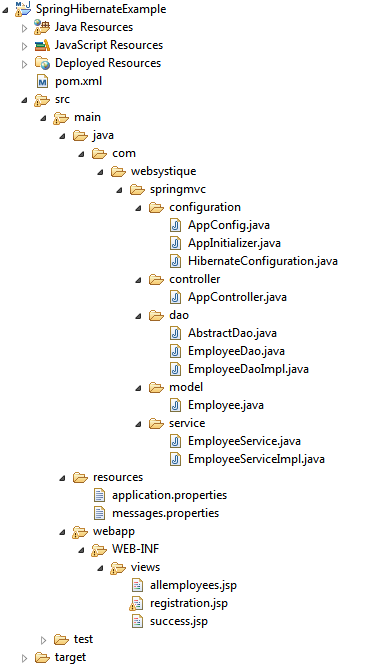
Let’s now add the content mentioned in above structure explaining each in detail.
Step 2: Update pom.xml to include required dependencies
<?xml version="1.0"?>
<project xsi:schemaLocation="http://maven.apache.org/POM/4.0.0 http://maven.apache.org/xsd/maven-4.0.0.xsd"
	xmlns="http://maven.apache.org/POM/4.0.0" xmlns:xsi="http://www.w3.org/2001/XMLSchema-instance">

	<modelVersion>4.0.0</modelVersion>
	<groupId>com.websystique.springmvc</groupId>
	<artifactId>SpringHibernateExample</artifactId>
	<packaging>war</packaging>
	<version>1.0.0</version>
	<name>SpringHibernateExample</name>

	<properties>
		<springframework.version>4.0.6.RELEASE</springframework.version>
		<hibernate.version>4.3.6.Final</hibernate.version>
		<mysql.connector.version>5.1.31</mysql.connector.version>
		<joda-time.version>2.3</joda-time.version>
		<testng.version>6.9.4</testng.version>
		<mockito.version>1.10.19</mockito.version>
		<h2.version>1.4.187</h2.version>
		<dbunit.version>2.2</dbunit.version>
	</properties>

	<dependencies>
		<!-- Spring -->
		<dependency>
			<groupId>org.springframework</groupId>
			<artifactId>spring-core</artifactId>
			<version>${springframework.version}</version>
		</dependency>
		<dependency>
			<groupId>org.springframework</groupId>
			<artifactId>spring-web</artifactId>
			<version>${springframework.version}</version>
		</dependency>
		<dependency>
			<groupId>org.springframework</groupId>
			<artifactId>spring-webmvc</artifactId>
			<version>${springframework.version}</version>
		</dependency>
		<dependency>
			<groupId>org.springframework</groupId>
			<artifactId>spring-tx</artifactId>
			<version>${springframework.version}</version>
		</dependency>
		<dependency>
			<groupId>org.springframework</groupId>
			<artifactId>spring-orm</artifactId>
			<version>${springframework.version}</version>
		</dependency>

		<!-- Hibernate -->
		<dependency>
			<groupId>org.hibernate</groupId>
			<artifactId>hibernate-core</artifactId>
			<version>${hibernate.version}</version>
		</dependency>

		<!-- jsr303 validation -->
		<dependency>
			<groupId>javax.validation</groupId>
			<artifactId>validation-api</artifactId>
			<version>1.1.0.Final</version>
		</dependency>
		<dependency>
			<groupId>org.hibernate</groupId>
			<artifactId>hibernate-validator</artifactId>
			<version>5.1.3.Final</version>
		</dependency>

		<!-- MySQL -->
		<dependency>
			<groupId>mysql</groupId>
			<artifactId>mysql-connector-java</artifactId>
			<version>${mysql.connector.version}</version>
		</dependency>

      	<!-- Joda-Time -->
		<dependency>
  			<groupId>joda-time</groupId>
  			<artifactId>joda-time</artifactId>
  			<version>${joda-time.version}</version>
  		</dependency>

		<!-- To map JodaTime with database type -->
  		<dependency>
    		<groupId>org.jadira.usertype</groupId>
    		<artifactId>usertype.core</artifactId>
    		<version>3.0.0.CR1</version>
		</dependency>

		<!-- Servlet+JSP+JSTL -->
		<dependency>
			<groupId>javax.servlet</groupId>
			<artifactId>javax.servlet-api</artifactId>
			<version>3.1.0</version>
		</dependency>
		<dependency>
			<groupId>javax.servlet.jsp</groupId>
			<artifactId>javax.servlet.jsp-api</artifactId>
			<version>2.3.1</version>
		</dependency>
		<dependency>
		    <groupId>javax.servlet</groupId>
		    <artifactId>jstl</artifactId>
		    <version>1.2</version>
		</dependency>


		<!-- Testing dependencies -->
		<dependency>
			<groupId>org.springframework</groupId>
			<artifactId>spring-test</artifactId>
			<version>${springframework.version}</version>
			<scope>test</scope>
		</dependency>
		<dependency>
			<groupId>org.testng</groupId>
			<artifactId>testng</artifactId>
			<version>${testng.version}</version>
			<scope>test</scope>
		</dependency>
		<dependency>
			<groupId>org.mockito</groupId>
			<artifactId>mockito-all</artifactId>
			<version>${mockito.version}</version>
			<scope>test</scope>
		</dependency>
		<dependency>
			<groupId>com.h2database</groupId>
			<artifactId>h2</artifactId>
			<version>${h2.version}</version>
			<scope>test</scope>
		</dependency>
		<dependency>
			<groupId>dbunit</groupId>
			<artifactId>dbunit</artifactId>
			<version>${dbunit.version}</version>
			<scope>test</scope>
		</dependency>

	</dependencies>

	<build>
		<pluginManagement>
			<plugins>
				<plugin>
					<groupId>org.apache.maven.plugins</groupId>
					<artifactId>maven-compiler-plugin</artifactId>
					<version>3.2</version>
					<configuration>
						<source>1.7</source>
						<target>1.7</target>
					</configuration>
				</plugin>
				<plugin>
					<groupId>org.apache.maven.plugins</groupId>
					<artifactId>maven-war-plugin</artifactId>
					<version>2.4</version>
					<configuration>
						<warSourceDirectory>src/main/webapp</warSourceDirectory>
						<warName>SpringHibernateExample</warName>
						<failOnMissingWebXml>false</failOnMissingWebXml>
					</configuration>
				</plugin>
			</plugins>
		</pluginManagement>
		<finalName>SpringHibernateExample</finalName>
	</build>
</project>
First thing to notice here is the maven-war-plugin declaration. As we are using full annotation configuration, we don’t even include web.xml in our project, so we will need to configure this plugin in order to avoid maven failure to build war package. Since in this example we will use a form to accept input from user, we need also to validate the user input. We will choose JSR303 Validation here, so we have included validation-api which represents the specification, and hibernate-validator which represents an implementation of this specification. hibernate-validator also provides few of it’s own annotations (@Email, @NotEmpty, etc..) which are not part of the specification.
Along with that, we have also included JSP/Servlet/Jstl dependencies which we will be needing as we are going to use servlet api’s and jstl view in our code. In general, containers might already contains these libraries, so we can set the scope as ‘provided’ for them in pom.xml.
We also have added testing dependencies. Testing part of this post is described in detail in Next post.
Rest of the dependencies are for Spring, Hibernate and Joda-Time.
Step 3: Configure Hibernate
com.websystique.springmvc.configuration.HibernateConfiguration
package com.websystique.springmvc.configuration;

import java.util.Properties;

import javax.sql.DataSource;

import org.hibernate.SessionFactory;
import org.springframework.beans.factory.annotation.Autowired;
import org.springframework.context.annotation.Bean;
import org.springframework.context.annotation.ComponentScan;
import org.springframework.context.annotation.Configuration;
import org.springframework.context.annotation.PropertySource;
import org.springframework.core.env.Environment;
import org.springframework.jdbc.datasource.DriverManagerDataSource;
import org.springframework.orm.hibernate4.HibernateTransactionManager;
import org.springframework.orm.hibernate4.LocalSessionFactoryBean;
import org.springframework.transaction.annotation.EnableTransactionManagement;

@Configuration
@EnableTransactionManagement
@ComponentScan({ "com.websystique.springmvc.configuration" })
@PropertySource(value = { "classpath:application.properties" })
public class HibernateConfiguration {

    @Autowired
    private Environment environment;

    @Bean
    public LocalSessionFactoryBean sessionFactory() {
        LocalSessionFactoryBean sessionFactory = new LocalSessionFactoryBean();
        sessionFactory.setDataSource(dataSource());
        sessionFactory.setPackagesToScan(new String[] { "com.websystique.springmvc.model" });
        sessionFactory.setHibernateProperties(hibernateProperties());
        return sessionFactory;
     }

    @Bean
    public DataSource dataSource() {
        DriverManagerDataSource dataSource = new DriverManagerDataSource();
        dataSource.setDriverClassName(environment.getRequiredProperty("jdbc.driverClassName"));
        dataSource.setUrl(environment.getRequiredProperty("jdbc.url"));
        dataSource.setUsername(environment.getRequiredProperty("jdbc.username"));
        dataSource.setPassword(environment.getRequiredProperty("jdbc.password"));
        return dataSource;
    }

    private Properties hibernateProperties() {
        Properties properties = new Properties();
        properties.put("hibernate.dialect", environment.getRequiredProperty("hibernate.dialect"));
        properties.put("hibernate.show_sql", environment.getRequiredProperty("hibernate.show_sql"));
        properties.put("hibernate.format_sql", environment.getRequiredProperty("hibernate.format_sql"));
        return properties;
    }

	@Bean
    @Autowired
    public HibernateTransactionManager transactionManager(SessionFactory s) {
       HibernateTransactionManager txManager = new HibernateTransactionManager();
       txManager.setSessionFactory(s);
       return txManager;
    }
}
@Configuration indicates that this class contains one or more bean methods annotated with @Bean producing beans manageable by spring container. In our case, this class represent hibernate configuration.
@ComponentScan is equivalent to context:component-scan base-package="..." in xml, providing with where to look for spring managed beans/classes.
@EnableTransactionManagement is equivalent to Spring’s tx:* XML namespace, enabling Spring’s annotation-driven transaction management capability.
@PropertySource is used to declare a set of properties(defined in a properties file in application classpath) in Spring run-time Environment, providing flexibility to have different values in different application environments.
Method sessionFactory() is creating a LocalSessionFactoryBean, which exactly mirrors the XML based configuration : We need a dataSource and hibernate properties (same as hibernate.properties). Thanks to @PropertySource, we can externalize the real values in a .properties file, and use Spring’s Environment to fetch the value corresponding to an item. Once the SessionFactory is created, it will be injected into Bean method transactionManager which may eventually provide transaction support for the sessions created by this sessionFactory.
Below is the properties file used in this post.
/src/main/resources/application.properties
jdbc.driverClassName = com.mysql.jdbc.Driver
jdbc.url = jdbc:mysql://localhost:3306/websystique
jdbc.username = myuser
jdbc.password = mypassword
hibernate.dialect = org.hibernate.dialect.MySQLDialect
hibernate.show_sql = true
hibernate.format_sql = true
Step 4: Configure Spring MVC
com.websystique.springmvc.configuration.AppConfig
package com.websystique.springmvc.configuration;

import org.springframework.context.MessageSource;
import org.springframework.context.annotation.Bean;
import org.springframework.context.annotation.ComponentScan;
import org.springframework.context.annotation.Configuration;
import org.springframework.context.support.ResourceBundleMessageSource;
import org.springframework.web.servlet.ViewResolver;
import org.springframework.web.servlet.config.annotation.EnableWebMvc;
import org.springframework.web.servlet.view.InternalResourceViewResolver;
import org.springframework.web.servlet.view.JstlView;

@Configuration
@EnableWebMvc
@ComponentScan(basePackages = "com.websystique.springmvc")
public class AppConfig {

	@Bean
	public ViewResolver viewResolver() {
		InternalResourceViewResolver viewResolver = new InternalResourceViewResolver();
		viewResolver.setViewClass(JstlView.class);
		viewResolver.setPrefix("/WEB-INF/views/");
		viewResolver.setSuffix(".jsp");
		return viewResolver;
	}

	@Bean
	public MessageSource messageSource() {
	    ResourceBundleMessageSource messageSource = new ResourceBundleMessageSource();
	    messageSource.setBasename("messages");
	    return messageSource;
	}
}
Again, @Configuration marks this class as configuration class as mentioned above & ComponentScan referes to package locations to find the associated beans.
@EnableWebMvc is equivalent to mvc:annotation-driven in XML.
Method viewResolver configures a view resolver to identify the real view.
In this post, we are working with form submission, validating user input (via JSR303 annotations). In case of validation failure, default error messages are shown.To override those default by your own custom [internationalized] messages from an external Message bundle [.properties file], we need to configure a ResourceBundleMessageSource. Method messageSource is there for same purpose. Notice the parameter provided (messages) to basename method. Spring will search for a file named messages.properties in application class path. Let’s add that file:
/src/main/resources/messages.properties
Size.employee.name=Name must be between {2} and {1} characters long
NotNull.employee.joiningDate=Joining Date can not be blank
NotNull.employee.salary=Salary can not be blank
Digits.employee.salary=Only numeric data with max 8 digits and with max 2 precision is allowed
NotEmpty.employee.ssn=SSN can not be blank
typeMismatch=Invalid format
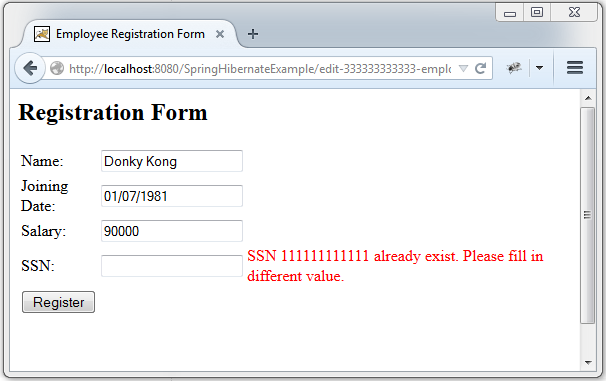
non.unique.ssn=SSN {0} already exist. Please fill in different value.
Notice that above message follows a specific pattern
{ValidationAnnotationClass}.{modelObject}.{fieldName}
Additionally, based on specific annotation (e.g. @Size) you can also pass the arguments to these messages using {0},{1},..{i} indexes.
Step 5: Configure Initializer class
com.websystique.springmvc.configuration.AppInitializer
package com.websystique.springmvc.configuration;

import javax.servlet.ServletContext;
import javax.servlet.ServletException;
import javax.servlet.ServletRegistration;

import org.springframework.web.WebApplicationInitializer;
import org.springframework.web.context.support.AnnotationConfigWebApplicationContext;
import org.springframework.web.servlet.DispatcherServlet;

public class AppInitializer implements WebApplicationInitializer {

	public void onStartup(ServletContext container) throws ServletException {

		AnnotationConfigWebApplicationContext ctx = new AnnotationConfigWebApplicationContext();
		ctx.register(AppConfig.class);
		ctx.setServletContext(container);

		ServletRegistration.Dynamic servlet = container.addServlet(
				"dispatcher", new DispatcherServlet(ctx));

		servlet.setLoadOnStartup(1);
		servlet.addMapping("/");
	}

}
The content above resembles the content of web.xml as we are using the front-controller DispatherServler, assigning the mapping (url-pattern in xml) and instead of providing the path to spring configuration file(spring-servlet.xml) , here we are registering the Configuration Class.
UPDATE: Note that above class can be written even more concisely [and it’s the preferred way], by extending AbstractAnnotationConfigDispatcherServletInitializer base class, as shown below:
package com.websystique.springmvc.configuration;

import org.springframework.web.servlet.support.AbstractAnnotationConfigDispatcherServletInitializer;

public class AppInitializer extends AbstractAnnotationConfigDispatcherServletInitializer {

	@Override
	protected Class<?>[] getRootConfigClasses() {
		return new Class[] { AppConfig.class };
	}

	@Override
	protected Class<?>[] getServletConfigClasses() {
		return null;
	}

	@Override
	protected String[] getServletMappings() {
		return new String[] { "/" };
	}

}
Step 6: Add Controller to handle the requests
Add the controller which will serve the GET and POST request.
com.websystique.springmvc.controller.AppController
package com.websystique.springmvc.controller;

import java.util.List;
import java.util.Locale;

import javax.validation.Valid;

import org.springframework.beans.factory.annotation.Autowired;
import org.springframework.context.MessageSource;
import org.springframework.stereotype.Controller;
import org.springframework.ui.ModelMap;
import org.springframework.validation.BindingResult;
import org.springframework.validation.FieldError;
import org.springframework.web.bind.annotation.PathVariable;
import org.springframework.web.bind.annotation.RequestMapping;
import org.springframework.web.bind.annotation.RequestMethod;

import com.websystique.springmvc.model.Employee;
import com.websystique.springmvc.service.EmployeeService;

@Controller
@RequestMapping("/")
public class AppController {

	@Autowired
	EmployeeService service;

	@Autowired
	MessageSource messageSource;

	/*
	 * This method will list all existing employees.
	 */
	@RequestMapping(value = { "/", "/list" }, method = RequestMethod.GET)
	public String listEmployees(ModelMap model) {

		List<Employee> employees = service.findAllEmployees();
		model.addAttribute("employees", employees);
		return "allemployees";
	}

	/*
	 * This method will provide the medium to add a new employee.
	 */
	@RequestMapping(value = { "/new" }, method = RequestMethod.GET)
	public String newEmployee(ModelMap model) {
		Employee employee = new Employee();
		model.addAttribute("employee", employee);
		model.addAttribute("edit", false);
		return "registration";
	}

	/*
	 * This method will be called on form submission, handling POST request for
	 * saving employee in database. It also validates the user input
	 */
	@RequestMapping(value = { "/new" }, method = RequestMethod.POST)
	public String saveEmployee(@Valid Employee employee, BindingResult result,
			ModelMap model) {

		if (result.hasErrors()) {
			return "registration";
		}

		/*
		 * Preferred way to achieve uniqueness of field [ssn] should be implementing custom @Unique annotation
		 * and applying it on field [ssn] of Model class [Employee].
		 *
		 * Below mentioned peace of code [if block] is to demonstrate that you can fill custom errors outside the validation
		 * framework as well while still using internationalized messages.
		 *
		 */
		if(!service.isEmployeeSsnUnique(employee.getId(), employee.getSsn())){
			FieldError ssnError =new FieldError("employee","ssn",messageSource.getMessage("non.unique.ssn", new String[]{employee.getSsn()}, Locale.getDefault()));
		    result.addError(ssnError);
			return "registration";
		}

		service.saveEmployee(employee);

		model.addAttribute("success", "Employee " + employee.getName() + " registered successfully");
		return "success";
	}


	/*
	 * This method will provide the medium to update an existing employee.
	 */
	@RequestMapping(value = { "/edit-{ssn}-employee" }, method = RequestMethod.GET)
	public String editEmployee(@PathVariable String ssn, ModelMap model) {
		Employee employee = service.findEmployeeBySsn(ssn);
		model.addAttribute("employee", employee);
		model.addAttribute("edit", true);
		return "registration";
	}

	/*
	 * This method will be called on form submission, handling POST request for
	 * updating employee in database. It also validates the user input
	 */
	@RequestMapping(value = { "/edit-{ssn}-employee" }, method = RequestMethod.POST)
	public String updateEmployee(@Valid Employee employee, BindingResult result,
			ModelMap model, @PathVariable String ssn) {

		if (result.hasErrors()) {
			return "registration";
		}

		if(!service.isEmployeeSsnUnique(employee.getId(), employee.getSsn())){
			FieldError ssnError =new FieldError("employee","ssn",messageSource.getMessage("non.unique.ssn", new String[]{employee.getSsn()}, Locale.getDefault()));
		    result.addError(ssnError);
			return "registration";
		}

		service.updateEmployee(employee);

		model.addAttribute("success", "Employee " + employee.getName()	+ " updated successfully");
		return "success";
	}


	/*
	 * This method will delete an employee by it's SSN value.
	 */
	@RequestMapping(value = { "/delete-{ssn}-employee" }, method = RequestMethod.GET)
	public String deleteEmployee(@PathVariable String ssn) {
		service.deleteEmployeeBySsn(ssn);
		return "redirect:/list";
	}

}
It’s a pretty straight-forward Spring based controller.@Controller indicates that this class is a controller handling the requests with pattern mapped by @RequestMapping.Here with ‘/’, it is serving as default controller.
Method listEmployees , annotated with @RequestMethod.GET, handling both the default URL ‘/’ as well as ‘/list’. It acts as handle for initial page of application, showing a list of existing employees.
Method newEmployee is handling the GET request for the new employee registration page, showing page backed by a model Employee object.
Method saveEmployee is annotated with @RequestMethod.POST, and will handle the form-submission POST requests for new employee registration (‘/new’). Notice the parameters and their orders in this method. @Valid asks spring to validate the associated object(Employee). BindingResult contains the outcome of this validation and any error that might have occurred during this validation. Notice that BindingResult must come right after the validated object else spring won’t be able to validate and an exception been thrown. In case of validation failure, custom error messages(as we have configured in step 4) are shown.
We have also included code to check for SSN uniqueness as it is declared to be unique in database. Before saving/updating an employee, we are checking if the SSN is unique.If not, we generate validation error and redirect to registration page. This peace of code demonstrate a way to
fill it custom errors outside the validation framework as well while still using internationalized messages.
Method editEmployee takes you to registration page with employee details filled in, while updateEmployee gets called when you click on update button after possible updation on gui.
Method deleteEmployee is handling the deletion of an employee by it’s SSN number. Notice @PathVariable , which indicates that this parameter will be bound to variable in URI template (SSN in our case).
As for as Annotation based configuration goes,this is all we need to do. Now to make the application complete, we will add service layer, dao layer, views, Domain object, sample database schema and run the application.
Step 7: Add DAO Layer
com.websystique.springmvc.dao.AbstractDao
package com.websystique.springmvc.dao;

import java.io.Serializable;

import java.lang.reflect.ParameterizedType;

import org.hibernate.Criteria;
import org.hibernate.Session;
import org.hibernate.SessionFactory;
import org.springframework.beans.factory.annotation.Autowired;

public abstract class AbstractDao<PK extends Serializable, T> {

	private final Class<T> persistentClass;

	@SuppressWarnings("unchecked")
	public AbstractDao(){
		this.persistentClass =(Class<T>) ((ParameterizedType) this.getClass().getGenericSuperclass()).getActualTypeArguments()[1];
	}

	@Autowired
	private SessionFactory sessionFactory;

	protected Session getSession(){
		return sessionFactory.getCurrentSession();
	}

	@SuppressWarnings("unchecked")
	public T getByKey(PK key) {
		return (T) getSession().get(persistentClass, key);
	}

	public void persist(T entity) {
		getSession().persist(entity);
	}

	public void delete(T entity) {
		getSession().delete(entity);
	}

	protected Criteria createEntityCriteria(){
		return getSession().createCriteria(persistentClass);
	}

}
This Generic class is the base class for all DAO implementation classes. It provides the wrapper methods for common hibernate operations.
Notice above, that SessionFactory we have created earlier in step 3, will be autowired here.
com.websystique.springmvc.dao.EmployeeDao
package com.websystique.springmvc.dao;

import java.util.List;

import com.websystique.springmvc.model.Employee;

public interface EmployeeDao {

	Employee findById(int id);

	void saveEmployee(Employee employee);

	void deleteEmployeeBySsn(String ssn);

	List<Employee> findAllEmployees();

	Employee findEmployeeBySsn(String ssn);

}
com.websystique.springmvc.dao.EmployeeDaoImpl
package com.websystique.springmvc.dao;

import java.util.List;

import org.hibernate.Criteria;
import org.hibernate.Query;
import org.hibernate.criterion.Restrictions;
import org.springframework.stereotype.Repository;

import com.websystique.springmvc.model.Employee;

@Repository("employeeDao")
public class EmployeeDaoImpl extends AbstractDao<Integer, Employee> implements EmployeeDao {

	public Employee findById(int id) {
		return getByKey(id);
	}

	public void saveEmployee(Employee employee) {
		persist(employee);
	}

	public void deleteEmployeeBySsn(String ssn) {
		Query query = getSession().createSQLQuery("delete from Employee where ssn = :ssn");
		query.setString("ssn", ssn);
		query.executeUpdate();
	}

	@SuppressWarnings("unchecked")
	public List<Employee> findAllEmployees() {
		Criteria criteria = createEntityCriteria();
		return (List<Employee>) criteria.list();
	}

	public Employee findEmployeeBySsn(String ssn) {
		Criteria criteria = createEntityCriteria();
		criteria.add(Restrictions.eq("ssn", ssn));
		return (Employee) criteria.uniqueResult();
	}
}
Step 8: Add Service Layer
com.websystique.springmvc.service.EmployeeService
package com.websystique.springmvc.service;

import java.util.List;

import com.websystique.springmvc.model.Employee;

public interface EmployeeService {

	Employee findById(int id);

	void saveEmployee(Employee employee);

	void updateEmployee(Employee employee);

	void deleteEmployeeBySsn(String ssn);

	List<Employee> findAllEmployees();

	Employee findEmployeeBySsn(String ssn);

	boolean isEmployeeSsnUnique(Integer id, String ssn);

}
com.websystique.springmvc.service.EmployeeServiceImpl
package com.websystique.springmvc.service;

import java.util.List;

import org.springframework.beans.factory.annotation.Autowired;
import org.springframework.stereotype.Service;
import org.springframework.transaction.annotation.Transactional;

import com.websystique.springmvc.dao.EmployeeDao;
import com.websystique.springmvc.model.Employee;

@Service("employeeService")
@Transactional
public class EmployeeServiceImpl implements EmployeeService {

	@Autowired
	private EmployeeDao dao;

	public Employee findById(int id) {
		return dao.findById(id);
	}

	public void saveEmployee(Employee employee) {
		dao.saveEmployee(employee);
	}

	/*
	 * Since the method is running with Transaction, No need to call hibernate update explicitly.
	 * Just fetch the entity from db and update it with proper values within transaction.
	 * It will be updated in db once transaction ends.
	 */
	public void updateEmployee(Employee employee) {
		Employee entity = dao.findById(employee.getId());
		if(entity!=null){
			entity.setName(employee.getName());
			entity.setJoiningDate(employee.getJoiningDate());
			entity.setSalary(employee.getSalary());
			entity.setSsn(employee.getSsn());
		}
	}

	public void deleteEmployeeBySsn(String ssn) {
		dao.deleteEmployeeBySsn(ssn);
	}

	public List<Employee> findAllEmployees() {
		return dao.findAllEmployees();
	}

	public Employee findEmployeeBySsn(String ssn) {
		return dao.findEmployeeBySsn(ssn);
	}

	public boolean isEmployeeSsnUnique(Integer id, String ssn) {
		Employee employee = findEmployeeBySsn(ssn);
		return ( employee == null || ((id != null) && (employee.getId() == id)));
	}

}
Most interesting part above is @Transactional which starts a transaction on each method start, and commits it on each method exit ( or rollback if method was failed due to an error). Note that since the transaction are on method scope, and inside method we are using DAO, DAO method will be executed within same transaction.
Step 9: Create Domain Entity Class(POJO)
Let’s create the actual Employee Entity itself whose instances we will be playing with in database.
com.websystique.springmvc.model.Employee
package com.websystique.springmvc.model;

import java.math.BigDecimal;

import javax.persistence.Column;
import javax.persistence.Entity;
import javax.persistence.GeneratedValue;
import javax.persistence.GenerationType;
import javax.persistence.Id;
import javax.persistence.Table;
import javax.validation.constraints.Digits;
import javax.validation.constraints.NotNull;
import javax.validation.constraints.Size;

import org.hibernate.annotations.Type;
import org.hibernate.validator.constraints.NotEmpty;
import org.joda.time.LocalDate;
import org.springframework.format.annotation.DateTimeFormat;

@Entity
@Table(name="EMPLOYEE")
public class Employee {

	@Id
	@GeneratedValue(strategy = GenerationType.IDENTITY)
	private int id;

	@Size(min=3, max=50)
	@Column(name = "NAME", nullable = false)
	private String name;

	@NotNull
	@DateTimeFormat(pattern="dd/MM/yyyy")
	@Column(name = "JOINING_DATE", nullable = false)
	@Type(type="org.jadira.usertype.dateandtime.joda.PersistentLocalDate")
	private LocalDate joiningDate;

	@NotNull
	@Digits(integer=8, fraction=2)
	@Column(name = "SALARY", nullable = false)
	private BigDecimal salary;

	@NotEmpty
	@Column(name = "SSN", unique=true, nullable = false)
	private String ssn;

	public int getId() {
		return id;
	}

	public void setId(int id) {
		this.id = id;
	}

	public String getName() {
		return name;
	}

	public void setName(String name) {
		this.name = name;
	}

	public LocalDate getJoiningDate() {
		return joiningDate;
	}

	public void setJoiningDate(LocalDate joiningDate) {
		this.joiningDate = joiningDate;
	}

	public BigDecimal getSalary() {
		return salary;
	}

	public void setSalary(BigDecimal salary) {
		this.salary = salary;
	}

	public String getSsn() {
		return ssn;
	}

	public void setSsn(String ssn) {
		this.ssn = ssn;
	}

	@Override
	public int hashCode() {
		final int prime = 31;
		int result = 1;
		result = prime * result + id;
		result = prime * result + ((ssn == null) ? 0 : ssn.hashCode());
		return result;
	}

	@Override
	public boolean equals(Object obj) {
		if (this == obj)
			return true;
		if (obj == null)
			return false;
		if (!(obj instanceof Employee))
			return false;
		Employee other = (Employee) obj;
		if (id != other.id)
			return false;
		if (ssn == null) {
			if (other.ssn != null)
				return false;
		} else if (!ssn.equals(other.ssn))
			return false;
		return true;
	}

	@Override
	public String toString() {
		return "Employee [id=" + id + ", name=" + name + ", joiningDate="
				+ joiningDate + ", salary=" + salary + ", ssn=" + ssn + "]";
	}

}
This is a standard Entity class annotated with JPA annotations @Entity, @Table, @Column along with hibernate specific annotation @Type which we are using to provide mapping between database date type and Joda-Time LocalDate
@DateTimeFormat is a spring specific annotation which declares that a field should be formatted as a date time with a give format.
Rest of annotations are validation related (JSR303).Recall from step 4 that we have already provided the properties file(messages.properties) containing custom messages to be used in case of validation failure.
Step 10: Add Views/JSP’s
WEB-INF/views/allemployees.jsp [home page containing list of all existing employees]
<%@ page language="java" contentType="text/html; charset=ISO-8859-1"
    pageEncoding="ISO-8859-1"%>
<%@ taglib prefix="c" uri="http://java.sun.com/jsp/jstl/core" %>
<html>
<head>
	<meta http-equiv="Content-Type" content="text/html; charset=ISO-8859-1">
	<title>University Enrollments</title>

	<style>
		tr:first-child{
			font-weight: bold;
			background-color: #C6C9C4;
		}
	</style>

</head>


<body>
	<h2>List of Employees</h2>
	<table>
		<tr>
			<td>NAME</td><td>Joining Date</td><td>Salary</td><td>SSN</td><td></td>
		</tr>
		<c:forEach items="${employees}" var="employee">
			<tr>
			<td>${employee.name}</td>
			<td>${employee.joiningDate}</td>
			<td>${employee.salary}</td>
			<td><a href="<c:url value='/edit-${employee.ssn}-employee' />">${employee.ssn}</a></td>
			<td><a href="<c:url value='/delete-${employee.ssn}-employee' />">delete</a></td>
			</tr>
		</c:forEach>
	</table>
	<br/>
	<a href="<c:url value='/new' />">Add New Employee</a>
</body>
</html>
WEB-INF/views/registration.jsp [Registration page to create and save new employee in database]
<%@ page language="java" contentType="text/html; charset=ISO-8859-1"
    pageEncoding="ISO-8859-1"%>
<%@ taglib prefix="form" uri="http://www.springframework.org/tags/form"%>
<%@ taglib prefix="c" uri="http://java.sun.com/jsp/jstl/core" %>

<html>

<head>
	<meta http-equiv="Content-Type" content="text/html; charset=ISO-8859-1">
	<title>Employee Registration Form</title>

<style>

	.error {
		color: #ff0000;
	}
</style>

</head>

<body>

	<h2>Registration Form</h2>

	<form:form method="POST" modelAttribute="employee">
		<form:input type="hidden" path="id" id="id"/>
		<table>
			<tr>
				<td><label for="name">Name: </label> </td>
				<td><form:input path="name" id="name"/></td>
				<td><form:errors path="name" cssClass="error"/></td>
		    </tr>

			<tr>
				<td><label for="joiningDate">Joining Date: </label> </td>
				<td><form:input path="joiningDate" id="joiningDate"/></td>
				<td><form:errors path="joiningDate" cssClass="error"/></td>
		    </tr>

			<tr>
				<td><label for="salary">Salary: </label> </td>
				<td><form:input path="salary" id="salary"/></td>
				<td><form:errors path="salary" cssClass="error"/></td>
		    </tr>

			<tr>
				<td><label for="ssn">SSN: </label> </td>
				<td><form:input path="ssn" id="ssn"/></td>
				<td><form:errors path="ssn" cssClass="error"/></td>
		    </tr>

			<tr>
				<td colspan="3">
					<c:choose>
						<c:when test="${edit}">
							<input type="submit" value="Update"/>
						</c:when>
						<c:otherwise>
							<input type="submit" value="Register"/>
						</c:otherwise>
					</c:choose>
				</td>
			</tr>
		</table>
	</form:form>
	<br/>
	<br/>
	Go back to <a href="<c:url value='/list' />">List of All Employees</a>
</body>
</html>
WEB-INF/views/success.jsp [Success page containg a confirmation of new employee creation and link back to list of employees]
<%@ page language="java" contentType="text/html; charset=ISO-8859-1"
    pageEncoding="ISO-8859-1"%>
<%@ taglib prefix="c" uri="http://java.sun.com/jsp/jstl/core" %>

<html>
<head>
<meta http-equiv="Content-Type" content="text/html; charset=ISO-8859-1">
<title>Registration Confirmation Page</title>
</head>
<body>
	message : ${success}
	<br/>
	<br/>
	Go back to <a href="<c:url value='/list' />">List of All Employees</a>

</body>

</html>
Step 11: Create Schema in database
CREATE TABLE EMPLOYEE(
	id INT NOT NULL auto_increment,
	name VARCHAR(50) NOT NULL,
	joining_date DATE NOT NULL,
	salary DOUBLE NOT NULL,
	ssn VARCHAR(30) NOT NULL UNIQUE,
	PRIMARY KEY (id)
);
Please visit MySQL installation on Local PC in case you are finding difficulties in setting up MySQL locally.
Step 12: Build, deploy and Run Application
Now build the war (either by eclipse as was mentioned in previous tutorials) or via maven command line( mvn clean install). Deploy the war to a Servlet 3.0 container . Since here i am using Tomcat, i will simply put this war file into tomcat webapps folder and click on start.bat inside tomcat/bin directory.
If you prefer to deploy from within Eclipse using tomcat: For those of us, who prefer to deploy and run from within eclipse, and might be facing difficulties setting Eclipse with tomcat, the detailed step-by-step solution can be found at : How to setup tomcat with Eclipse.
Open browser and browse at http://localhost:8080/SpringHibernateExample/
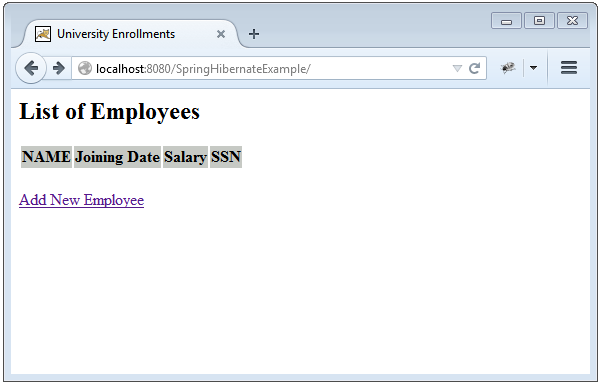
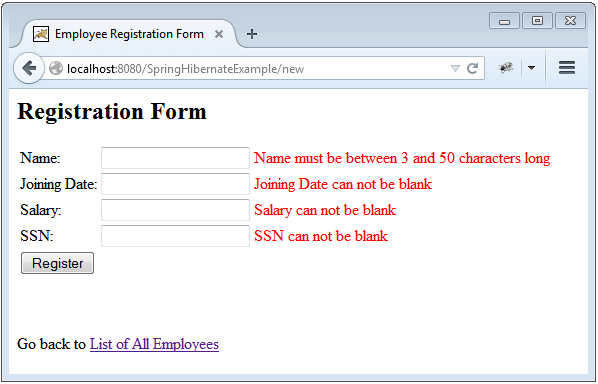
Now click on “Add New Employee”, and click on Register button wihtout filling any detail:
Now fill the details
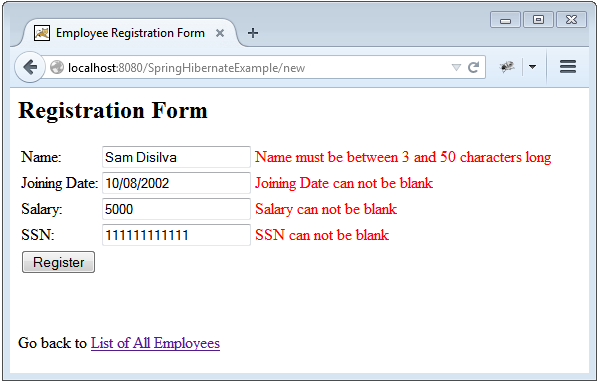
Click on Register, you should get something similar to:
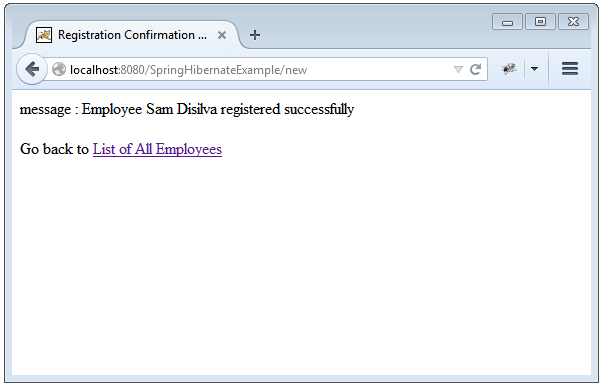
Click on list to go to listing:
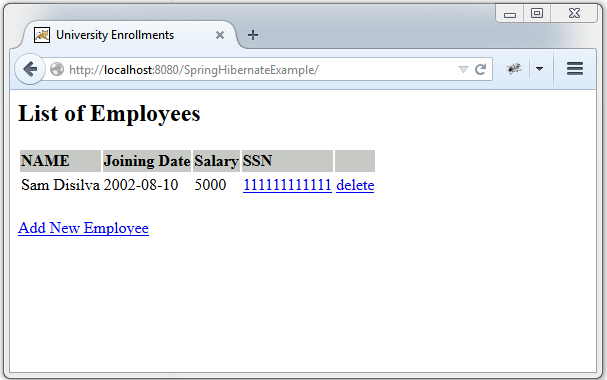
Now add few records as before:
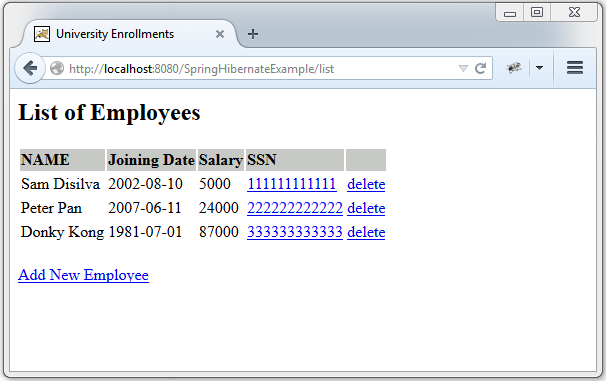
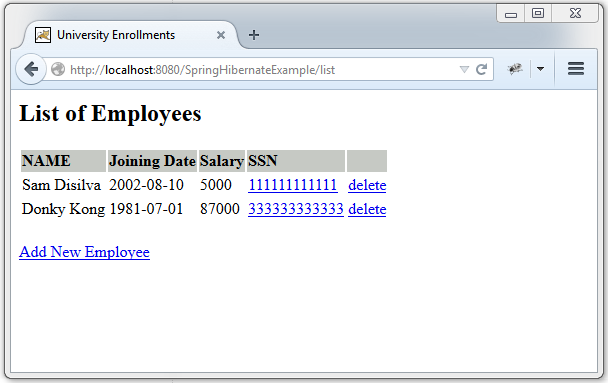
Now click on delete link of Second record, it should get deleted.
Now click on SSN link (which is an update) of 2nd record to update it:
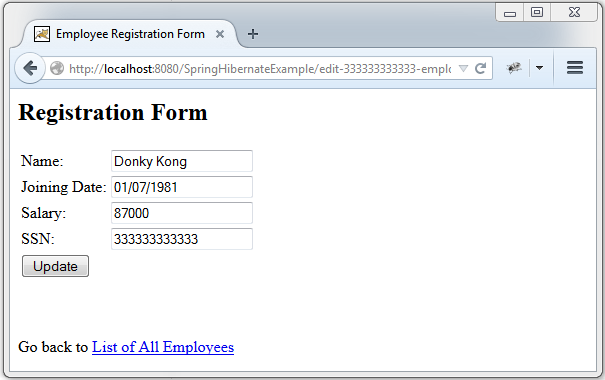
Now edit some fields, in addition change the SSN value to a value for an existing record:
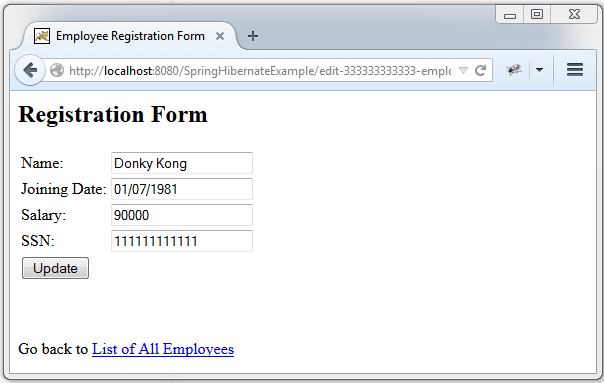
Try to update, you should get validation error on SSN:
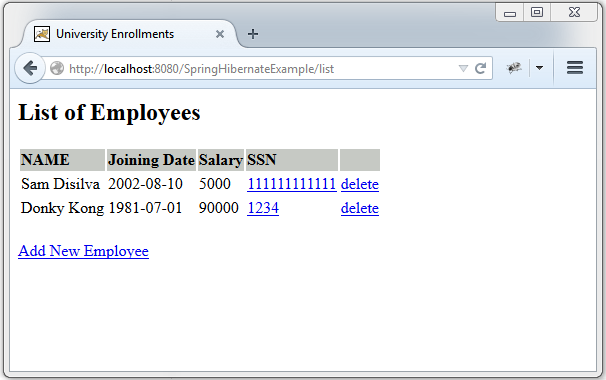
Fix that error by changing SSN to unique value, update, and then view complete list of records, update changes should be taken into account:
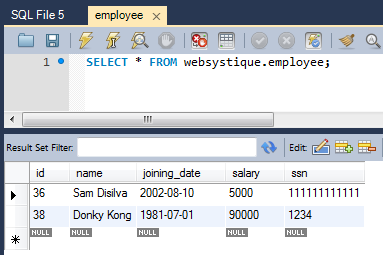
Finally check the database at this moment :
That’s it.
In the Next post, we will tests this application thoroughly with unit & integration tests, using TestNG, Mockito, DBUnit and testing best practices.
Download Source Code
References
If you like tutorials on this site, why not take a step further and connect me on Facebook , Google Plus & Twitter as well? I would love to hear your thoughts on these articles, it will help improve further our learning process.