This post demonstrates a complete CRUD application using AngularJS ngResource module with $resource service to communicate with REST API on server. AngularJS ngResource module provides built-in support for interacting with RESTful services, via $resource service. $resource is a higher-level abstraction on low-level $http service used for server communication. If you have a RESTful API on your server, you can significantly reduce the amount of code you have to write to interact with server using AngularJS ngResource module. Let’s get started.
We will create a CRUD application using Spring REST API on back-end while AngularJS encapsulated within plain JSP on front-end, using $resource service for server communication.
Want to download???
There are two downloads available with this post: One with only client part (pure javascript solution), other as a complete spring application. This gives you complete freedom on what to use.
- If you want only client part, and you already have a REST API based server, just download client part, change the endpoint to your server end-point, and that’s it.
- If you want to use client and servers separate, download and install them separately. This way, you can use pure javascript client while still interacting with Server from this POST.
- Or just download the Complete application, and access home page using http://localhost:8080/Spring4MVCAngularJSNgResourceExample/
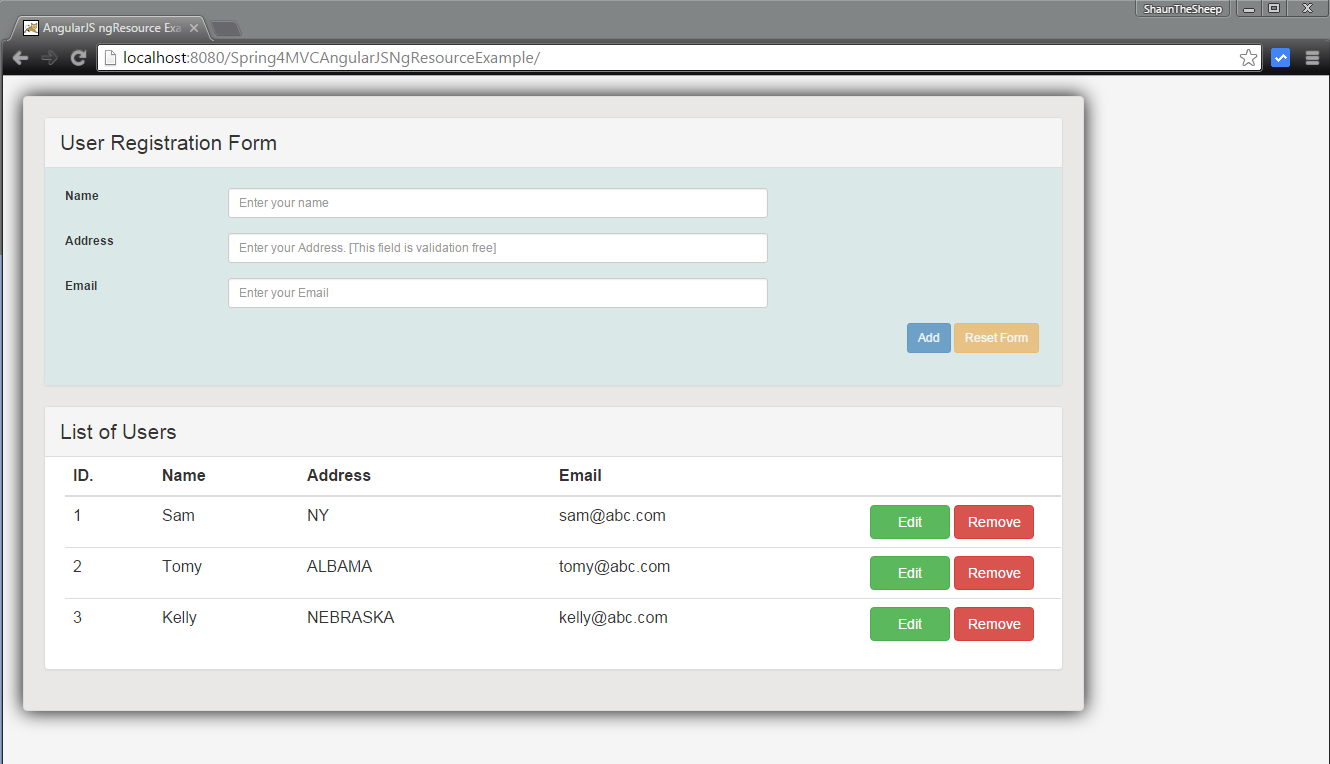
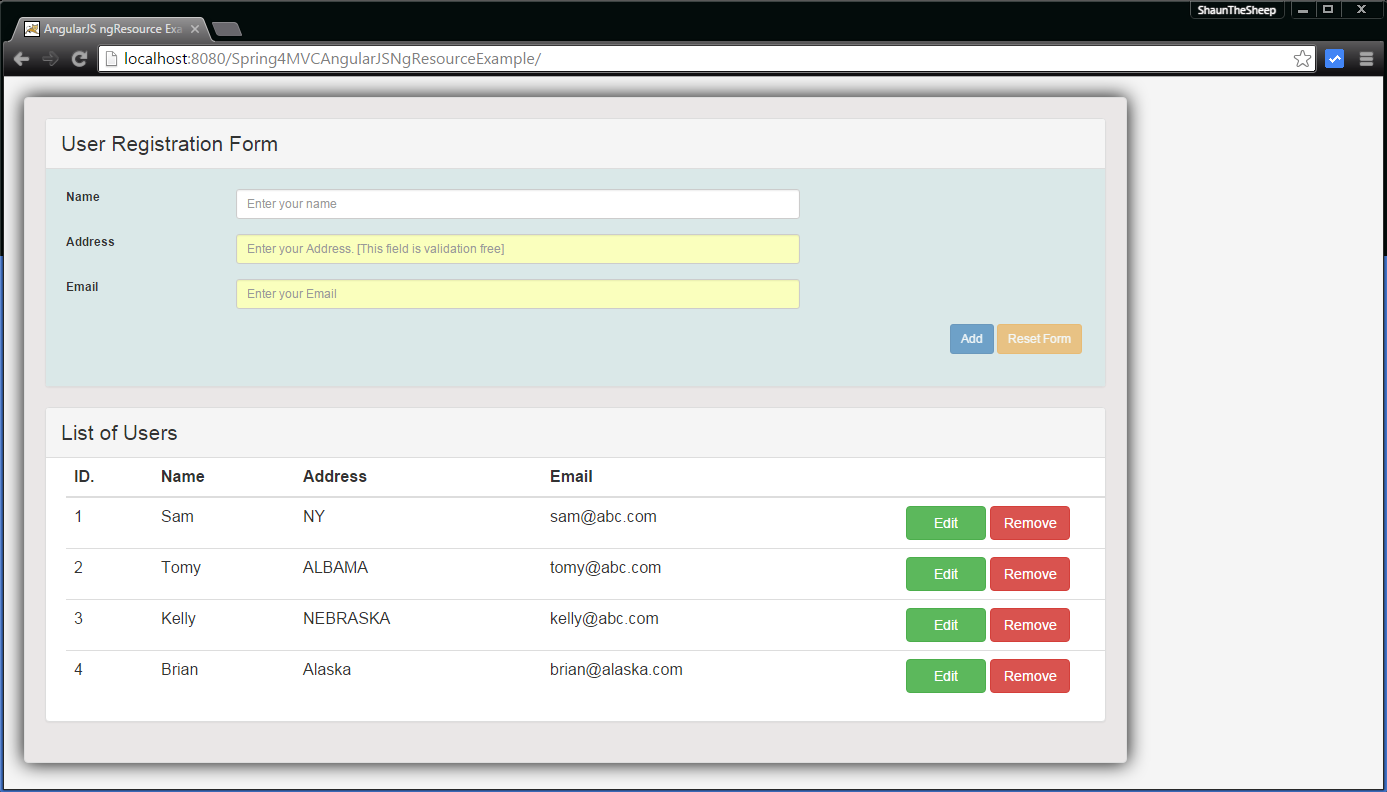
In our application, Client side is based on AngularJS , & server side is based on Spring REST API. This is what our final Application will look like:
- Spring Boot+AngularJS+Spring Data+Hibernate+MySQL CRUD App
- Spring Boot REST API Tutorial
- Spring Boot WAR deployment example
- Secure Spring REST API using OAuth2
- Spring Boot Introduction + Hello World Example
- AngularJS+Spring Security using Basic Authentication
- Secure Spring REST API using Basic Authentication
- Spring 4 MVC+JPA2+Hibernate Many-to-many Example
- Spring 4 Caching Annotations Tutorial
- Spring 4 Cache Tutorial with EhCache
- Spring 4 Email Template Library Example
- Spring 4 Email With Attachment Tutorial
- Spring 4 Email Integration Tutorial
- Spring MVC 4+JMS+ActiveMQ Integration Example
- Spring 4+JMS+ActiveMQ @JmsLister @EnableJms Example
- Spring 4+JMS+ActiveMQ Integration Example
- Spring MVC 4+Apache Tiles 3 Integration Example
- Spring MVC 4+Spring Security 4 + Hibernate Integration Example
- Spring MVC 4+AngularJS Server communication example : CRUD application using ngResource $resource service
- Spring MVC 4+AngularJS server communication Example using $http service
- Angularjs Server Communication using ngResource $resource service
- Angularjs Controllers Detailed Tutorial
- Angularjs Form Validation Detailed Tutorial
- Angularjs Services Detailed Tutorial
- Angularjs Filters (Builtin + Custom) Detailed Tutorial
- Angularjs Directives Detailed Tutorial
- Angularjs Routing Tutorial using ngRoute
- Angularjs Routing Tutorial using ui-router
Let’s get started.
Following technologies being used:
- Spring 4.2.0.RELEASE
- AngularJS 1.4.4
- Maven 3
- JDK 1.7
- Eclipse Luna
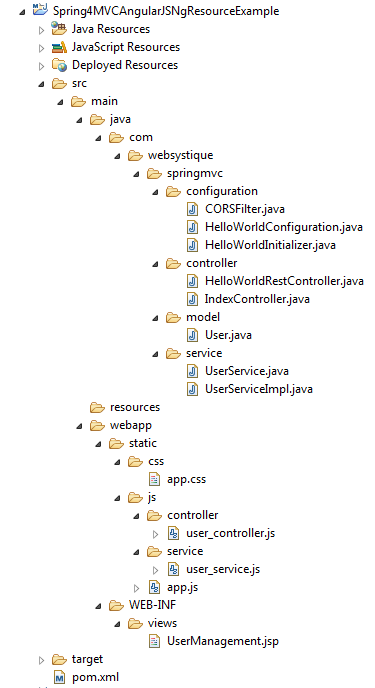
Project Structure
Provide Dependencies in pom.xml
<project xmlns="http://maven.apache.org/POM/4.0.0" xmlns:xsi="http://www.w3.org/2001/XMLSchema-instance"
	xsi:schemaLocation="http://maven.apache.org/POM/4.0.0 http://maven.apache.org/maven-v4_0_0.xsd">
	<modelVersion>4.0.0</modelVersion>
	<groupId>com.websystique.springmvc</groupId>
	<artifactId>Spring4MVCAngularJSNgResourceExample</artifactId>
	<packaging>war</packaging>
	<version>1.0.0</version>

	<properties>
		<springframework.version>4.2.0.RELEASE</springframework.version>
		<jackson.version>2.5.3</jackson.version>
	</properties>

	<dependencies>
		<dependency>
			<groupId>org.springframework</groupId>
			<artifactId>spring-webmvc</artifactId>
			<version>${springframework.version}</version>
		</dependency>
		<dependency>
			<groupId>org.springframework</groupId>
			<artifactId>spring-tx</artifactId>
			<version>${springframework.version}</version>
		</dependency>

		<dependency>
			<groupId>com.fasterxml.jackson.core</groupId>
			<artifactId>jackson-databind</artifactId>
			<version>${jackson.version}</version>
		</dependency>
		<dependency>
			<groupId>javax.servlet</groupId>
			<artifactId>javax.servlet-api</artifactId>
			<version>3.1.0</version>
		</dependency>
		<dependency>
			<groupId>javax.servlet</groupId>
			<artifactId>jstl</artifactId>
			<version>1.2</version>
		</dependency>
	</dependencies>


	<build>
		<pluginManagement>
			<plugins>
				<plugin>
			        <groupId>org.apache.maven.plugins</groupId>
			        <artifactId>maven-compiler-plugin</artifactId>
			        <version>3.2</version>
			        <configuration>
			            <source>1.7</source>
			            <target>1.7</target>
			        </configuration>
			    </plugin>
				<plugin>
					<groupId>org.apache.maven.plugins</groupId>
					<artifactId>maven-war-plugin</artifactId>
					<version>2.4</version>
					<configuration>
						<warSourceDirectory>src/main/webapp</warSourceDirectory>
						<warName>Spring4MVCAngularJSNgResourceExample</warName>
						<failOnMissingWebXml>false</failOnMissingWebXml>
					</configuration>
				</plugin>
			</plugins>

		</pluginManagement>

		<finalName>Spring4MVCAngularJSNgResourceExample</finalName>
	</build>
</project>
1. Client Side
Client side of our Application is AngularJS based. Note that this post mainly focuses on ngResource module & $resource service. If you would like to add AngularJs in your skill set, Detailed AngularJS Tutorial is available for you to deep dive in one of the most popular Javascript Meta framework.
A short introduction on ngResource & $resource
Following are the required steps in order to use ngResource module ( & eventually $resource service).
A. Include angular-resource.js in your HTML.
      <script src="https://ajax.googleapis.com/ajax/libs/angularjs/1.4.4/angular.js"></script>
      <script src="https://ajax.googleapis.com/ajax/libs/angularjs/1.4.4/angular-resource.js"></script>
Don’t forget to change the version accordingly.
B. Load the module in your application by adding it as a dependent module:
angular.module('app', ['ngResource']);
C. Create a service around your REST API end-point, using $resource.
App.factory('User', ['$resource', function ($resource) {
	return $resource('http://localhost:8080/Spring4MVCAngularJSNgResourceExample/user/:id');
}]);
In above snippet, we are creating an AngularJS factory named ‘User’ injecting $resource service as a dependency. Then we have called $resource service, passing our RESTful API endpoint as parameter. Note that $resource can take additional optional parameters. Full syntax of resource call is as follows:
$resource(url, [paramDefaults], [actions], options);
This call will return a resource class object that can be used to interact with RESTful server-side data sources. On this resource class object, following methods are available
'get':    {method:'GET'},
'save':   {method:'POST'},
'query':  {method:'GET', isArray:true},
'remove': {method:'DELETE'},  //Preferable over delete due to IE incompatibilities.
'delete': {method:'DELETE'}
Calling these methods invokes low-level $http with the specified HTTP method, destination and parameters. This set of actions can of-course be extended with custom actions. For instance, there is no HTTP PUT support in default methods, but we can add it, as shown below:
App.factory('User', ['$resource', function ($resource) {
    return $resource(
    		'http://localhost:8080/Spring4MVCAngularJSNgResourceExample/user/:id',
    		{},//parameters
    		{
    			update: {
    			      method: 'PUT' // To send the HTTP Put request when calling this custom update method.
    			}

    		},
    		{
    			stripTrailingSlashes: false
    		}
    );
}]);
$resource arguments: Arguments passed in $resource are described below:
url: URL of REST API end-point, may contain parameters (tokens preceded with :). In our URL, we have one parameter named id.
paramDefaults : it is an object with key:value pairs, used for specifying default values for individual parameters in url.
actions: It is an object [action object] with declaration of custom actions that should extend the default set of resource actions.
options: It is an object that provides possibility to specify some custom settings.
A deep-detailed description of ngResource & $resource is available on a separate post :AngularJS Server communication using ngResource. I will prefer not to repeat it again in this post, and suggest you to refer to that post for any theory on $resource, repeating it again in this post will just consume more space and time.
Let’s get into code.
Create app Module, include ngResource as dependency
app.js
var App = angular.module('myApp',['ngResource']);
Create AngularJS Service using $resource
user_service.js
App.factory('User', ['$resource', function ($resource) {
	//$resource() function returns an object of resource class
    return $resource(
    		'http://localhost:8080/Spring4MVCAngularJSNgResourceExample/user/:id',
    		{id: '@id'},
    		{
    			update: {
    			      method: 'PUT' // To send the HTTP Put request when calling this custom update method.
    			}

    		}
    );
}]);
In above snippet, we have created an AngularJS factory named ‘User’ injecting $resource service as a dependency. This User service can then be used (for example in controller) to interact with RESTful server-side data sources.
For detailed description of $resource, please refer to AngularJS Server communication using ngResource.
Create Controller
user_controller.js
'use strict';

App.controller('UserController', ['$scope', 'User', function($scope, User) {
          var self = this;
          self.user= new User();

          self.users=[];

          self.fetchAllUsers = function(){
        	  self.users = User.query();
          };

          self.createUser = function(){
        	  self.user.$save(function(){
        		  self.fetchAllUsers();
        	  });
          };

          self.updateUser = function(){
        	  self.user.$update(function(){
    			  self.fetchAllUsers();
    		  });
          };

         self.deleteUser = function(identity){
        	 var user = User.get({id:identity}, function() {
        		  user.$delete(function(){
        			  console.log('Deleting user with id ', identity);
        			  self.fetchAllUsers();
        		  });
        	 });
          };

          self.fetchAllUsers();

          self.submit = function() {
              if(self.user.id==null){
                  console.log('Saving New User', self.user);
                  self.createUser();
              }else{
    			  console.log('Upddating user with id ', self.user.id);
                  self.updateUser();
                  console.log('User updated with id ', self.user.id);
              }
              self.reset();
          };

          self.edit = function(id){
              console.log('id to be edited', id);
              for(var i = 0; i < self.users.length; i++){
                  if(self.users[i].id === id) {
                     self.user = angular.copy(self.users[i]);
                     break;
                  }
              }
          };

          self.remove = function(id){
              console.log('id to be deleted', id);
              if(self.user.id === id) {//If it is the one shown on screen, reset screen
                 self.reset();
              }
              self.deleteUser(id);
          };


          self.reset = function(){
              self.user= new User();
              $scope.myForm.$setPristine(); //reset Form
          };

      }]);
Create View
Here we are acting on a bit traditional side and using plain JSP encapsulating all AngularJS code we wrote above. Please note that in case you don’t like JSP or you just want to use a pure Javascript client, an index.html is included in below section with similar content.. We have also added bootstrap in our view to enhance it’s look & feel. Additionally, we will also perform required Form validation. To know Form Validation in details [in general in AngularJS], please have a look at AngularJS Form Validation Explained.
UserManagement.jsp
<%@ page language="java" contentType="text/html; charset=ISO-8859-1" pageEncoding="ISO-8859-1"%>
<%@ taglib prefix="c" uri="http://java.sun.com/jsp/jstl/core" %>
<html>
  <head>
    <title>AngularJS ngResource Example</title>
    <style>
      .username.ng-valid {
          background-color: lightgreen;
      }
      .username.ng-dirty.ng-invalid-required {
          background-color: red;
      }
      .username.ng-dirty.ng-invalid-minlength {
          background-color: yellow;
      }

      .email.ng-valid {
          background-color: lightgreen;
      }
      .email.ng-dirty.ng-invalid-required {
          background-color: red;
      }
      .email.ng-dirty.ng-invalid-email {
          background-color: yellow;
      }

    </style>
     <link rel="stylesheet" href="https://maxcdn.bootstrapcdn.com/bootstrap/3.3.5/css/bootstrap.min.css">
     <link href="<c:url value='/static/css/app.css' />" rel="stylesheet"></link>
  </head>
  <body ng-app="myApp" class="ng-cloak">
      <div class="generic-container" ng-controller="UserController as ctrl">
          <div class="panel panel-default">
              <div class="panel-heading"><span class="lead">User Registration Form </span></div>
              <div class="formcontainer">
                  <form ng-submit="ctrl.submit()" name="myForm" class="form-horizontal">
                      <input type="hidden" ng-model="ctrl.user.id" />
                      <div class="row">
                          <div class="form-group col-md-12">
                              <label class="col-md-2 control-lable" for="uname">Name</label>
                              <div class="col-md-7">
                                  <input type="text" ng-model="ctrl.user.username" id="uname" class="username form-control input-sm" placeholder="Enter your name" required ng-minlength="3"/>
                                  <div class="has-error" ng-show="myForm.$dirty">
                                      <span ng-show="myForm.uname.$error.required">This is a required field</span>
                                      <span ng-show="myForm.uname.$error.minlength">Minimum length required is 3</span>
                                      <span ng-show="myForm.uname.$invalid">This field is invalid </span>
                                  </div>
                              </div>
                          </div>
                      </div>


                      <div class="row">
                          <div class="form-group col-md-12">
                              <label class="col-md-2 control-lable" for="address">Address</label>
                              <div class="col-md-7">
                                  <input type="text" ng-model="ctrl.user.address" id="address" class="form-control input-sm" placeholder="Enter your Address. [This field is validation free]"/>
                              </div>
                          </div>
                      </div>

                      <div class="row">
                          <div class="form-group col-md-12">
                              <label class="col-md-2 control-lable" for="email">Email</label>
                              <div class="col-md-7">
                                  <input type="email" ng-model="ctrl.user.email" id="email" class="email form-control input-sm" placeholder="Enter your Email" required/>
                                  <div class="has-error" ng-show="myForm.$dirty">
                                      <span ng-show="myForm.email.$error.required">This is a required field</span>
                                      <span ng-show="myForm.email.$invalid">This field is invalid </span>
                                  </div>
                              </div>
                          </div>
                      </div>

                      <div class="row">
                          <div class="form-actions floatRight">
                              <input type="submit"  value="{{!ctrl.user.id ? 'Add' : 'Update'}}" class="btn btn-primary btn-sm" ng-disabled="myForm.$invalid">
                              <button type="button" ng-click="ctrl.reset()" class="btn btn-warning btn-sm" ng-disabled="myForm.$pristine">Reset Form</button>
                          </div>
                      </div>
                  </form>
              </div>
          </div>
          <div class="panel panel-default">
                <!-- Default panel contents -->
              <div class="panel-heading"><span class="lead">List of Users </span></div>
              <div class="tablecontainer">
                  <table class="table table-hover">
                      <thead>
                          <tr>
                              <th>ID.</th>
                              <th>Name</th>
                              <th>Address</th>
                              <th>Email</th>
                              <th width="20%"></th>
                          </tr>
                      </thead>
                      <tbody>
                          <tr ng-repeat="u in ctrl.users">
                              <td><span ng-bind="u.id"></span></td>
                              <td><span ng-bind="u.username"></span></td>
                              <td><span ng-bind="u.address"></span></td>
                              <td><span ng-bind="u.email"></span></td>
                              <td>
                              <button type="button" ng-click="ctrl.edit(u.id)" class="btn btn-success custom-width">Edit</button>  <button type="button" ng-click="ctrl.remove(u.id)" class="btn btn-danger custom-width">Remove</button>
                              </td>
                          </tr>
                      </tbody>
                  </table>
              </div>
          </div>
      </div>

      <script src="https://ajax.googleapis.com/ajax/libs/angularjs/1.4.4/angular.js"></script>
      <script src="https://ajax.googleapis.com/ajax/libs/angularjs/1.4.4/angular-resource.js"></script>
      <script src="<c:url value='/static/js/app.js' />"></script>
      <script src="<c:url value='/static/js/service/user_service.js' />"></script>
      <script src="<c:url value='/static/js/controller/user_controller.js' />"></script>
  </body>
</html>
Remark:
As mentioned above, in case you prefer to use this application only for backend use (which we will write in a moment), and client part as a pure javacript client, you can use following index.html. Just copy all the js files (& CSS if you like) into a separate folder in your machine, include this index.html, and your client application is ready for use. Then you can deploy the application from this post as a server.
Index.html
<html>
  <head>
    <title>AngularJS $http Example</title>
    <style>
      .username.ng-valid {
          background-color: lightgreen;
      }
      .username.ng-dirty.ng-invalid-required {
          background-color: red;
      }
      .username.ng-dirty.ng-invalid-minlength {
          background-color: yellow;
      }

      .email.ng-valid {
          background-color: lightgreen;
      }
      .email.ng-dirty.ng-invalid-required {
          background-color: red;
      }
      .email.ng-dirty.ng-invalid-email {
          background-color: yellow;
      }

    </style>
     <link rel="stylesheet" href="https://maxcdn.bootstrapcdn.com/bootstrap/3.3.5/css/bootstrap.min.css">
     <link rel="stylesheet" href="app.css">
  </head>
  <body ng-app="myApp" class="ng-cloak">
      <div class="generic-container" ng-controller="UserController as ctrl">
          <div class="panel panel-default">
              <div class="panel-heading"><span class="lead">User Registration Form </span></div>
              <div class="formcontainer">
                  <form ng-submit="ctrl.submit()" name="myForm" class="form-horizontal">
                      <input type="hidden" ng-model="ctrl.user.id" />
                      <div class="row">
                          <div class="form-group col-md-12">
                              <label class="col-md-2 control-lable" for="uname">Name</label>
                              <div class="col-md-7">
                                  <input type="text" ng-model="ctrl.user.username" id="uname" class="username form-control input-sm" placeholder="Enter your name" required ng-minlength="3"/>
                                  <div class="has-error" ng-show="myForm.$dirty">
                                      <span ng-show="myForm.uname.$error.required">This is a required field</span>
                                      <span ng-show="myForm.uname.$error.minlength">Minimum length required is 3</span>
                                      <span ng-show="myForm.uname.$invalid">This field is invalid </span>
                                  </div>
                              </div>
                          </div>
                      </div>


                      <div class="row">
                          <div class="form-group col-md-12">
                              <label class="col-md-2 control-lable" for="address">Address</label>
                              <div class="col-md-7">
                                  <input type="text" ng-model="ctrl.user.address" id="address" class="form-control input-sm" placeholder="Enter your Address. [This field is validation free]"/>
                              </div>
                          </div>
                      </div>

                      <div class="row">
                          <div class="form-group col-md-12">
                              <label class="col-md-2 control-lable" for="email">Email</label>
                              <div class="col-md-7">
                                  <input type="email" ng-model="ctrl.user.email" id="email" class="email form-control input-sm" placeholder="Enter your Email" required/>
                                  <div class="has-error" ng-show="myForm.$dirty">
                                      <span ng-show="myForm.email.$error.required">This is a required field</span>
                                      <span ng-show="myForm.email.$invalid">This field is invalid </span>
                                  </div>
                              </div>
                          </div>
                      </div>

                      <div class="row">
                          <div class="form-actions floatRight">
                              <input type="submit"  value="{{!ctrl.user.id ? 'Add' : 'Update'}}" class="btn btn-primary btn-sm" ng-disabled="myForm.$invalid">
                              <button type="button" ng-click="ctrl.reset()" class="btn btn-warning btn-sm" ng-disabled="myForm.$pristine">Reset Form</button>
                          </div>
                      </div>
                  </form>
              </div>
          </div>
          <div class="panel panel-default">
                <!-- Default panel contents -->
              <div class="panel-heading"><span class="lead">List of Users </span></div>
              <div class="tablecontainer">
                  <table class="table table-hover">
                      <thead>
                          <tr>
                              <th>ID.</th>
                              <th>Name</th>
                              <th>Address</th>
                              <th>Email</th>
                              <th width="100"></th>
                          </tr>
                      </thead>
                      <tbody>
                          <tr ng-repeat="u in ctrl.users">
                              <td><span ng-bind="u.id"></span></td>
                              <td><span ng-bind="u.username"></span></td>
                              <td><span ng-bind="u.address"></span></td>
                              <td><span ng-bind="u.email"></span></td>
                              <td>
                              <button type="button" ng-click="ctrl.edit(u.id)" class="btn btn-success custom-width">Edit</button>  <button type="button" ng-click="ctrl.remove(u.id)" class="btn btn-danger custom-width">Remove</button>
                              </td>
                          </tr>
                      </tbody>
                  </table>
              </div>
          </div>
      </div>

      <script src="https://ajax.googleapis.com/ajax/libs/angularjs/1.4.4/angular.js"></script>
      <script src="https://ajax.googleapis.com/ajax/libs/angularjs/1.4.4/angular-resource.js"></script>
      <script src="app.js"></script>
      <script src="user_service.js"></script>
      <script src="user_controller.js"></script>
  </body>
</html>
2. Server Side
Create REST Controller for Spring MVC application
Below shown is a REST based Controller. It is the same controller as explained in Spring MVC 4 RESTFul Web Services CRUD Example+RestTemplate. Only difference is that User [the model object] have different properties, based on User interface in this example. Please visit the mentioned post to clarify any doubts you might have regarding REST support in Spring.
package com.websystique.springmvc.controller;

import java.util.List;

import org.springframework.beans.factory.annotation.Autowired;
import org.springframework.http.HttpHeaders;
import org.springframework.http.HttpStatus;
import org.springframework.http.MediaType;
import org.springframework.http.ResponseEntity;
import org.springframework.web.bind.annotation.PathVariable;
import org.springframework.web.bind.annotation.RequestBody;
import org.springframework.web.bind.annotation.RequestMapping;
import org.springframework.web.bind.annotation.RequestMethod;
import org.springframework.web.bind.annotation.RestController;
import org.springframework.web.util.UriComponentsBuilder;

import com.websystique.springmvc.model.User;
import com.websystique.springmvc.service.UserService;

@RestController
public class HelloWorldRestController {

    @Autowired
    UserService userService;  //Service which will do all data retrieval/manipulation work


    //-------------------Retrieve All Users--------------------------------------------------------

    @RequestMapping(value = "/user", method = RequestMethod.GET)
    public ResponseEntity<List<User>> listAllUsers() {
        List<User> users = userService.findAllUsers();
        if(users.isEmpty()){
            return new ResponseEntity<List<User>>(HttpStatus.NO_CONTENT);//You many decide to return HttpStatus.NOT_FOUND
        }
        return new ResponseEntity<List<User>>(users, HttpStatus.OK);
    }


    //-------------------Retrieve Single User--------------------------------------------------------

    @RequestMapping(value = "/user/{id}", method = RequestMethod.GET, produces = MediaType.APPLICATION_JSON_VALUE)
    public ResponseEntity<User> getUser(@PathVariable("id") long id) {
        System.out.println("Fetching User with id " + id);
        User user = userService.findById(id);
        if (user == null) {
            System.out.println("User with id " + id + " not found");
            return new ResponseEntity<User>(HttpStatus.NOT_FOUND);
        }
        return new ResponseEntity<User>(user, HttpStatus.OK);
    }


    //-------------------Create a User--------------------------------------------------------

    @RequestMapping(value = "/user", method = RequestMethod.POST)
    public ResponseEntity<Void> createUser(@RequestBody User user,    UriComponentsBuilder ucBuilder) {
        System.out.println("Creating User " + user.getUsername());

        if (userService.isUserExist(user)) {
            System.out.println("A User with name " + user.getUsername() + " already exist");
            return new ResponseEntity<Void>(HttpStatus.CONFLICT);
        }

        userService.saveUser(user);

        HttpHeaders headers = new HttpHeaders();
        headers.setLocation(ucBuilder.path("/user/{id}").buildAndExpand(user.getId()).toUri());
        return new ResponseEntity<Void>(headers, HttpStatus.CREATED);
    }


    //------------------- Update a User --------------------------------------------------------

    @RequestMapping(value = "/user/{id}", method = RequestMethod.PUT)
    public ResponseEntity<User> updateUser(@PathVariable("id") long id, @RequestBody User user) {
        System.out.println("Updating User " + id);

        User currentUser = userService.findById(id);

        if (currentUser==null) {
            System.out.println("User with id " + id + " not found");
            return new ResponseEntity<User>(HttpStatus.NOT_FOUND);
        }

        currentUser.setUsername(user.getUsername());
        currentUser.setAddress(user.getAddress());
        currentUser.setEmail(user.getEmail());

        userService.updateUser(currentUser);
        return new ResponseEntity<User>(currentUser, HttpStatus.OK);
    }


    //------------------- Delete a User --------------------------------------------------------

    @RequestMapping(value = "/user/{id}", method = RequestMethod.DELETE)
    public ResponseEntity<User> deleteUser(@PathVariable("id") long id) {
        System.out.println("Fetching & Deleting User with id " + id);

        User user = userService.findById(id);
        if (user == null) {
            System.out.println("Unable to delete. User with id " + id + " not found");
            return new ResponseEntity<User>(HttpStatus.NOT_FOUND);
        }

        userService.deleteUserById(id);
        return new ResponseEntity<User>(HttpStatus.NO_CONTENT);
    }


    //------------------- Delete All Users --------------------------------------------------------

    @RequestMapping(value = "/user", method = RequestMethod.DELETE)
    public ResponseEntity<User> deleteAllUsers() {
        System.out.println("Deleting All Users");

        userService.deleteAllUsers();
        return new ResponseEntity<User>(HttpStatus.NO_CONTENT);
    }

}
Create Main Controller for Spring MVC application
This is a trivial controller which will serve our main page.
package com.websystique.springmvc.controller;

import org.springframework.stereotype.Controller;
import org.springframework.web.bind.annotation.RequestMapping;
import org.springframework.web.bind.annotation.RequestMethod;

@Controller
@RequestMapping("/")
public class IndexController {

	  @RequestMapping(method = RequestMethod.GET)
	    public String getIndexPage() {
	        return "UserManagement";
	    }

}
Create Spring based Service to handle user related operations
package com.websystique.springmvc.service;

import java.util.List;

import com.websystique.springmvc.model.User;


public interface UserService {

	User findById(long id);

	User findByName(String name);

	void saveUser(User user);

	void updateUser(User user);

	void deleteUserById(long id);

	List<User> findAllUsers();

	void deleteAllUsers();

	public boolean isUserExist(User user);

}
package com.websystique.springmvc.service;

import java.util.ArrayList;
import java.util.Iterator;
import java.util.List;
import java.util.concurrent.atomic.AtomicLong;

import org.springframework.stereotype.Service;
import org.springframework.transaction.annotation.Transactional;

import com.websystique.springmvc.model.User;

@Service("userService")
@Transactional
public class UserServiceImpl implements UserService{

	private static final AtomicLong counter = new AtomicLong();

	private static List<User> users;

	static{
		users= populateDummyUsers();
	}

	public List<User> findAllUsers() {
		return users;
	}

	public User findById(long id) {
		for(User user : users){
			if(user.getId() == id){
				return user;
			}
		}
		return null;
	}

	public User findByName(String name) {
		for(User user : users){
			if(user.getUsername().equalsIgnoreCase(name)){
				return user;
			}
		}
		return null;
	}

	public void saveUser(User user) {
		user.setId(counter.incrementAndGet());
		users.add(user);
	}

	public void updateUser(User user) {
		int index = users.indexOf(user);
		users.set(index, user);
	}

	public void deleteUserById(long id) {

		for (Iterator<User> iterator = users.iterator(); iterator.hasNext(); ) {
		    User user = iterator.next();
		    if (user.getId() == id) {
		        iterator.remove();
		    }
		}
	}

	public boolean isUserExist(User user) {
		return findByName(user.getUsername())!=null;
	}

	public void deleteAllUsers(){
		users.clear();
	}

	private static List<User> populateDummyUsers(){
		List<User> users = new ArrayList<User>();
		users.add(new User(counter.incrementAndGet(),"Sam", "NY", "sam@abc.com"));
		users.add(new User(counter.incrementAndGet(),"Tomy", "ALBAMA", "tomy@abc.com"));
		users.add(new User(counter.incrementAndGet(),"Kelly", "NEBRASKA", "kelly@abc.com"));
		return users;
	}

}
Create Model
package com.websystique.springmvc.model;

public class User {

	private long id;

	private String username;

	private String address;

	private String email;

	public User(){
		id=0;
	}

	public User(long id, String username, String address, String email){
		this.id = id;
		this.username = username;
		this.address = address;
		this.email = email;
	}

	public long getId() {
		return id;
	}

	public void setId(long id) {
		this.id = id;
	}

	public String getUsername() {
		return username;
	}

	public void setUsername(String username) {
		this.username = username;
	}

	public String getAddress() {
		return address;
	}

	public void setAddress(String address) {
		this.address = address;
	}

	public String getEmail() {
		return email;
	}

	public void setEmail(String email) {
		this.email = email;
	}

	@Override
	public int hashCode() {
		final int prime = 31;
		int result = 1;
		result = prime * result + (int) (id ^ (id >>> 32));
		return result;
	}

	@Override
	public boolean equals(Object obj) {
		if (this == obj)
			return true;
		if (obj == null)
			return false;
		if (!(obj instanceof User))
			return false;
		User other = (User) obj;
		if (id != other.id)
			return false;
		return true;
	}

	@Override
	public String toString() {
		return "User [id=" + id + ", username=" + username + ", address=" + address
				+ ", email=" + email + "]";
	}


}
Create Spring Configuration Class
package com.websystique.springmvc.configuration;

import org.springframework.context.annotation.ComponentScan;
import org.springframework.context.annotation.Configuration;
import org.springframework.web.servlet.config.annotation.EnableWebMvc;
import org.springframework.web.servlet.config.annotation.ResourceHandlerRegistry;
import org.springframework.web.servlet.config.annotation.ViewResolverRegistry;
import org.springframework.web.servlet.config.annotation.WebMvcConfigurerAdapter;
import org.springframework.web.servlet.view.InternalResourceViewResolver;
import org.springframework.web.servlet.view.JstlView;

@Configuration
@EnableWebMvc
@ComponentScan(basePackages = "com.websystique.springmvc")
public class HelloWorldConfiguration extends WebMvcConfigurerAdapter{

	@Override
	public void configureViewResolvers(ViewResolverRegistry registry) {
		InternalResourceViewResolver viewResolver = new InternalResourceViewResolver();
		viewResolver.setViewClass(JstlView.class);
		viewResolver.setPrefix("/WEB-INF/views/");
		viewResolver.setSuffix(".jsp");
		registry.viewResolver(viewResolver);
	}

	@Override
	public void addResourceHandlers(ResourceHandlerRegistry registry) {
		registry.addResourceHandler("/static/**").addResourceLocations("/static/");
	}

}
Create Spring Initializer class
Look at how we are registering CORS filter with Spring configuration, which will help us to get away with Same Origin Policy issues.
package com.websystique.springmvc.configuration;

import javax.servlet.Filter;

import org.springframework.web.servlet.support.AbstractAnnotationConfigDispatcherServletInitializer;

public class HelloWorldInitializer extends AbstractAnnotationConfigDispatcherServletInitializer {

    @Override
    protected Class<?>[] getRootConfigClasses() {
        return new Class[] { HelloWorldConfiguration.class };
    }

    @Override
    protected Class<?>[] getServletConfigClasses() {
        return null;
    }

    @Override
    protected String[] getServletMappings() {
        return new String[] { "/" };
    }

    @Override
    protected Filter[] getServletFilters() {
    	Filter [] singleton = { new CORSFilter() };
    	return singleton;
	}

}
Create Filter to handle Same Origin Policy related issues
package com.websystique.springmvc.configuration;

import java.io.IOException;

import javax.servlet.Filter;
import javax.servlet.FilterChain;
import javax.servlet.FilterConfig;
import javax.servlet.ServletException;
import javax.servlet.ServletRequest;
import javax.servlet.ServletResponse;
import javax.servlet.http.HttpServletResponse;


public class CORSFilter implements Filter {

	public void doFilter(ServletRequest req, ServletResponse res, FilterChain chain) throws IOException, ServletException {
		System.out.println("Filtering on...........................................................");
		HttpServletResponse response = (HttpServletResponse) res;
		response.setHeader("Access-Control-Allow-Origin", "*");
		response.setHeader("Access-Control-Allow-Methods", "POST, GET, PUT, OPTIONS, DELETE");
		response.setHeader("Access-Control-Max-Age", "3600");
		response.setHeader("Access-Control-Allow-Headers", "x-requested-with, Content-Type");
		chain.doFilter(req, res);
	}

	public void init(FilterConfig filterConfig) {}

	public void destroy() {}

}
Deploy & Run
Now build the war (either by eclipse as was mentioned in previous tutorials) or via maven command line( mvn clean install). Deploy the war to a Servlet 3.0 container . Since here i am using Tomcat, i will simply put this war file into tomcat webapps folder and click on startup.bat inside tomcat/bin directory.
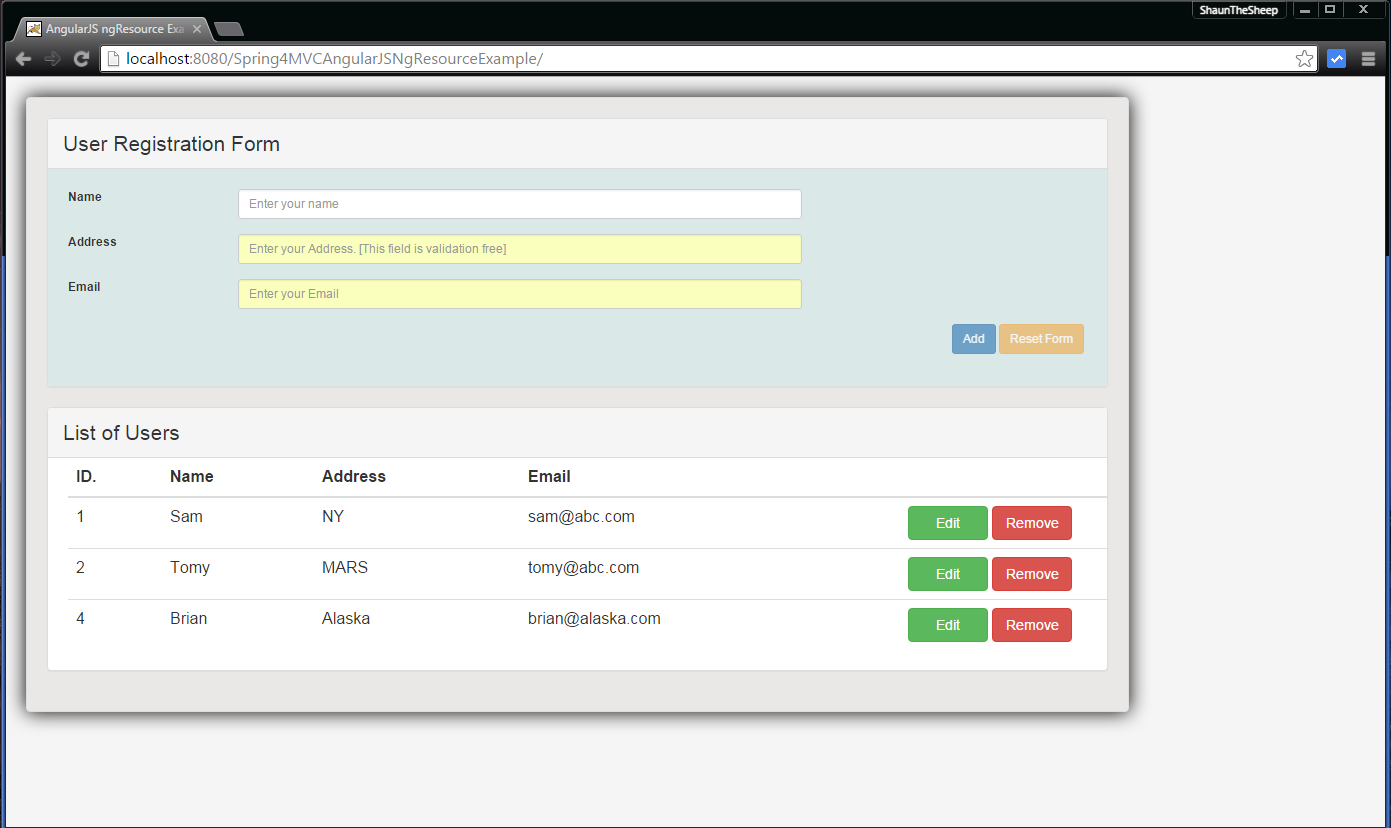
Open browser and browse at http://localhost:8080/Spring4MVCAngularJSNgResourceExample/. You may want to open the Developer tools as well in your browser to see the HTTP requests/responses in action.
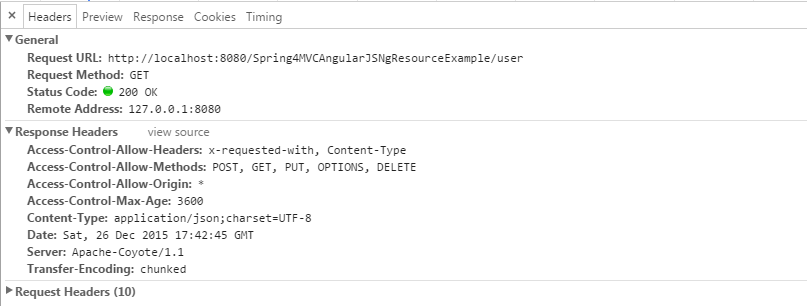
Check the Developer tools. On load of this page, an HTTP GET request is fired [thanks to User.query() call ] to get all users. Response brings a list of all users.

Now, fill in details to add a new user
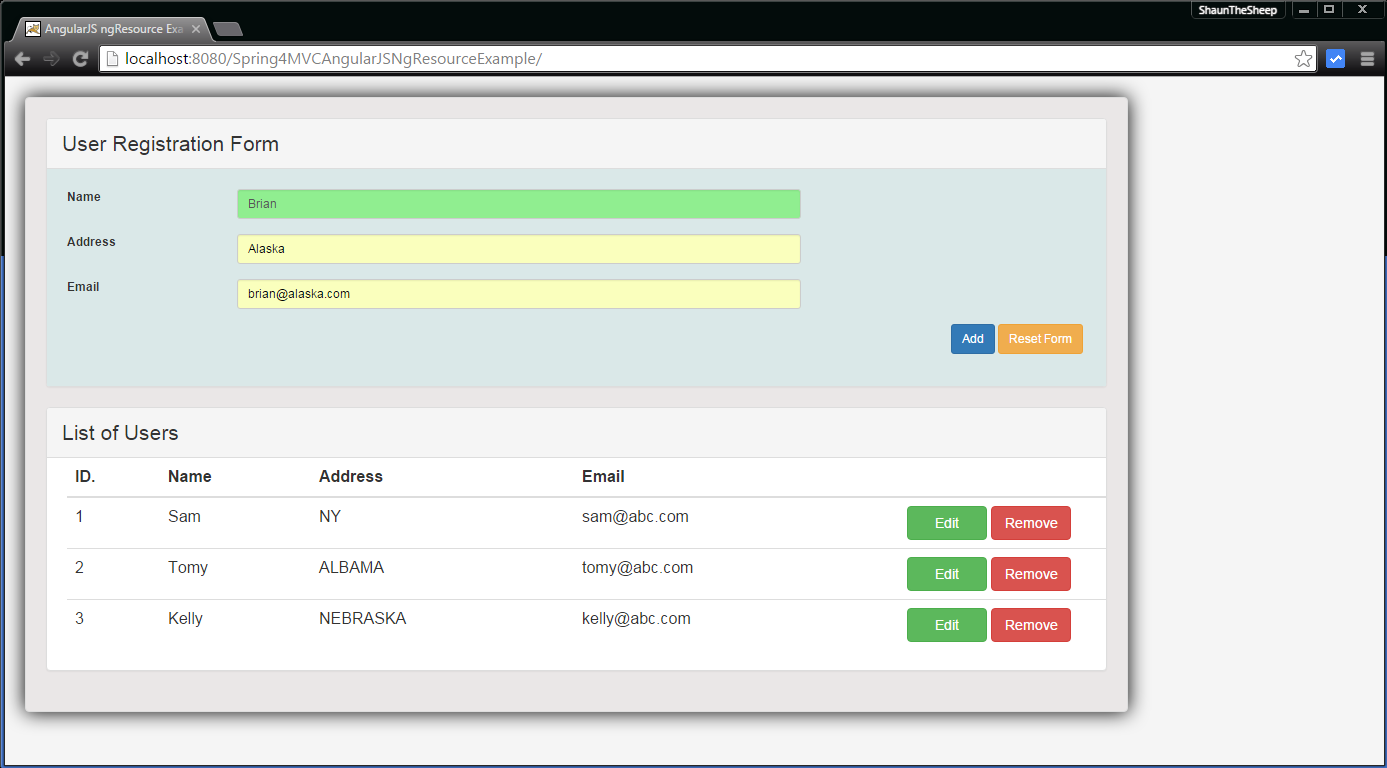
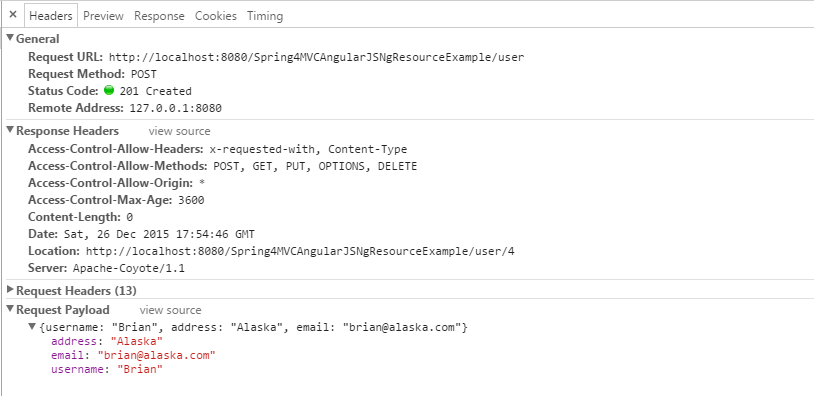
Click on Add, user should be added asynchronously [thanks to user.$save() call ]
Check the Developer tools. An HTTP POST request has been sent. We got Location header in Response to inform the client the location of newly created resource.
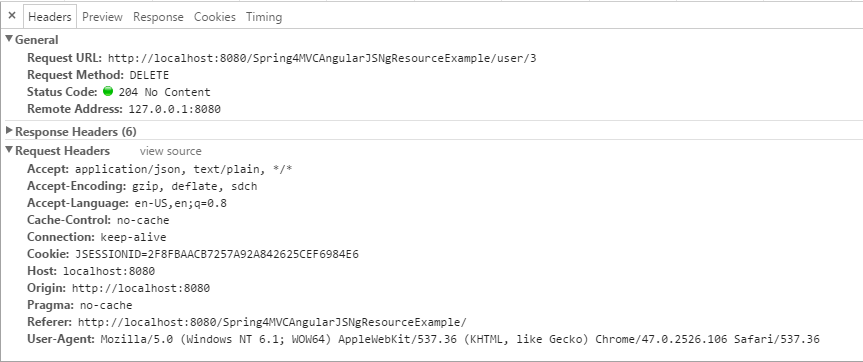
Now, click on Delete for a user [let’s say user ‘kelly’ with id 3], user should be deleted asynchronously [thanks to user.$delete()].
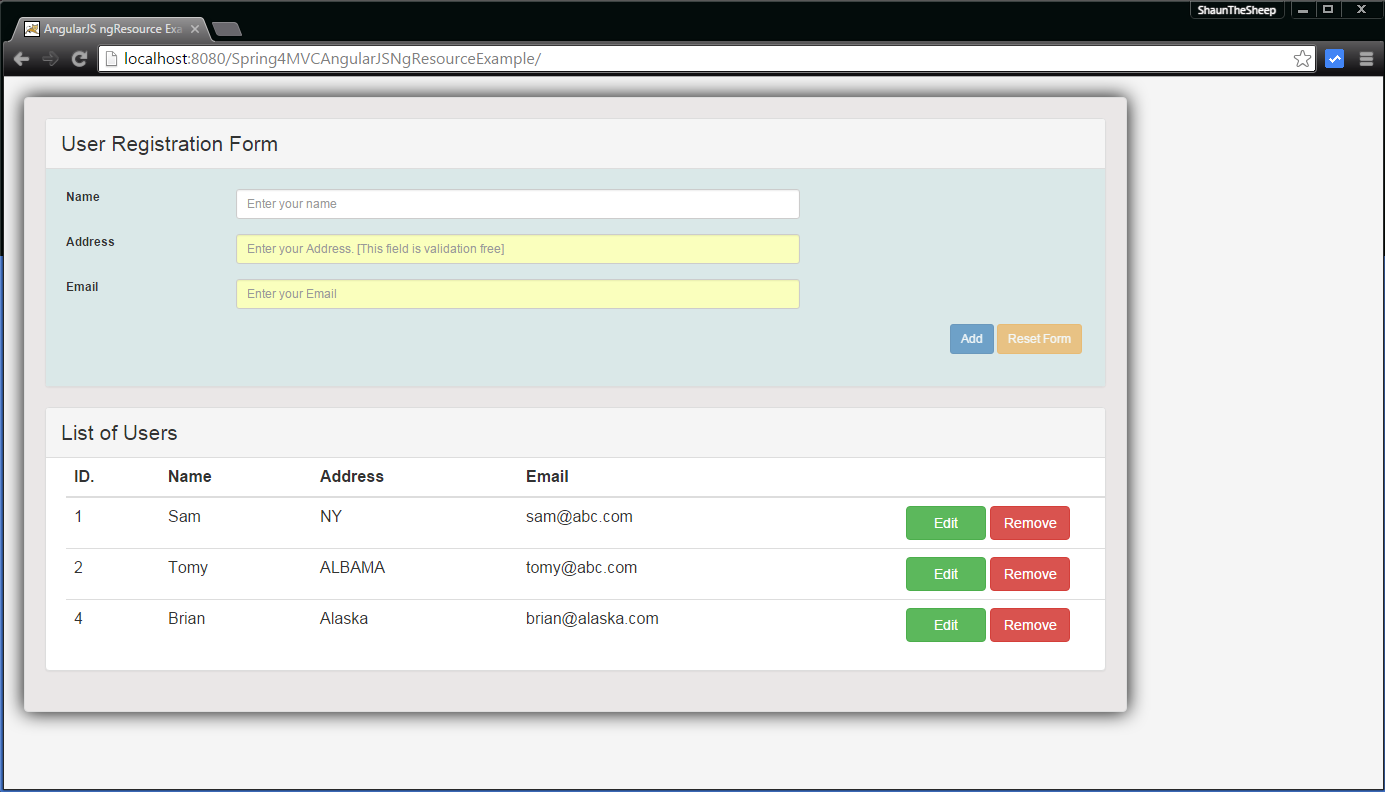
Check Developer tools. An HTTP DELETE request is sent towards server with id of user to be deleted.
Now, click on Edit for a user [user id 2 e.g.], user details should be shown on form. Update details [we will update address].
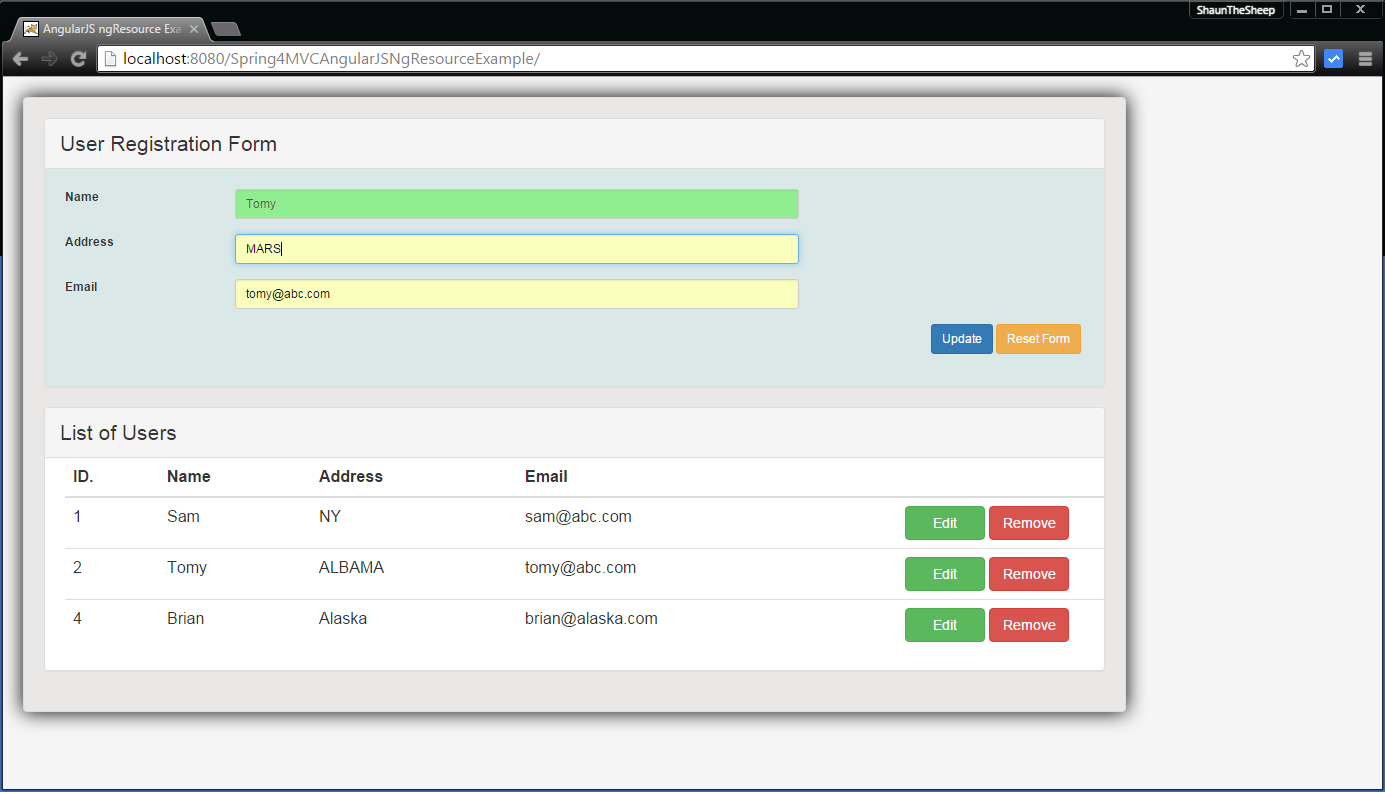
Now click on Update, user should be updated asynchronously [thanks to user.$update()].
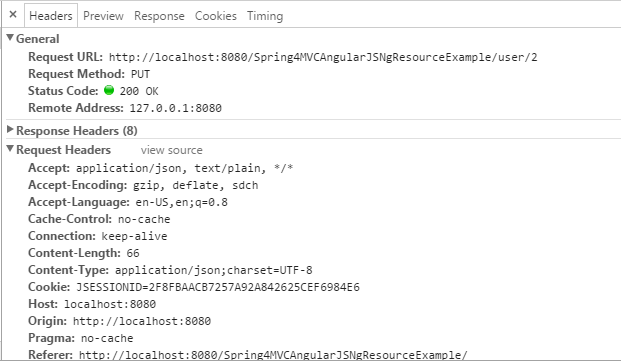
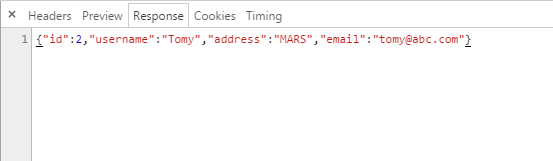
Check Developer tools. An HTTP PUT request has been sent to server, which brings the updated user as response.
That’s it. This should be enough to get you started using ngResource in your application. As always, don’t forget to comment for any possible questions related to this topic.
Download Source Code
Client Application [NgResourceClientApp]
Full Application [Spring4MVCAngularJSNgResourceExample]
References
If you like tutorials on this site, why not take a step further and connect me on Facebook , Google Plus & Twitter as well? I would love to hear your thoughts on these articles, it will help improve further our learning process.