Spring framework has taken the software development industry by storm. Dependency Injection, rock solid MVC framework, Transaction management, messaging support, web-services etc are some of the aspects spring provides through its eco-system of related sub-frameworks. Convention over configuration is the most prominent key aspect Spring promotes.
Spring-Boot which is build upon Spring foundation itself, takes convention over configuration to the next level by reducing the development time many-fold, enabling your projects up and running as quickly as possible.
- It takes an opinionated view by providing the commonly used dependencies out of the box, avoiding version collisions.
- If something gets in your way, you can kick it out by excluding or overriding the version of your choice.
- Do more with less code, virtually no xml envolved.
- Spring Boot apps can be run as standalone [using embedded containers] or can as well be deployed as WAR on external containers.
- Provides multiple ways to run your app :
java -jar, new run goalmvn spring-boot:runor traditional WAR deployment. - Provides out of the box, tons of production-ready non-functional features that are common to large classes of projects (e.g. embedded servers, security, metrics, health checks, externalized configuration).
Following technologies stack being used:
- Spring Boot 1.4.3.RELEASE
- Spring 4.3.5.RELEASE [transitively]
- Maven 3.1
- JDK 1.8
- Eclipse MARS.1
Let’s begin with a traditional “Hello world”, using Spring-Boot this time, learning along the way. Complete project as usual is available in download section.
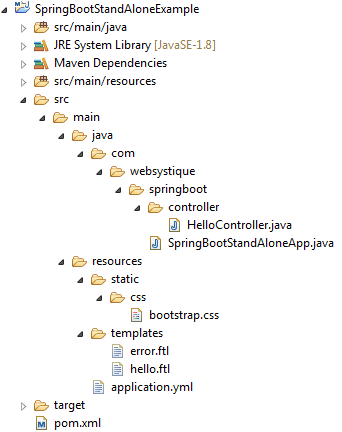
Project Structure
Step 1 : Dependency Management [pom.xml]
In most of the cases, your maven project POM will simply inherit from the spring-boot-starter-parent project. The spring-boot-starter-parent
- provides useful Maven defaults.
- provides dependency-management section so that you can omit version tags for dependencies you would need for your own project.
- Adds a ‘run’ goal that we can use on command-line to start the application [
mvn spring-boot:run]
Spring boot requires java 1.7 or higher. Additionally notice that packaging is jar, as we are building a standalone app. Don’t worry, Spring Boot WAR deployment post shows the same example using WAR for traditional deployment.
Resulting POM would be:
<project xmlns="http://maven.apache.org/POM/4.0.0" xmlns:xsi="http://www.w3.org/2001/XMLSchema-instance"
	xsi:schemaLocation="http://maven.apache.org/POM/4.0.0 http://maven.apache.org/xsd/maven-4.0.0.xsd">
	<modelVersion>4.0.0</modelVersion>

	<groupId>com.websystique.springboot</groupId>
	<artifactId>SpringBootStandAloneExample</artifactId>
	<version>1.0.0</version>
	<packaging>jar</packaging>

	<name>SpringBootStandAloneExample</name>

	<parent>
		<groupId>org.springframework.boot</groupId>
		<artifactId>spring-boot-starter-parent</artifactId>
		<version>1.4.3.RELEASE</version>
	</parent>

	<properties>
		<java.version>1.8</java.version>
	</properties>

</project>
Now, based on your project requirement, you would declare dependencies to one or more “Starters” jars. For instance, in our hello world example, we will be developing a MVC app, and will be using Freemarker templates for views. So we will include spring-boot-starter-web & spring-boot-starter-freemarker. Resulting POM should look like:
<project xmlns="http://maven.apache.org/POM/4.0.0" xmlns:xsi="http://www.w3.org/2001/XMLSchema-instance"
	xsi:schemaLocation="http://maven.apache.org/POM/4.0.0 http://maven.apache.org/xsd/maven-4.0.0.xsd">
	<modelVersion>4.0.0</modelVersion>

	<groupId>com.websystique.springboot</groupId>
	<artifactId>SpringBootStandAloneExample</artifactId>
	<version>1.0.0</version>
	<packaging>jar</packaging>

	<name>SpringBootStandAloneExample</name>

	<parent>
		<groupId>org.springframework.boot</groupId>
		<artifactId>spring-boot-starter-parent</artifactId>
		<version>1.4.3.RELEASE</version>
	</parent>

	<properties>
		<java.version>1.8</java.version>
	</properties>

	<dependencies>
		<!-- Add typical dependencies for a web application -->
		<!-- Adds Tomcat and Spring MVC, along others -->
		<dependency>
			<groupId>org.springframework.boot</groupId>
			<artifactId>spring-boot-starter-web</artifactId>
		</dependency>
		<dependency>
			<groupId>org.springframework.boot</groupId>
			<artifactId>spring-boot-starter-freemarker</artifactId>
		</dependency>
	</dependencies>
</project>
Notice that we didn’t have to declare the version, thanks to Dependency Management Section in spring-boot-starter-parent. Add this stage, if you open the ‘Effective POM’ tab in Eclipse, you would see a lots of dependencies being added by default for your project.
Optionally, you could add the spring-boot-maven-plugin to create executable jars. Executable jars[also known as FAT Jars] contains all the required libraries it needs to run, so that you can run it on command line using traditional java -jar myapp.jar
Final pom.xml would be:
<project xmlns="http://maven.apache.org/POM/4.0.0" xmlns:xsi="http://www.w3.org/2001/XMLSchema-instance"
	xsi:schemaLocation="http://maven.apache.org/POM/4.0.0 http://maven.apache.org/xsd/maven-4.0.0.xsd">
	<modelVersion>4.0.0</modelVersion>

	<groupId>com.websystique.springboot</groupId>
	<artifactId>SpringBootStandAloneExample</artifactId>
	<version>1.0.0</version>
	<packaging>jar</packaging>

	<name>SpringBootStandAloneExample</name>

	<parent>
		<groupId>org.springframework.boot</groupId>
		<artifactId>spring-boot-starter-parent</artifactId>
		<version>1.4.3.RELEASE</version>
	</parent>

	<properties>
		<java.version>1.8</java.version>
		<!-- Additionally, Please make sure that your JAVA_HOME is pointing to
			1.8 when building on commandline -->
	</properties>

	<dependencies>
		<!-- Add typical dependencies for a web application -->
		<!-- Adds Tomcat and Spring MVC, along others -->
		<dependency>
			<groupId>org.springframework.boot</groupId>
			<artifactId>spring-boot-starter-web</artifactId>
		</dependency>
		<dependency>
			<groupId>org.springframework.boot</groupId>
			<artifactId>spring-boot-starter-freemarker</artifactId>
		</dependency>
	</dependencies>
	<build>
		<plugins>
			<plugin><!-- Include if you want to make an executable jar[FAT JAR which
					includes all dependencies along with sprinboot loader] that you can run on
					commandline using java -jar NAME -->
				<!-- If you are not including it, result would be just a regular jar.
				You could run the project using mvn spring-boot:run [on project root directory]-->
				<groupId>org.springframework.boot</groupId>
				<artifactId>spring-boot-maven-plugin</artifactId>
			</plugin>
		</plugins>
	</build>
</project>
Step 2 : Add ‘Main’ class
You read it right. Good old main is what all we need to start our newly created spring boot app. Spring Boot provides SpringApplication class to bootstrap a Spring application that will be started from a main() method using static SpringApplication.run method.
package com.websystique.springboot;

import org.springframework.boot.SpringApplication;
import org.springframework.boot.autoconfigure.EnableAutoConfiguration;
import org.springframework.context.annotation.ComponentScan;


@EnableAutoConfiguration
@ComponentScan("com.websystique.springboot")
//OR JUST USE @SpringBootApplication(scanBasePackages={"com.websystique.springboot"})// same as @Configuration @EnableAutoConfiguration @ComponentScan combined
public class SpringBootStandAloneApp {

	public static void main(String[] args) {
		SpringApplication.run(SpringBootStandAloneApp.class, args);
	}
}
This class is annotated with @EnableAutoConfiguration & @ComponentScan. Spring Boot @EnableAutoConfiguration attempts to automatically configure your Spring application based on the jar dependencies that you have added. Since we have added spring-boot-starter-web, Spring boot will setup the Spring configuration for a web-application. @ComponentScan is as usual helps locate the spring beans the app would need.
Step 3 : Add a Controller
Since it’s a MVC app, let’s add a tiny controller.
package com.websystique.springboot.controller;
import org.springframework.stereotype.Controller;
import org.springframework.ui.ModelMap;
import org.springframework.web.bind.annotation.RequestMapping;
@Controller
public class HelloController {
@RequestMapping("/")
String home(ModelMap modal) {
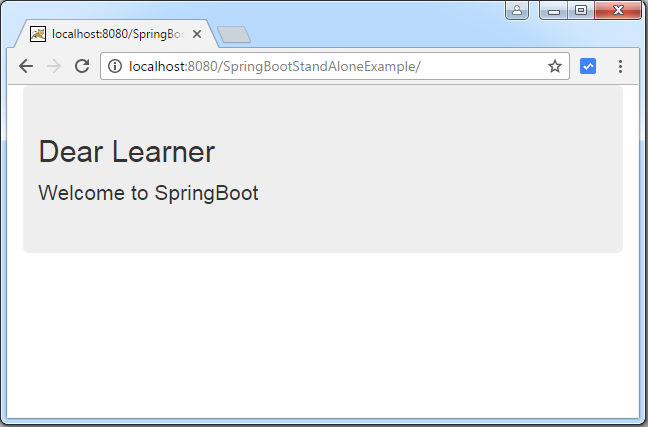
modal.addAttribute("title", "Dear Learner");
modal.addAttribute("message", "Welcome to SpringBoot");
return "hello";
}
}
Step 4 : Add properties file
Since our app will be running on an Embedded container, we need a way to configure the port and context-path for our app. Properties file to the rescue. Although we could use traditional .properties file, Spring-Boot provides fantastic support for YAML as well, provided SnakeYAML library is in classpath, which is the case when using spring-boot-starters. YAML files are great in representing hierarchical data. Property/yml files are commonly located inside src/main/resources.
By-default, Spring-Boot will use no context-path, and the default port would be 8080, means your application would be available at localhost:8080.But you can overwrite these properties by declaring them in application.yml [or application.yaml/application.properties] file
Although we could have several properties in .properties/.yml/.yaml, please note that server.* properties apply to the embedded tomcat only, which is all we need for this example. We would be doing a lot more using .yaml in coming posts.
src/main/resources/application.yml
server:
  port: 8080
  contextPath: /SpringBootStandAloneExample
If you had preferred .properties file, application.properties corresponding to above .yml would be
server.port: 8080
server.contextPath: /SpringBootStandAloneExample
Please refer to Spring Boot properties list of available properties which you can use/override.
Step 5 : Add views
Let’s add a view to our MVC app. We would be using Freemarker templates in our app. Spring Boot WebMvcAutoConfiguration adds FreeMarkerViewResolver with id ‘freeMarkerViewResolver’ if freemarker jar is in classpath, which is the case since we are using spring-boot-starter-freemarker. It looks for resources in a loader path (externalized to spring.freemarker.templateLoaderPath, default ‘classpath:/templates/’) by surrounding the view name with a prefix and suffix (externalized to spring.freemarker.prefix and spring.freemarker.suffix, with empty and ‘.ftl’ defaults respectively). It can be overridden by providing a bean of the same name.
src/main/resources/templates/hello.ftl
<!DOCTYPE html>

<html lang="en">
<head>
    <link rel="stylesheet" type="text/css" href="css/bootstrap.css" />
</head>
<body>
	<div class="container">
	    <div class="jumbotron">
	        <h2>${title}</h2>
	        <p>${message}</p>
	    </div>
	</div>
</body>
</html>
Error Page
By default, Spring Boot installs a ‘whitelabel’ error page that is shown in browser client if you encounter a server error. You can override that page, based upon the templating technology you are using. For freemarker, you can create a page with name ‘error.ftl’ which would be shown in case an error occurred.
src/main/resources/templates/error.ftl
<!DOCTYPE html>
<html lang="en">
<head>
<link rel="stylesheet" type="text/css" href="css/bootstrap.css" />
</head>
<body>
<div class="container">
<div class="jumbotron alert-danger">
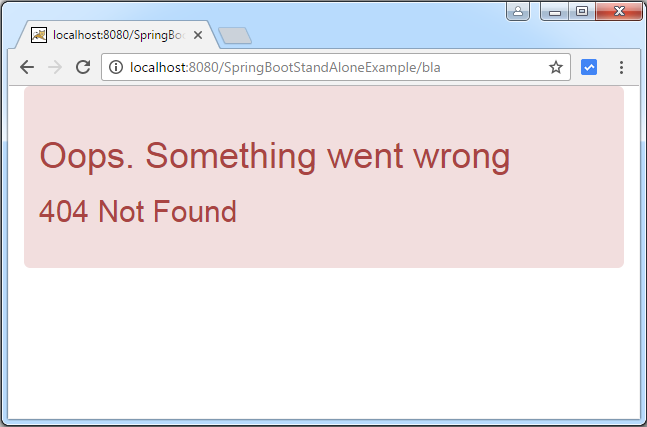
<h1>Oops. Something went wrong</h1>
<h2>${status} ${error}</h2>
</div>
</div>
</body>
</html>
Step 6: Static resources
Static resources like images/css/JS in a Spring boot application are commonly located in a directory called /static (or /public or /resources or /META-INF/resources) in the classpath or from the root of the ServletContext. In this example, we are using bootstrap.css which is located in src/main/resources/static/css.
Step 7 : Run the application
Select the main class [SpringBootStandAloneApp] in your IDE, run as-> java application.
- java -jar path-to-jar
- on Project root , mvn spring-boot:run
  .   ____          _            __ _ _
 /\\ / ___'_ __ _ _(_)_ __  __ _ \ \ \ \
( ( )\___ | '_ | '_| | '_ \/ _` | \ \ \ \
 \\/  ___)| |_)| | | | | || (_| |  ) ) ) )
  '  |____| .__|_| |_|_| |_\__, | / / / /
 =========|_|==============|___/=/_/_/_/
 :: Spring Boot ::        (v1.4.3.RELEASE)

2016-12-26 20:31:51.539  INFO 5892 --- [           main] c.w.springboot.SpringBootStandAloneApp   : Starting SpringBootStandAloneApp on dragon with PID 5892 (D:\Development\workspaces\workspace_websystique\SpringBootStandAloneExample\target\classes started by ADMIN in D:\Development\workspaces\workspace_websystique\SpringBootStandAloneExample)
2016-12-26 20:31:51.544  INFO 5892 --- [           main] c.w.springboot.SpringBootStandAloneApp   : No active profile set, falling back to default profiles: default
2016-12-26 20:31:51.621  INFO 5892 --- [           main] ationConfigEmbeddedWebApplicationContext : Refreshing org.springframework.boot.context.embedded.AnnotationConfigEmbeddedWebApplicationContext@c730b35: startup date [Mon Dec 26 20:31:51 CET 2016]; root of context hierarchy
2016-12-26 20:31:54.182  INFO 5892 --- [           main] s.b.c.e.t.TomcatEmbeddedServletContainer : Tomcat initialized with port(s): 8080 (http)
2016-12-26 20:31:54.205  INFO 5892 --- [           main] o.apache.catalina.core.StandardService   : Starting service Tomcat
2016-12-26 20:31:54.208  INFO 5892 --- [           main] org.apache.catalina.core.StandardEngine  : Starting Servlet Engine: Apache Tomcat/8.5.6
2016-12-26 20:31:54.390  INFO 5892 --- [ost-startStop-1] c.c.C.[.[.[/SpringBootStandAloneExample] : Initializing Spring embedded WebApplicationContext
2016-12-26 20:31:54.391  INFO 5892 --- [ost-startStop-1] o.s.web.context.ContextLoader            : Root WebApplicationContext: initialization completed in 2776 ms
2016-12-26 20:31:54.659  INFO 5892 --- [ost-startStop-1] o.s.b.w.servlet.ServletRegistrationBean  : Mapping servlet: 'dispatcherServlet' to [/]
2016-12-26 20:31:54.666  INFO 5892 --- [ost-startStop-1] o.s.b.w.servlet.FilterRegistrationBean   : Mapping filter: 'characterEncodingFilter' to: [/*]
2016-12-26 20:31:54.667  INFO 5892 --- [ost-startStop-1] o.s.b.w.servlet.FilterRegistrationBean   : Mapping filter: 'hiddenHttpMethodFilter' to: [/*]
2016-12-26 20:31:54.667  INFO 5892 --- [ost-startStop-1] o.s.b.w.servlet.FilterRegistrationBean   : Mapping filter: 'httpPutFormContentFilter' to: [/*]
2016-12-26 20:31:54.667  INFO 5892 --- [ost-startStop-1] o.s.b.w.servlet.FilterRegistrationBean   : Mapping filter: 'requestContextFilter' to: [/*]
2016-12-26 20:31:55.158  INFO 5892 --- [           main] s.w.s.m.m.a.RequestMappingHandlerAdapter : Looking for @ControllerAdvice: org.springframework.boot.context.embedded.AnnotationConfigEmbeddedWebApplicationContext@c730b35: startup date [Mon Dec 26 20:31:51 CET 2016]; root of context hierarchy
2016-12-26 20:31:55.268  INFO 5892 --- [           main] s.w.s.m.m.a.RequestMappingHandlerMapping : Mapped "{[/]}" onto java.lang.String com.websystique.springboot.controller.HelloController.home(org.springframework.ui.ModelMap)
2016-12-26 20:31:55.277  INFO 5892 --- [           main] s.w.s.m.m.a.RequestMappingHandlerMapping : Mapped "{[/error]}" onto public org.springframework.http.ResponseEntity<java.util.Map<java.lang.String, java.lang.Object>> org.springframework.boot.autoconfigure.web.BasicErrorController.error(javax.servlet.http.HttpServletRequest)
2016-12-26 20:31:55.278  INFO 5892 --- [           main] s.w.s.m.m.a.RequestMappingHandlerMapping : Mapped "{[/error],produces=}" onto public org.springframework.web.servlet.ModelAndView org.springframework.boot.autoconfigure.web.BasicErrorController.errorHtml(javax.servlet.http.HttpServletRequest,javax.servlet.http.HttpServletResponse)
2016-12-26 20:31:55.327  INFO 5892 --- [           main] o.s.w.s.handler.SimpleUrlHandlerMapping  : Mapped URL path [/webjars/**] onto handler of type [class org.springframework.web.servlet.resource.ResourceHttpRequestHandler]
2016-12-26 20:31:55.327  INFO 5892 --- [           main] o.s.w.s.handler.SimpleUrlHandlerMapping  : Mapped URL path [/**] onto handler of type [class org.springframework.web.servlet.resource.ResourceHttpRequestHandler]
2016-12-26 20:31:55.394  INFO 5892 --- [           main] o.s.w.s.handler.SimpleUrlHandlerMapping  : Mapped URL path [/**/favicon.ico] onto handler of type [class org.springframework.web.servlet.resource.ResourceHttpRequestHandler]
2016-12-26 20:31:55.768  INFO 5892 --- [           main] o.s.w.s.v.f.FreeMarkerConfigurer         : ClassTemplateLoader for Spring macros added to FreeMarker configuration
2016-12-26 20:31:55.924  INFO 5892 --- [           main] o.s.j.e.a.AnnotationMBeanExporter        : Registering beans for JMX exposure on startup
2016-12-26 20:31:56.025  INFO 5892 --- [           main] s.b.c.e.t.TomcatEmbeddedServletContainer : Tomcat started on port(s): 8080 (http)
2016-12-26 20:31:56.034  INFO 5892 --- [           main] c.w.springboot.SpringBootStandAloneApp   : Started SpringBootStandAloneApp in 5.213 seconds (JVM running for 5.709)
Open the browser and hit http://localhost:8080/SpringBootStandAloneExample
Try to access a non-existing url, you should get a 404 but with your custom error page.
Remark: In case you added the spring-boot-maven-plugin as stated above, you can simply run your app from command line. On the root of your project, perform
java -jar target/SpringBootStandAlone-1.0.0.jar
This will start the application as in above scenarios. Most of the time, Spring-boot apps are run using this approach instead, quite common in case of Microservices Architecture.
Conclusion
Although the post was bit long, Spring Boot and associated concepts are fairly trivial. We’ve just scratched the surface. Spring Boot eco-system is huge, covering every aspect of your application development, reducing the development time by many-fold, certainly worth giving a try. Make sure to check our other posts on Spring Boot, we will be covering lots of concepts here. Feel free to write your thoughts in comment section.
Download Source Code
References
If you like tutorials on this site, why not take a step further and connect me on Facebook , Google Plus & Twitter as well? I would love to hear your thoughts on these articles, it will help improve further our learning process.