AngularJS ngResource module provides first class built-in support for interacting with RESTful services asynchronously, via $resource service. $resource is a higher-level abstraction on low-level $http service used for asynchronous server communication.
It is worth to note down that everything that can be done by $resource can be done by directly using $http. $http is designed for general purpose AJAX calls that can deal with both RESTful & Non-RESTful API on your server. $resource however, is designed specially to work with RESTful API. If you have a RESTful API on your server, you can significantly reduce the amount of code you have to write to interact with server using $resource service. If you don’t have a RESTful API on your server, you should then be using $http instead.
This post is inspired by Official documentation.
At the end of this post, a Complete CRUD application with code is included, also available as download, so that you can deploy it to play along and learn.
Precondition to use ngResource module is that your server is providing a RESTful API. For example, a typical RESTful API based server would behave somewhat similar as following:
- GET request to /api/user returns a list of users.
- GET request to /api/user/1 returns the user with ID 1.
- POST request to /api/user with a user object as JSON creates a new user.
- PUT request to /api/user/3 with a user object as JSON updates the user with ID 3.
- DELETE request to /api/user/4 deletes the user with ID 4.
- DELETE request to /api/user deletes all the users.
Assuming your Server is RESTFul, ngResource can be put in action as follows:
1. Include angular-resource.js in your HTML.
      <script src="https://ajax.googleapis.com/ajax/libs/angularjs/1.4.4/angular.js"></script>
      <script src="https://ajax.googleapis.com/ajax/libs/angularjs/1.4.4/angular-resource.js"></script>
Don’t forget to change the version accordingly.
2. Load the module in your application by adding it as a dependent module:
angular.module('app', ['ngResource']);
3. Create a service around your REST API end-point, using $resource.
App.factory('User', ['$resource', function ($resource) {
	return $resource('http://localhost:8080/Spring4MVCAngularJSNgResourceExample/user/:id');
}]);
In above snippet, we have created an AngularJS factory named ‘User’ injecting $resource service as a dependency. Then we have called $resource service, passing our RESTful API endpoint as parameter. This call will return a resource class object that can be used to interact with RESTful server-side data sources.
$resource(url, [paramDefaults], [actions], options);
We will discuss all the parameters further down in post.
The resource object returned from above call contains following default methods for specific HTTP actions:
  'get':    {method:'GET'},
  'save':   {method:'POST'},
  'query':  {method:'GET', isArray:true},
  'remove': {method:'DELETE'},  //Preferable over delete due to IE incompatibilities.
  'delete': {method:'DELETE'}
All these methods are available as ‘class level’ actions on User, means you can directly call them on User [User.get(params) / User.query() / User.save(params) /User.remove(params) / User.delete(params) e.g.] , passing required parameters. We will see example of each of them further down in this post.
Calling these methods invokes $http with the specified HTTP method, destination and parameters. This set of actions can of-course be extended with custom actions. For instance, there is no HTTP PUT support available in default set of methods, but we can add it, as shown below:
App.factory('User', ['$resource', function ($resource) {
	//$resource() function returns an object of resource class.
    return $resource(
    		'http://localhost:8080/Spring4MVCAngularJSNgResourceExample/user/:id',
    		{},//parameters
    		{
    			update: {
    			      method: 'PUT' // To send the HTTP Put request when calling this custom update method.
    			}

    		},
    		{
    			stripTrailingSlashes: false
    		}
    );
}]);
In above snippet, we have added three additional optional parameters to $resource:
paramDefaults : Second parameter in $resource is an object, with key:value pairs, used for specifying default values for individual parameters in url (parameters prefixed with : in url). We will discuss more on it in a moment.
actions : Third parameter in $resource is an object hash [action object] with declaration of custom actions that should extend the default set of resource actions.
options : Fourth parameter is an object that provides possibility to specify some custom settings. In above snippet, we are asking AngularJS not to strip the trailing slashes present at the end of URL (which by default gets removed). It is handy for dealing with Servers who wants trailing slashes to be present in URL.
Action parameter deserves special attention. Using action parameter, we have added a custom update method on resource object which on use, will eventually send HTTP PUT request to server. You can do some very useful stuff using action parameter. For example, you can cache certain type of request by providing extra info in action:
App.factory('User', ['$resource', function ($resource) {
	//$resource() function returns an object of resource class.
    return $resource(
    		'http://localhost:8080/Spring4MVCAngularJSNgResourceExample/user/:id',
    		{},//parameters
    		{
    			update: {
    			      method: 'PUT' // To send the HTTP Put request when calling this custom update method.
    			},
    			get: {
    			      method: 'GET', cache: true // To cache the GET request fired using 'get' method.
    			}
    		},
    		{
    			stripTrailingSlashes: false
    		}
    );
}]);
Now the GET request [fired using ‘get’ call] be will cached. That means only the first call to get(‘/api/user/2’) will fire an HTTP GET and AngularJS will cache the result. On subsequent calls of get(‘/api/user/2’), AngularJS will not fire a new GET, it will simply serve the result from cache. Please refer to $resource official documentation for complete list of configuration options available.
Parameter default values and their effects on URL
Let’s learn in detail about the second parameter to $resource, by providing some data in parameter section this time. Recall that we have following configuration for our factory:
App.factory('User', ['$resource', function ($resource) {
	//$resource() function returns an object of resource class.
    return $resource(
    		'http://localhost:8080/MyApi/user/:id',
    		{},//parameters
    		{
    			update: {
    			      method: 'PUT' // To send the HTTP Put request when calling this custom update method.
    			}

    		}
    );
}]);
As can be seen, we have one parameter id in our URL (token prefixed with :). Below shown are few possibilities for URL & parameters combinations:
URL : 'http://localhost:8080/MyApi/user/:id',
defaultParam : {}

//As no parameter value found in parameters section '{}', $resource will strip away all parameters from URL.
Request will be sent to  : http://localhost:8080/MyApi/user
URL : 'http://localhost:8080/MyApi/user/:id',
defaultParam : {id:2}

//As there is something [one key:value pair] in params, it will be matched against URL, and all the matched parameters in URL would be replaced with there values.
Request will be sent to  : http://localhost:8080/MyApi/user/2
URL : 'http://localhost:8080/MyApi/user/:id',
defaultParam : {id:2, tom:'jerry'}

//Any excessive paramrter not present in URL would be added as query string.
Request will be sent to  : http://localhost:8080/MyApi/user/2?tom=jerry
URL : 'http://localhost:8080/MyApi/user/:id/subjects/:sub/score',
defaultParam : {id:2, tom:'jerry'}

//sub will be removed as it is nowhere found in parameters.
Request will be sent to  : http://localhost:8080/MyApi/user/2/subjects/score?tom=jerry
URL : 'http://localhost:8080/MyApi/user/:id',
defaultParam : {id:@myid}

//If the parameter value is prefixed with @ then the value for that parameter will be extracted from
//the corresponding property on the data object (provided when calling an action method). Here the
//default value of id would be data.myid where data is the object provided.
Request will be sent to  : http://localhost:8080/MyApi/user/xyz

//If there is no data object found with property 'myid', then 'id' parameter will be stripped away from URL.
//In that case, Request will be sent to  : http://localhost:8080/MyApi/user
Performing CRUD Operations using $resource
As shown above, we’ve created an AngularJS factory to handle all server communications which internally uses $resource to perform actual HTTP communication. Let’s see how we can now use this User service ( and eventually individual operations as mentioned above) in our code. To recall, below shown is the factory which will be used in all interaction with server.
App.factory('User', ['$resource', function ($resource) {
	//$resource() function returns an object of resource class.
    return $resource(
    		'http://localhost:8080/Spring4MVCAngularJSNgResourceExample/user/:id',
    		{id:@id},//parameters
    		{
    			update: {
    			      method: 'PUT' // To send the HTTP Put request when calling this custom update method.
    			}

    		}
    );
}]);
In above snippet, we have added a parameter object with key as id, & value as @id. If the parameter value is prefixed with @ then the value for that parameter will be extracted from the corresponding property on the data object (provided when calling an action method, we will see example of that soon). For example, if the defaultParam object is {someParam: ‘@someProp’} then the value of someParam will be data.someProp. In case no data object is found with that property, parameter token (:someParam) will be stripped away from URL.
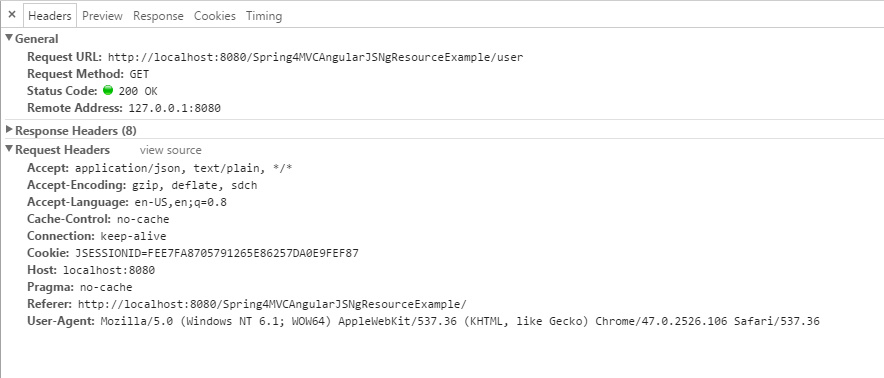
1. Fetch all records using query method
If we want to fetch all records, say in our controller, we can do so using query method.
    $scope.users = User.query();//returns all user objects.
   //HTTP GET on : http://localhost:8080/Spring4MVCAngularJSNgResourceExample/user
query method sends an HTTP GET request to server and returns empty array. This empty array gets populated when the response arrives from server. The view which is using that data [array] automatically re-renders itself showing the new data. Notice that as explained before. since we did not provide any data object with a property ‘id’, token ‘id’ got removed from URL.

Note that each user in the response will be an instance of resource type, and all of the non-GET methods [save, update, delete e.g.] will be available with $ prefix.
Passing Success & Failure Handlers
We can pass callbacks [success & failure handlers] as well as data [in case of POST,PUT e.g.] while calling any of the methods on resource class object or instance object.
HTTP GET  "class" actions: Resource.action([parameters], [success], [error])
non-GET "class" actions: Resource.action([parameters], postData, [success], [error])
non-GET instance actions: instance.$action([parameters], [success], [error])
Moreover, the success callback for get, query and other methods gets passed in the response that came from the server (populated resource instance, or collection in case of query), as well as responseHeaders. Failure callback, on the other hand gets passed httpResponse.
For example, if we were to pass callbacks, above snippet will look like following:
    $scope.users = User.query(function(result, responseHeaders){
        console.log('Total users received', result.length);
    }, function(httpResponse){
        console.log('Error while fetching users list');
    });
Knowing that response is available in success handler, we can simplify the code even more:
    User.query(function(result, responseHeaders){
        $scope.users = result
        console.log('Total users received', result.length);
    }, function(httpResponse){
        console.log('Error while fetching users list');
    });
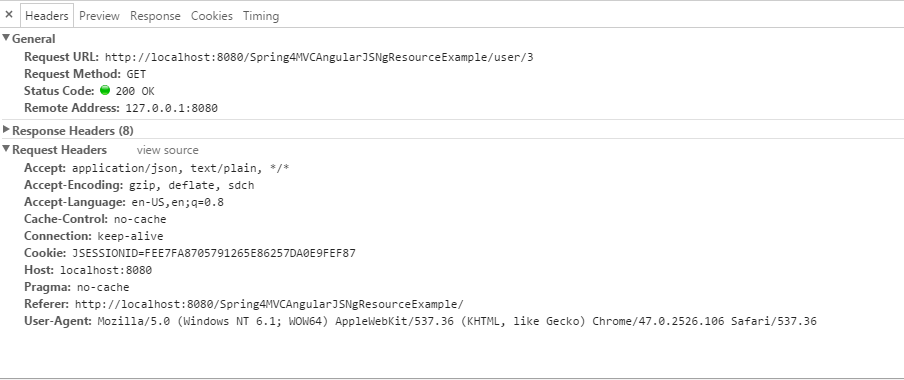
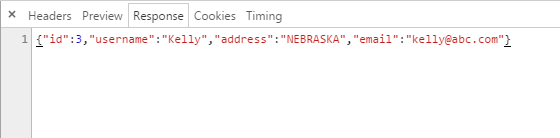
2. Fetch a specific record using get method
If we want to fetch a specific record, say in our controller, we can do so using get method:
    $scope.user = User.get({id:3});
    //HTTP GET on : http://localhost:8080/Spring4MVCAngularJSNgResourceExample/user/3
With callbacks:
    $scope.user = User.get({id:3}, function() {
        console.log('User name is ',$scope.user.username);
    });
Or more simplified version:
    User.get({id:3}, function(result) {
        $scope.user = result;
        console.log('User name is ',$scope.user.username);
    });
get method sends an HTTP GET request to server and returns an empty object. This empty object gets populated when the response arrives from server. The view which is using this object automatically re-renders itself showing the new data. Note that the response object from above get is an instance of resource type. That means, any of non-get methods like save,update,delete are available on it with $prefix. Notice that id parameter in URL got replaced by value provided in parameters.
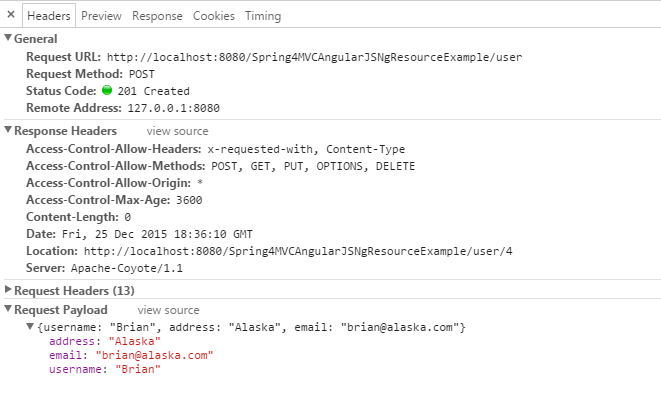
3. Create a record using save method
We can also create a new record on server using save method.
    var myUser = {username:'Brian',address:'Alaska',email:'brian@alaska.com'};
    User.save(myUser);


    // HTTP POST on : http://localhost:8080/Spring4MVCAngularJSNgResourceExample/user
    // with data  {name:'Brian', address='alaska', email: 'brian@alaska.com'} as POST BODY.

    // Now your Server, based on implementation, may return:
    // ->complete data with generated identifier : {id:4, name :'Brian", address:'Alaska' , email:'brian@alask.com'};
    // -> or it may just return the location header (as in our server) :                     //Location:http://localhost:8080/Spring4MVCAngularJSNgResourceExample/user/4
save method sends an HTTP POST request to server, sending actual data in POST body. Optionally, we can provide success & failure handler that will be called when the response from server arrived.
    var myUser = {username:'Brian',address:'Alaska',email:'brian@alaska.com'};
    User.save(myUser, function(){
            console.log('User saved');
        },function(){
            console.log('User could not be saved');
        }
    );
Class level actions vs instance level actions
Note that in above example, we are invoking save method on resource class object. It is invoked as class level action. In fact, all the methods are available as class level action on resource class object: User.get(params) / User.query() / User.save(params) / User.delete(params) / User.update(params) / User.remove(params).
We just need to pass appropriate parameters. In practice however, you will only be using get & query as class level actions [as shown in previous section]. Or put it differently, whenever you need to invoke get() or query() methods, you should invoke them on resource class object [as User.get(params) / User.query()].
Rest of the methods [NON-GET methods like save, update, delete, remove] are commonly used as resource instance level actions. Means they are invoked on resource instances instead of resource class object. First of all, we get resource instances in two ways:
-
1. By calling new.
var user = new User(); - 2. From the server response. For any operation, when the data is returned from the server then the object(s) is(are) an instance of the resource type.
Once you got a resource instance, all the NON-GET methods [save, update, delete e.g.] are available on them using $ prefix. It means you can call user.$save() / user.$delete() / user.$remove() / user.$update(). In practice, you will be using instances to invoke save/update/delete/remove.
Example :
    var user = User.get({id:3}, function() {//get the user instance
        user.username="ShaunTheSheep"; //update some data for example.
        user.$update(function(){//Then send an update HTTP PUT to server.
                    console.log('Updating user with id ',user.id);
                    });
        });
Note that update method is called with $ prefix. Now, let’s re-implement above save example, this time using resource instance.
// Create an instance
var newUser = new User();
newUser.name = "Brian";
newUser.address="Alaska";
newUser.email="brian@alaska.com"
newUser.$save(function(){ console.log('User is saved');});

// HTTP POST on : http://localhost:8080/Spring4MVCAngularJSNgResourceExample/user
// with data  {name:'Brian', address='alaska', email: 'brian@alaska.com'}
// Server, based on implementation, may return:
// ->complete data with generated identifier : {id:4, name :'Brian", address:'Alaska' , email:'brian@alask.com';
// -> or it may just return the location header : Location:http://localhost:8080/Spring4MVCAngularJSNgResourceExample/user/4
The outcome remains same for both approaches.
To conclude: whenever you need to invoke GET methods [get or query], go for class level action [User.get(params) / User.query()].Whenever you need to invoke NON-GET methods [save,update,delete,remove], go for instance level action , prefixing methods with $ [user.$save() / user.$update / user.$delete() / user.$remove()]
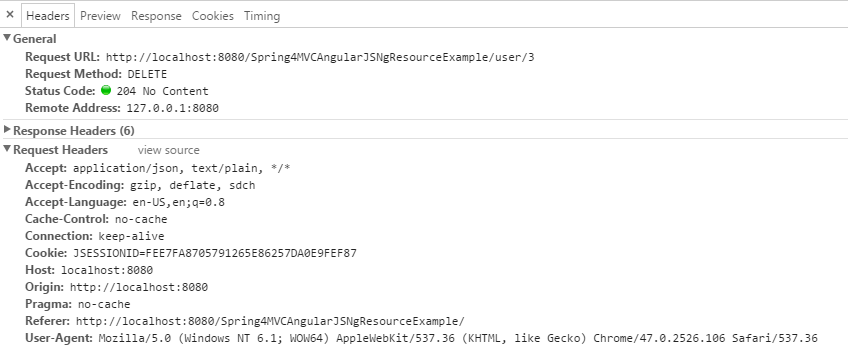
4. Delete a record using delete method
We can delete an existing record from server using delete method. Note that delete method is called with $ prefix.
//Let's first get the user and then delete it.
var user = User.get({id:3}, function() {
        		  user.$delete(function(){
        			  console.log('Deleting user with id 3');
        		  });
        	 });
delete method sends an HTTP DELETE request to server. Notice that before sending actual HTTP DELETE, AngularJS replaces the ‘id’ in URL by value of user.id. This is because user is the data object [a resource instance] returned from get call, so user.id contains a valid value, thanks to {id:@id} in configuration, ‘id’ in URL will be replaced by value of user.id. Since user is a resource instance, we used $ prefix while calling delete.
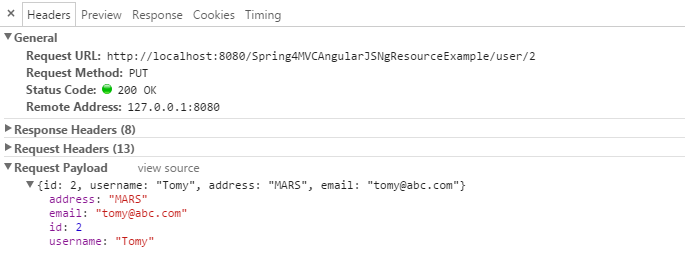
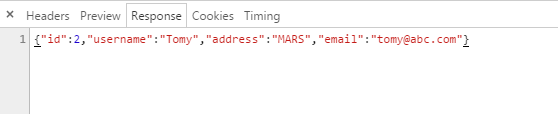
5. Update a record using our custom update method
If you recall, we have created a custom update method to support HTTP PUT. Now, using that update method, we can update a record on server.Note that update method is called with $ prefix.
//Let's first get the user and then update it.
var user = User.get({id:2}, function() {
        		  user.address="MARS";
        		  user.$update(function(){
        			  console.log('Updating user with id 2');
        		  });
        	 });
update method sends an HTTP PUT request to server, sending actual data (user object) in HTTP PUT body. Notice that before sending actual HTTP PUT, AngularJS replaces the ‘id’ in URL by value of user.id (Again, remember {id:@id} in configuration, here user is the data object).
That should be sufficient to get you started using ngResource. Next section shows a full CRUD application to play with.
What if you need $promise
Ideally, the callbacks you provide in these functions are enough to get the result you are looking for. But if you need old-school $promise, you can get it. $promise is available as a property on the resource instances and collections:
var users = User.query();
users.$promise.then(function (result, responseHeaders) {
    $scope.users = result;
},function(httpResponse) {
  alert('Failed: ' + httpResponse);
});
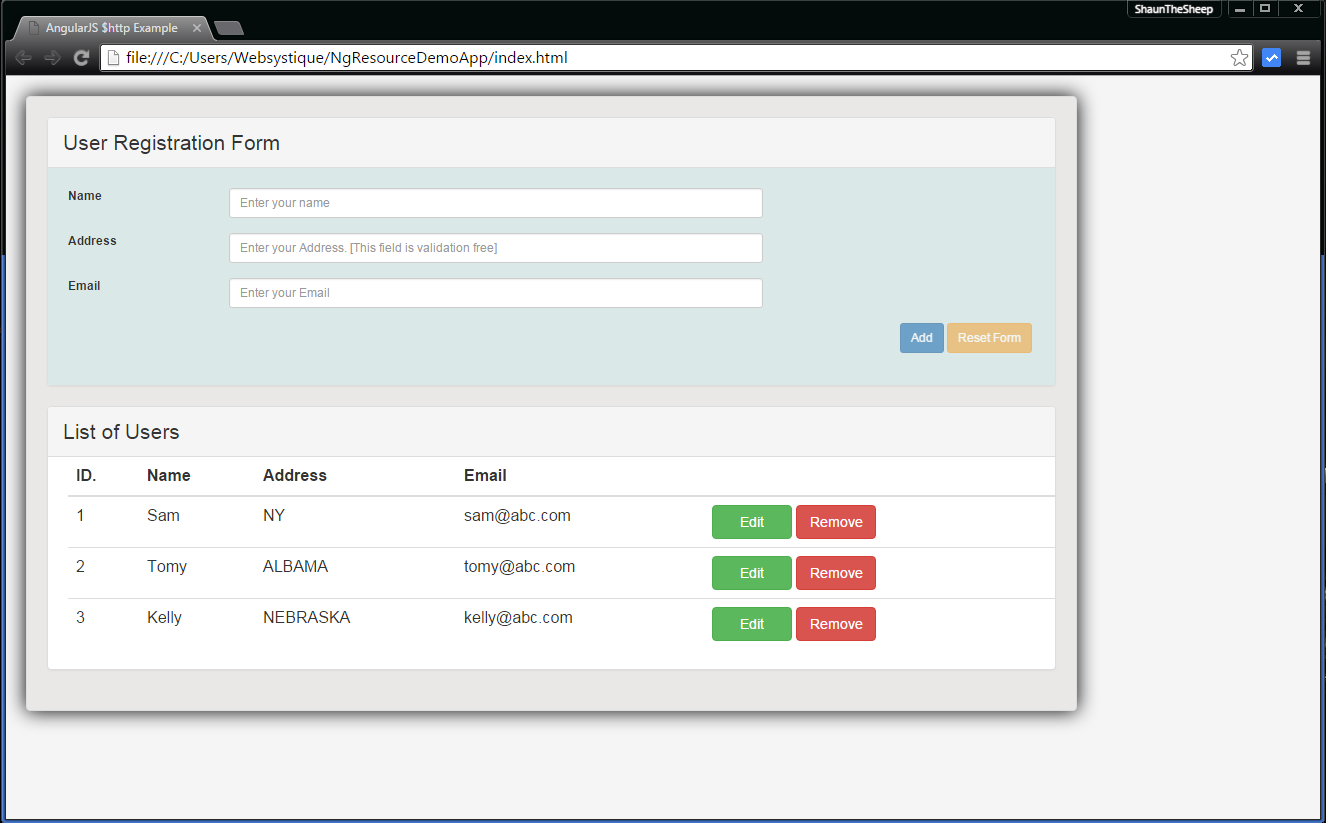
Complete CRUD application
Based on what we have learned so far on ngResource & $resource, let’s create a simple & complete CRUD application. Application is also available for download. Please note that in order to test this application, i’ve created a Spring based REST server on my local environment. You may prefer to create REST based server using other alternatives [nodeJS e.g.].
In case you are a Spring fan, Post Spring MVC + AngularJS CRUD application using ngResource contains both ,this client & a spring based server. deploy that and you are set to go.
Application itself is fairly simple, one-page application. You can fetch, create, update and delete user objects on single page, with basic form-validation applied. It has been divided into different parts [controller, service & index.html] to remain consistent with AngularJS philosophy.
Screenshot :
app.js
'use strict';
var App = angular.module('myApp',['ngResource']);
user_service.js
'use strict';

App.factory('User', ['$resource', function ($resource) {
	//$resource() function returns an object of resource class
    return $resource(
    		'http://localhost:8080/Spring4MVCAngularJSNgResourceExample/user/:id',
    		{id: '@id'},
    		{
    			update: {
    			      method: 'PUT' // To send the HTTP Put request when calling this custom update method.
    			}

    		}
    );
}]);
user_controller.js
'use strict';

App.controller('UserController', ['$scope', 'User', function($scope, User) {
          var self = this;
          self.user= new User();

          self.users=[];

          self.fetchAllUsers = function(){
        	  self.users = User.query();
          };

          self.createUser = function(){
        	  self.user.$save(function(){
        		  self.fetchAllUsers();
        	  });
          };

          self.updateUser = function(){
        	  self.user.$update(function(){
    			  self.fetchAllUsers();
    		  });
          };

         self.deleteUser = function(identity){
        	 var user = User.get({id:identity}, function() {
        		  user.$delete(function(){
        			  console.log('Deleting user with id ', identity);
        			  self.fetchAllUsers();
        		  });
        	 });
          };

          self.fetchAllUsers();

          self.submit = function() {
              if(self.user.id==null){
                  console.log('Saving New User', self.user);
                  self.createUser();
              }else{
    			  console.log('Upddating user with id ', self.user.id);
                  self.updateUser();
                  console.log('User updated with id ', self.user.id);
              }
              self.reset();
          };

          self.edit = function(id){
              console.log('id to be edited', id);
              for(var i = 0; i < self.users.length; i++){
                  if(self.users[i].id === id) {
                     self.user = angular.copy(self.users[i]);
                     break;
                  }
              }
          };

          self.remove = function(id){
              console.log('id to be deleted', id);
              if(self.user.id === id) {//If it is the one shown on screen, reset screen
                 self.reset();
              }
              self.deleteUser(id);
          };


          self.reset = function(){
              self.user= new User();
              $scope.myForm.$setPristine(); //reset Form
          };

      }]);
index.html
<html>
  <head>
    <title>AngularJS $http Example</title>
    <style>
      .username.ng-valid {
          background-color: lightgreen;
      }
      .username.ng-dirty.ng-invalid-required {
          background-color: red;
      }
      .username.ng-dirty.ng-invalid-minlength {
          background-color: yellow;
      }

      .email.ng-valid {
          background-color: lightgreen;
      }
      .email.ng-dirty.ng-invalid-required {
          background-color: red;
      }
      .email.ng-dirty.ng-invalid-email {
          background-color: yellow;
      }

    </style>
     <link rel="stylesheet" href="https://maxcdn.bootstrapcdn.com/bootstrap/3.3.5/css/bootstrap.min.css">
     <link rel="stylesheet" href="app.css">
  </head>
  <body ng-app="myApp" class="ng-cloak">
      <div class="generic-container" ng-controller="UserController as ctrl">
          <div class="panel panel-default">
              <div class="panel-heading"><span class="lead">User Registration Form </span></div>
              <div class="formcontainer">
                  <form ng-submit="ctrl.submit()" name="myForm" class="form-horizontal">
                      <input type="hidden" ng-model="ctrl.user.id" />
                      <div class="row">
                          <div class="form-group col-md-12">
                              <label class="col-md-2 control-lable" for="uname">Name</label>
                              <div class="col-md-7">
                                  <input type="text" ng-model="ctrl.user.username" id="uname" class="username form-control input-sm" placeholder="Enter your name" required ng-minlength="3"/>
                                  <div class="has-error" ng-show="myForm.$dirty">
                                      <span ng-show="myForm.uname.$error.required">This is a required field</span>
                                      <span ng-show="myForm.uname.$error.minlength">Minimum length required is 3</span>
                                      <span ng-show="myForm.uname.$invalid">This field is invalid </span>
                                  </div>
                              </div>
                          </div>
                      </div>


                      <div class="row">
                          <div class="form-group col-md-12">
                              <label class="col-md-2 control-lable" for="address">Address</label>
                              <div class="col-md-7">
                                  <input type="text" ng-model="ctrl.user.address" id="address" class="form-control input-sm" placeholder="Enter your Address. [This field is validation free]"/>
                              </div>
                          </div>
                      </div>

                      <div class="row">
                          <div class="form-group col-md-12">
                              <label class="col-md-2 control-lable" for="email">Email</label>
                              <div class="col-md-7">
                                  <input type="email" ng-model="ctrl.user.email" id="email" class="email form-control input-sm" placeholder="Enter your Email" required/>
                                  <div class="has-error" ng-show="myForm.$dirty">
                                      <span ng-show="myForm.email.$error.required">This is a required field</span>
                                      <span ng-show="myForm.email.$invalid">This field is invalid </span>
                                  </div>
                              </div>
                          </div>
                      </div>

                      <div class="row">
                          <div class="form-actions floatRight">
                              <input type="submit"  value="{{!ctrl.user.id ? 'Add' : 'Update'}}" class="btn btn-primary btn-sm" ng-disabled="myForm.$invalid">
                              <button type="button" ng-click="ctrl.reset()" class="btn btn-warning btn-sm" ng-disabled="myForm.$pristine">Reset Form</button>
                          </div>
                      </div>
                  </form>
              </div>
          </div>
          <div class="panel panel-default">
                <!-- Default panel contents -->
              <div class="panel-heading"><span class="lead">List of Users </span></div>
              <div class="tablecontainer">
                  <table class="table table-hover">
                      <thead>
                          <tr>
                              <th>ID.</th>
                              <th>Name</th>
                              <th>Address</th>
                              <th>Email</th>
                              <th width="100"></th>
                          </tr>
                      </thead>
                      <tbody>
                          <tr ng-repeat="u in ctrl.users">
                              <td><span ng-bind="u.id"></span></td>
                              <td><span ng-bind="u.username"></span></td>
                              <td><span ng-bind="u.address"></span></td>
                              <td><span ng-bind="u.email"></span></td>
                              <td>
                              <button type="button" ng-click="ctrl.edit(u.id)" class="btn btn-success custom-width">Edit</button>  <button type="button" ng-click="ctrl.remove(u.id)" class="btn btn-danger custom-width">Remove</button>
                              </td>
                          </tr>
                      </tbody>
                  </table>
              </div>
          </div>
      </div>

      <script src="https://ajax.googleapis.com/ajax/libs/angularjs/1.4.4/angular.js"></script>
      <script src="https://ajax.googleapis.com/ajax/libs/angularjs/1.4.4/angular-resource.js"></script>
      <script src="app.js"></script>
      <script src="user_service.js"></script>
      <script src="user_controller.js"></script>
  </body>
</html>
That’s it. As explained above, start your REST server and then click on index.html to see application getting alive. For those who like Spring, , post Spring MVC + AngularJS CRUD application using ngResource contains both ,this client & a Spring based server. That would be quick and clean way to test this sample application. For more information, please refer to Official documentation. Don’t forget to comment for any possible questions related to this topic.
Download Source Code
Client Application [NgResourceClientApp]
References
If you like tutorials on this site, why not take a step further and connect me on Facebook , Google Plus & Twitter as well? I would love to hear your thoughts on these articles, it will help improve further our learning process.