In this post we will see how Spring can auto-detect the beans configured in your application using component-scanning, wire them wherever required without even declaring as @Bean methods in @Configuration class ( or in XML terms, without declaring bean in Spring XML Configuration file). We will also see corresponding XML configuration side-by-side for comparison.
We will proceed with help of a typical enterprise level application setup example showing different layers(Service, DAO) involved in application development. Let’s get going.
- Spring Boot+AngularJS+Spring Data+Hibernate+MySQL CRUD App
- Spring Boot REST API Tutorial
- Spring Boot WAR deployment example
- Spring Boot Introduction + Hello World Example
- Secure Spring REST API using OAuth2
- AngularJS+Spring Security using Basic Authentication
- Spring MVC 4+AngularJS Example
- Secure Spring REST API using Basic Authentication
- Spring 4 Caching Annotations Tutorial
- Spring 4 Cache Tutorial with EhCache
- Spring 4 MVC+JPA2+Hibernate Many-to-many Example
- Spring 4 Email Template Library Example
- Spring 4 Email With Attachment Tutorial
- Spring 4 Email Integration Tutorial
- Spring MVC 4+JMS+ActiveMQ Integration Example
- Spring 4+JMS+ActiveMQ @JmsLister @EnableJms Example
- Spring 4+JMS+ActiveMQ Integration Example
- Spring MVC 4+Hibernate 4 Many-to-many JSP Example
- Spring MVC 4+Hibernate 4+MySQL+Maven integration example using annotations
- Spring MVC4 FileUpload-Download Hibernate+MySQL Example
- TestNG Mockito Integration Example Stubbing Void Methods
- Maven surefire plugin and TestNG Example
- Spring MVC 4 Form Validation and Resource Handling
Following technologies being used:
- Spring 4.0.6.RELEASE
- Joda-time 2.3
- Maven 3
- JDK 1.6
- Eclipse JUNO Service Release 2
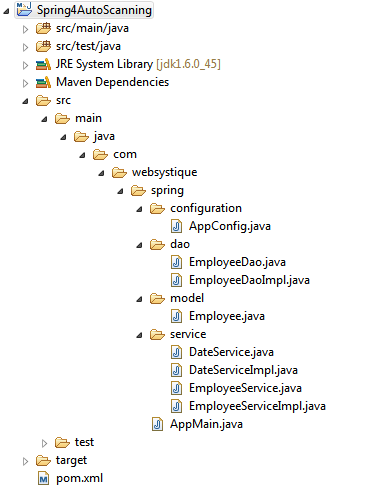
Project directory structure
Following will be the final project directory structure for this example:
Let’s add the content mentioned in above directory structure.
Step 1: Provide Spring dependencies in Maven pom.xml
<project xmlns="http://maven.apache.org/POM/4.0.0" xmlns:xsi="http://www.w3.org/2001/XMLSchema-instance"
  xsi:schemaLocation="http://maven.apache.org/POM/4.0.0 http://maven.apache.org/xsd/maven-4.0.0.xsd">
  <modelVersion>4.0.0</modelVersion>

  <groupId>com.websystique.spring</groupId>
  <artifactId>Spring4AutoScanning</artifactId>
  <version>1.0.0</version>
  <packaging>jar</packaging>

  <name>Spring4AutoScanning</name>
   	<properties>
		<springframework.version>4.0.6.RELEASE</springframework.version>
		<joda-time.version>2.3</joda-time.version>
	</properties>

	<dependencies>
		<!--  Spring -->
		<dependency>
			<groupId>org.springframework</groupId>
			<artifactId>spring-core</artifactId>
			<version>${springframework.version}</version>
		</dependency>
		<dependency>
			<groupId>org.springframework</groupId>
			<artifactId>spring-context</artifactId>
			<version>${springframework.version}</version>
		</dependency>

      	<!-- Joda-Time -->
		<dependency>
  			<groupId>joda-time</groupId>
  			<artifactId>joda-time</artifactId>
  			<version>${joda-time.version}</version>
  		</dependency>

  	</dependencies>
	<build>
		<pluginManagement>
			<plugins>
				<plugin>
					<groupId>org.apache.maven.plugins</groupId>
					<artifactId>maven-compiler-plugin</artifactId>
					<version>3.2</version>
					<configuration>
						<source>1.6</source>
						<target>1.6</target>
					</configuration>
				</plugin>
			</plugins>
		</pluginManagement>
	</build>

</project>
We need Spring core and Spring context dependencies to work with this example. Additionally in our example we will be doing some date calculation using JodaTime LocalDate class, so joda-time dependency is in there.
Step 2: Create Spring Configuration Class
Spring configuration class are the ones annotated with @Configuration. These classes contains methods annotated with @Bean. These @Bean annotated methods generates beans managed by Spring container.
package com.websystique.spring.configuration;

import org.springframework.context.annotation.ComponentScan;
import org.springframework.context.annotation.Configuration;

@Configuration
@ComponentScan(basePackages = "com.websystique.spring")
public class AppConfig {

}
You might have noticed that above class is Empty, no @Bean methods, acting as a placeholder instead. So where will the beans come from?
Actually, they will be auto-detected, thanks to @ComponentScan annotation.
@ComponentScan(basePackages = "com.websystique.spring")
@ComponentScan basePackages attribute takes package name[s] as input which will be search for to find any class annotated with Spring specific annotations.
Below are commonly used Spring annotation which makes a bean auto-detectable:
@Repository – Used to mark a bean as DAO Component on persistence layer
@Service – Used to mark a bean as Service Component on business layer
@Controller – Used to mark a bean as Controller Component on Presentation layer
@Configuration – Used to mark a bean as Configuration Component.
@Component – General purpose annotation, can be used as a replacement for above annotations.
Note that all above mentioned annotations are internally annotated with @Component, so indeed you can use @Component everywhere, but to keep the design & intention clean, it’s advisable to use different annotation based on different condition.
Remark: In our example, you can even discard the Configuration class altogether as it does not contain any @Bean method. We will see how to scan the beans in that case below.
Same Configuration in XML terms can be expressed as below (let’s name it app-config.xml)
<beans xmlns="http://www.springframework.org/schema/beans"
	xmlns:xsi="http://www.w3.org/2001/XMLSchema-instance"
	xmlns:context="http://www.springframework.org/schema/context"
	xsi:schemaLocation="http://www.springframework.org/schema/beans http://www.springframework.org/schema/beans/spring-beans-4.0.xsd
	http://www.springframework.org/schema/context http://www.springframework.org/schema/context/spring-context-4.0.xsd">

	<context:component-scan base-package="com.websystique.spring" />

</beans>
Step 3: Create DAO Layer Classes
package com.websystique.spring.dao;

import com.websystique.spring.model.Employee;

public interface EmployeeDao {

	void saveInDatabase(Employee employee);
}
package com.websystique.spring.dao;

import org.springframework.stereotype.Repository;

import com.websystique.spring.model.Employee;

@Repository("employeeDao")
public class EmployeeDaoImpl implements EmployeeDao{

	public void saveInDatabase(Employee employee) {

		/*
		 * Logic to save in DB goes here
		 */
		System.out.println("Employee "+employee.getName()+" is registered for assessment on "+ employee.getAssessmentDate());

	}

}
@Repository annotation marks this class as an Auto-detectable bean on persistence layer. Parameter to this annotation employeeDao provides a name to this bean. We will inject this class into main service bean.
Step 4: Create Service Layer Classes
package com.websystique.spring.service;

import org.joda.time.LocalDate;

public interface DateService {

	LocalDate getNextAssessmentDate();
}
package com.websystique.spring.service;

import org.joda.time.LocalDate;
import org.springframework.stereotype.Service;

@Service("dateService")
public class DateServiceImpl implements DateService{

	public LocalDate getNextAssessmentDate() {
		return new LocalDate(2015,10,10);
	}

}
@Service marks this class as Auto-detectable bean on business layer. We will inject this class into main service bean.
package com.websystique.spring.service;

import com.websystique.spring.model.Employee;

public interface EmployeeService {

	void registerEmployee(Employee employee);
}
package com.websystique.spring.service;

import org.springframework.beans.factory.annotation.Autowired;
import org.springframework.stereotype.Service;

import com.websystique.spring.dao.EmployeeDao;
import com.websystique.spring.model.Employee;

@Service("employeeService")
public class EmployeeServiceImpl implements EmployeeService{

	@Autowired
	private DateService dateService;

	@Autowired
	private EmployeeDao employeeDao;


	public void registerEmployee(Employee employee) {
		employee.setAssessmentDate(dateService.getNextAssessmentDate());
		employeeDao.saveInDatabase(employee);
	}

}
EmployeeService is our main service class.Notice that we have injected both DateService and EmployeeDao in this.
@Autowired on dateService property marks the DateService to be auto-wired by Spring’s dependency injection with the appropriate bean in Spring context. In our case, we have already declared a DateService bean using @Service, so that bean will be injected here. Similarly, employeeDao will be injected by EmployeeDao annotated with @Repository.
Below is the model class Employee used in our example
package com.websystique.spring.model;

import org.joda.time.LocalDate;

public class Employee {

	private int id;

	private String name;

	private LocalDate assessmentDate;

	public int getId() {
		return id;
	}

	public void setId(int id) {
		this.id = id;
	}

	public String getName() {
		return name;
	}

	public void setName(String name) {
		this.name = name;
	}

	public LocalDate getAssessmentDate() {
		return assessmentDate;
	}

	public void setAssessmentDate(LocalDate assessmentDate) {
		this.assessmentDate = assessmentDate;
	}

	@Override
	public String toString() {
		return "Employee [id=" + id + ", name=" + name + ", assessmentDate="
				+ assessmentDate + "]";
	}

}
Step 5: Create Main to run as Java Application
package com.websystique.spring;

import org.springframework.context.annotation.AnnotationConfigApplicationContext;
import org.springframework.context.support.AbstractApplicationContext;

import com.websystique.spring.configuration.AppConfig;
import com.websystique.spring.model.Employee;
import com.websystique.spring.service.EmployeeService;

public class AppMain {

	public static void main(String args[]){
		AbstractApplicationContext  context = new AnnotationConfigApplicationContext(AppConfig.class);

		EmployeeService service = (EmployeeService) context.getBean("employeeService");

		/*
		 * Register employee using service
		 */
		Employee employee = new Employee();
		employee.setName("Danny Theys");
		service.registerEmployee(employee);

		context.close();
	}
}
Run above program as Java Application, you should see following output
Employee Danny Theys is registered for assessment on 2015-10-10
Now, in case you decided to discard the configuration class AppConfig you can do so with following changes
package com.websystique.spring;

import org.springframework.context.annotation.AnnotationConfigApplicationContext;

import com.websystique.spring.model.Employee;
import com.websystique.spring.service.EmployeeService;

public class AppMain {

	public static void main(String args[]){
		//AbstractApplicationContext  context = new AnnotationConfigApplicationContext(AppConfig.class);
		AnnotationConfigApplicationContext  context = new AnnotationConfigApplicationContext();
		context.scan("com.websystique.spring");
		context.refresh();

		EmployeeService service = (EmployeeService) context.getBean("employeeService");

		/*
		 * Register employee using service
		 */
		Employee employee = new Employee();
		employee.setName("Danny Theys");
		service.registerEmployee(employee);

		context.close();
	}
}
AnnotationConfigApplicationContext.scan method performs a scan of all class in specified package[s], registering all the beans annotated with @Component (even @configuration itself is internally annotated with @component) in application context. A caveat here is that refresh must be called after scan in order to fully process the registered classes.
Run above program as Java Application, you should see same output as before.
That’s it.
For XML based configuration , replace
AbstractApplicationContext context = new AnnotationConfigApplicationContext(AppConfig.class);
with
AbstractApplicationContext context = new ClassPathXmlApplicationContext("app-config.xml");
in above main, no other changes. Run the program and you will see same output.
Download Source Code
References
If you like tutorials on this site, why not take a step further and connect me on Facebook , Google Plus & Twitter as well? I would love to hear your thoughts on these articles, it will help improve further our learning process.