This tutorial introduces you to Spring MVC 4 basics, using classic Hello World example without skipping any step. Spring 4 MVC HelloWorld Tutorial – Annotation/JavaConfig Example contains the Annotations based full example. Let’s get going.
- Spring Boot+AngularJS+Spring Data+Hibernate+MySQL CRUD App
- Spring Boot REST API Tutorial
- Spring Boot WAR deployment example
- Secure Spring REST API using OAuth2
- Spring Boot Introduction + Hello World Example
- AngularJS+Spring Security using Basic Authentication
- Secure Spring REST API using Basic Authentication
- Spring 4 Caching Annotations Tutorial
- Spring 4 MVC+JPA2+Hibernate Many-to-many Example
- Spring 4 Cache Tutorial with EhCache
- Spring 4 Email Template Library Example
- Spring 4 Email With Attachment Tutorial
- Spring 4 Email Integration Tutorial
- Spring MVC 4+JMS+ActiveMQ Integration Example
- Spring 4+JMS+ActiveMQ @JmsLister @EnableJms Example
- Spring 4+JMS+ActiveMQ Integration Example
- Spring MVC 4+Apache Tiles 3 Integration Example
- Spring MVC 4+Spring Security 4 + Hibernate Integration Example
- Spring MVC 4+AngularJS Example
- Spring MVC 4+AngularJS Routing with UI-Router Example
- Spring MVC 4 HelloWorld – Annotation/JavaConfig Example
- Spring MVC 4+Hibernate 4+MySQL+Maven integration example
- Spring 4 Hello World Example
- Spring Security 4 Hello World Annotation+XML Example
- Hibernate MySQL Maven Hello World Example (Annotation)
- TestNG Hello World Example
- JAXB2 Helloworld Example
- Spring Batch- Read a CSV file and write to an XML file
Following technologies being used:
- Spring 4.0.6.RELEASE
- Maven 3
- JDK 1.6
- Eclipse JUNO Service Release 2
- M2Eclipse plugin (Optional)
Feel free to skip Step 1, if you are already familiar with creating a maven project with eclipse.
Let’s begin.
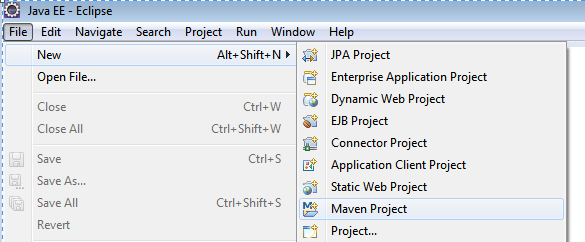
Step 1 : Create a new Maven webapp project in Eclipse
Goto File-> New -> Maven Project,
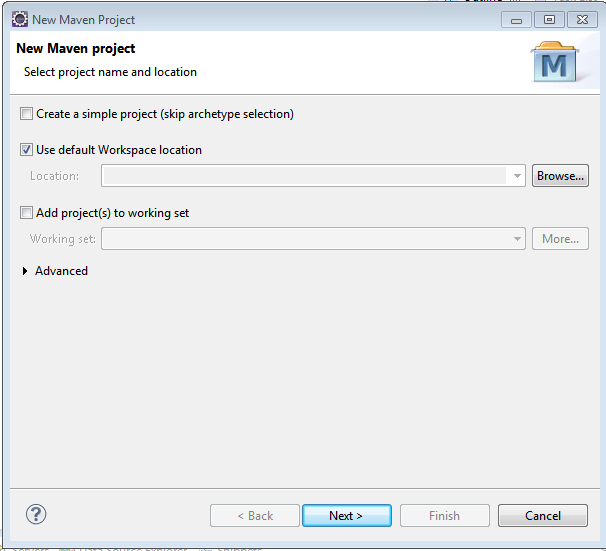
Uncheck “Use default Workspace location” in case you prefer to create the project on another location
click Next
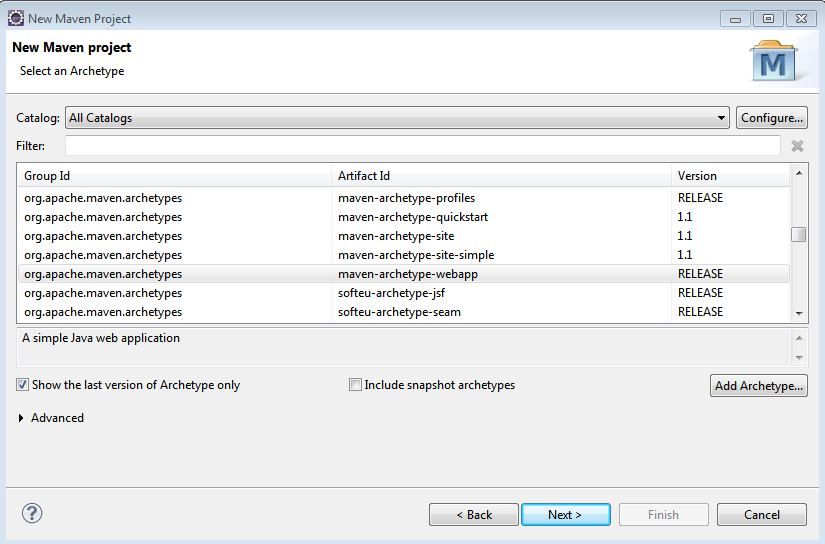
Select maven web app archetype from the list of Options, click Next
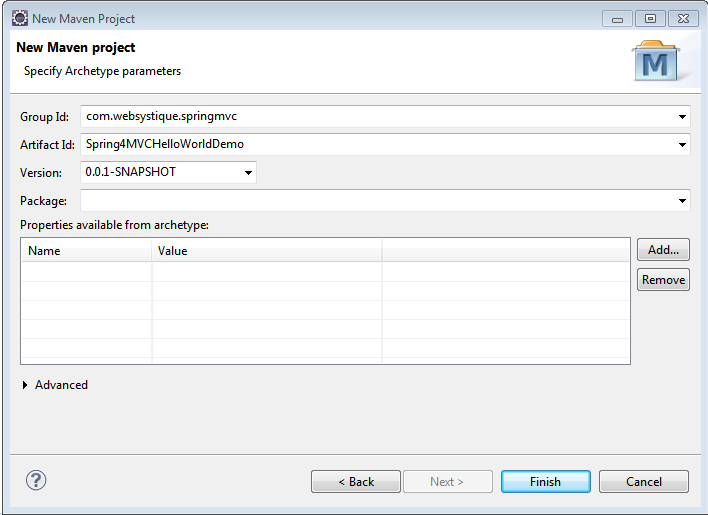
Provide Group Id, Artifact Id, version as shown above, and click Finish.Refresh your project
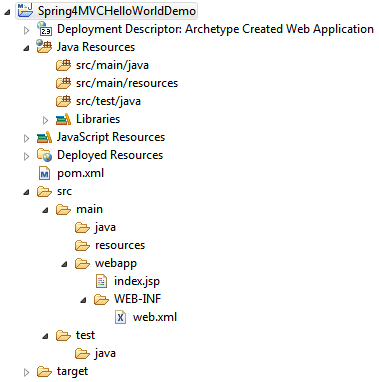
You should get the file structure as shown below
Note: In case you do not see the src/main/java and src/test/java folder in your project structure, goto Project>Properties>Java BuildPath>Libraries, select/change-to appropriate Java version, click ok, you should see those folders now.
Note: With recent Eclipse versions you don’t need to use mvn eclise:eclipse anymore, this functionality is built-in with m2e eclipse plugin.
Step 2: Provide Spring dependencies in Maven pom.xml
Since it’s a maven project, all the project dependencies can be configured in pom.xml and maven will take care of downloading all the respective dependencies automatically. Below is the pom.xml for our project.
<project
	xsi:schemaLocation="http://maven.apache.org/POM/4.0.0 http://maven.apache.org/xsd/maven-4.0.0.xsd"
	xmlns="http://maven.apache.org/POM/4.0.0" xmlns:xsi="http://www.w3.org/2001/XMLSchema-instance">

	<modelVersion>4.0.0</modelVersion>
	<groupId>com.websystique.springmvc</groupId>
	<artifactId>Spring4MVCHelloWorldDemo</artifactId>
	<packaging>war</packaging>
	<version>1.0.0</version>
	<name>Spring4MVCHelloWorldDemo Maven Webapp</name>

	<properties>
		<springframework.version>4.0.6.RELEASE</springframework.version>
	</properties>

	<dependencies>
		<dependency>
			<groupId>org.springframework</groupId>
			<artifactId>spring-webmvc</artifactId>
			<version>${springframework.version}</version>
		</dependency>

		<!-- Below declared dependencies are included for the servers who may complain about servlet/jstl missing dependency -->
		<dependency>
			<groupId>javax.servlet</groupId>
			<artifactId>javax.servlet-api</artifactId>
			<version>3.1.0</version>
		</dependency>
		<dependency>
			<groupId>javax.servlet.jsp</groupId>
			<artifactId>javax.servlet.jsp-api</artifactId>
			<version>2.3.1</version>
		</dependency>
		<dependency>
			<groupId>javax.servlet</groupId>
			<artifactId>jstl</artifactId>
			<version>1.2</version>
		</dependency>
	</dependencies>

	<build>
		<pluginManagement>
			<plugins>
				<plugin>
					<groupId>org.apache.maven.plugins</groupId>
					<artifactId>maven-compiler-plugin</artifactId>
					<version>3.2</version>
					<configuration>
						<source>1.6</source>
						<target>1.6</target>
					</configuration>
				</plugin>
			</plugins>
		</pluginManagement>
		<finalName>Spring4MVCHelloWorldDemo</finalName>
	</build>
</project>
The Maven plugin maven-compiler-plugin has been added here to explicitly specify the java-version we are going to use. Do note that it also force eclipse to respect the jdk-version being used for the project. if it is not present, and you perform mvn-update from within your eclipse, eclipse switches jdk-version back to 1.5 which is annoying. So do add it in your project pom as well.
Step 3: Add Controller and View
Add a package under src/main/java [src/main/java->New->package].
Then create a Controller class(shown below) which simply adds a string into model which will be accessible to the view for our example.
com.websystique.springmvc.controller.HelloWorldController
package com.websystique.springmvc.controller;
import org.springframework.stereotype.Controller;
import org.springframework.ui.ModelMap;
import org.springframework.web.bind.annotation.RequestMapping;
import org.springframework.web.bind.annotation.RequestMethod;
@Controller
@RequestMapping("/")
public class HelloWorldController {
@RequestMapping(method = RequestMethod.GET)
public String sayHello(ModelMap model) {
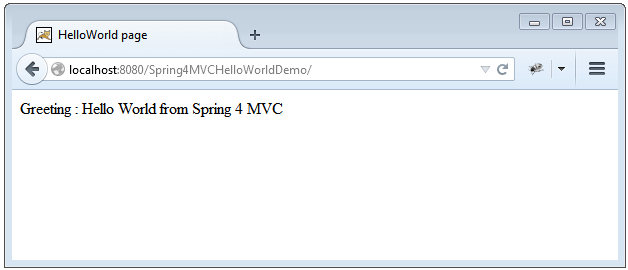
model.addAttribute("greeting", "Hello World from Spring 4 MVC");
return "welcome";
}
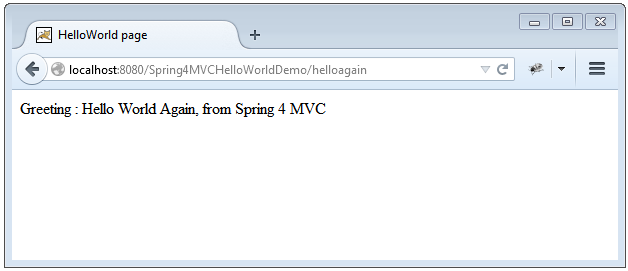
@RequestMapping(value="/helloagain", method = RequestMethod.GET)
public String sayHelloAgain(ModelMap model) {
model.addAttribute("greeting", "Hello World Again, from Spring 4 MVC");
return "welcome";
}
}
Lets dig deeper:
@Controller annotation marks this class as spring bean which may handle different HTTP requests based on mapping specified on class or individual controller methods.
@RequestMapping annotation is used for mapping web requests onto specific handler classes and/or handler methods. In our case, we have applied it on class level too, which says that this class is default handler for all HTTP requests of type ‘/’. @RequestMapping have several attributes [value,method,params,..] which can be used to narrow down your mapping to more specific selection.
First method does not have any URL mapping declared, so it will inherit the mapping from mapping declared on class level, acting as default handler for GET requests. Second method (due to additional mapping declaration with value attribute) will serve the request of form /helloagain. Attribute method is used to specify type of HTTP request this method can serve. If a mapping does not include ‘method’ attribute, then that mapped controller method will server all types of request on that mapped URL.
ModelMap is a Map implementation, which saves you from old request.getAttribute/ request.setAttribute. It provides a way to set/get attributes from/to request or session.
Look at the return values from these methods. These values will be suffixed and prefixed with suffix and prefix defined in view resolver(see spring-servlet.xml further down) to form the real view file name.
Create a new folder named views under WEB-INF and add in a Simple JSP page welcome.jsp ( WEB-INF/views/welcome.jsp) which in our example will simply access the model value sent from controller.
<%@ page language="java" contentType="text/html; charset=ISO-8859-1"
    pageEncoding="ISO-8859-1"%>
<!DOCTYPE html PUBLIC "-//W3C//DTD HTML 4.01 Transitional//EN" "http://www.w3.org/TR/html4/loose.dtd">
<html>
<head>
<meta http-equiv="Content-Type" content="text/html; charset=ISO-8859-1">
<title>HelloWorld page</title>
</head>
<body>
	Greeting : ${greeting}
</body>
</html>
Step 4: Create Spring configuration file
Spring configuration file contains instructions for Spring to operate. Here we are going to use XML configuration but one can avoid XML configuration by using Annotation based Configuration, which will be our topic for next tutorial.
Let’s create a file named spring-servlet.xml with below content in WEB-INF folder. Note that you can name this file anything you like but be sure to declare it in web.xml (as shown further down in this tutorial).
<beans xmlns="http://www.springframework.org/schema/beans"
	xmlns:context="http://www.springframework.org/schema/context"
	xmlns:mvc="http://www.springframework.org/schema/mvc"
	xmlns:xsi="http://www.w3.org/2001/XMLSchema-instance"
	xsi:schemaLocation="http://www.springframework.org/schema/beans http://www.springframework.org/schema/beans/spring-beans-4.0.xsd
 	http://www.springframework.org/schema/mvc http://www.springframework.org/schema/mvc/spring-mvc-4.0.xsd
 	http://www.springframework.org/schema/context http://www.springframework.org/schema/context/spring-context-4.0.xsd">

	<context:component-scan base-package="com.websystique.springmvc" />

	<mvc:annotation-driven />

	<bean
		class="org.springframework.web.servlet.view.InternalResourceViewResolver">
		<property name="prefix">
			<value>/WEB-INF/views/</value>
		</property>
		<property name="suffix">
			<value>.jsp</value>
		</property>
	</bean>

</beans>
Lets dig deeper, again
<mvc:annotation-driven /> says that we can define spring beans dependencies without actually having to specify a bunch of beans in xml or implement an interface or extend a base class or anything. For example, just by annotating a class with @Controller (as we did above) , spring will know that the specified class contains methods that will handle HTTP requests, no need to define that as a bean in xml.
<context:component-scan base-package="com.websystique.springmvc" /> tells spring to search project classpath for all classes under the package specified with base-package [com.websystique.springmvc], and look at each class to see if it is annotated with specific Spring annotations [@Controller, @Service, @Repository, @Component, etc..] and if it does then Spring will register the class with the bean factory as if you had typed
Along with that, we have declared a view resolver which will help controller to delegate the response to appropriate view.
Now we need to specify this configuration file in web.xml, as shown below.
Step 4: Update web configuration (web.xml) file
<web-app id="WebApp_ID" version="2.4"
 	xmlns="http://java.sun.com/xml/ns/j2ee"
 	xmlns:xsi="http://www.w3.org/2001/XMLSchema-instance"
 	xsi:schemaLocation="http://java.sun.com/xml/ns/j2ee
 				http://java.sun.com/xml/ns/j2ee/web-app_2_4.xsd">

 <display-name>Spring4MVCHelloWorldDemo Web Application</display-name>

 <servlet>
 	<servlet-name>dispatcher</servlet-name>
 	<servlet-class>
 		org.springframework.web.servlet.DispatcherServlet
 	</servlet-class>
 	<init-param>
 		<param-name>contextConfigLocation</param-name>
 		<param-value>/WEB-INF/spring-servlet.xml</param-value>
 	</init-param>
 	<load-on-startup>1</load-on-startup>
 </servlet>

 <servlet-mapping>
 	<servlet-name>dispatcher</servlet-name>
 	<url-pattern>/</url-pattern>
 </servlet-mapping>

</web-app>
Things to take from here are DispatcherServlet & contextConfigLocation. DispatcherServlet is the front controller which receives each request(see the url pattern) and direct the request to appropriate controller.It is also responsible for directing the response from controller to appropriate views.
Look carefully at contextConfigLocation init-param. Thanks to this parameter, you can name your spring configuration file anything you want and place anywhere you want, even you can provide multiple files. In absence of this parameter, you are obliged to name the file as ABC-servlet.xml where ABC is the dispatcher servlet name.
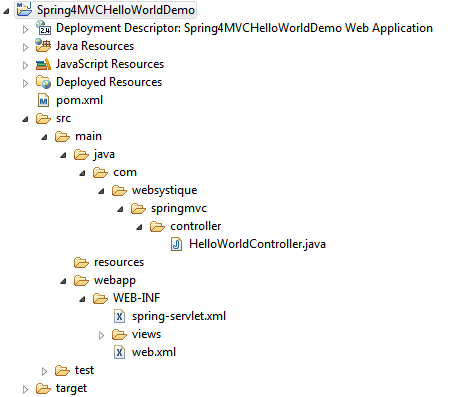
That’s it. You should have following project structure by now:
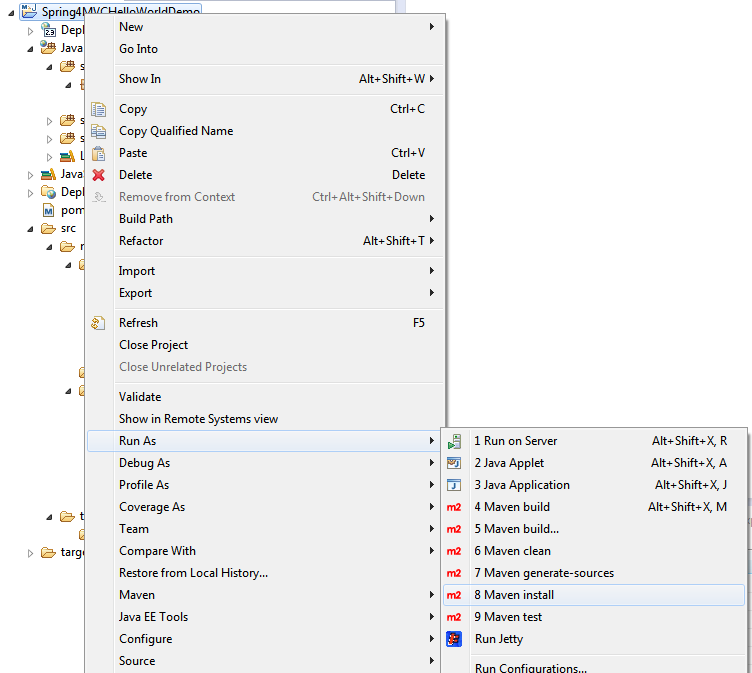
Step 6: Deploy & run your application
Right click your project ->Run as-> maven install as show below:
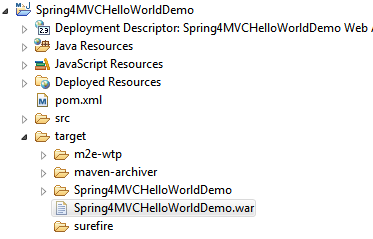
As a result, you will see a war file under target folder
Deploy this war into a container. There are several ways to do this. In case of tomcat, put this war file inside webapp folder of your tomcat installation(tomcat/webapp), and click on start.bat file(under tomcat/bin).
To be quick, i am using a handy eclipse jetty plugin run-jetty-run to run it on jetty. Right click on your war->run as->run-jetty.
Open your browser and run.
That’s it. Next post, Spring 4 MVC HelloWorld Tutorial – Annotation/JavaConfig Example contains the Annotations based full example.
Download Source Code
References
If you like tutorials on this site, why not take a step further and connect me on Facebook , Google Plus & Twitter as well? I would love to hear your thoughts on these articles, it will help improve further our learning process.