This tutorial demonstrates Spring Security 4 usage to secure a Spring MVC web application, securing URL access with authentication. We will use classic Hello World example to learn Spring Security 4 basics. This post uses Spring Annotation based configuration for Servlet 3.0 containers [hence no web.xml] and also shows corresponding XML based Security configuration for side-by-side comparison where applicable. Let’s get started.
- Spring Boot+AngularJS+Spring Data+Hibernate+MySQL CRUD App
- Spring Boot REST API Tutorial
- Spring Boot WAR deployment example
- Secure Spring REST API using OAuth2
- Spring Boot Introduction + Hello World Example
- AngularJS+Spring Security using Basic Authentication
- Secure Spring REST API using Basic Authentication
- Spring MVC 4+AngularJS Example
- Spring MVC 4+Spring Security 4 + Hibernate Integration Example
- Spring 4 Caching Annotations Tutorial
- Spring 4 Cache Tutorial with EhCache
- Spring 4 MVC+JPA2+Hibernate Many-to-many Example
- Spring 4 Email Template Library Example
- Spring 4 Email With Attachment Tutorial
- Spring 4 Email Integration Tutorial
- Spring MVC 4+JMS+ActiveMQ Integration Example
- Spring 4+JMS+ActiveMQ @JmsLister @EnableJms Example
- Spring 4+JMS+ActiveMQ Integration Example
- Spring MVC 4+AngularJS Routing with UI-Router Example
- Spring MVC 4 HelloWorld – Annotation/JavaConfig Example
- Spring MVC 4+Hibernate 4+MySQL+Maven integration example
- Spring 4 Hello World Example
- Spring Security 4 Hello World Annotation+XML Example
- Hibernate MySQL Maven Hello World Example (Annotation)
- TestNG Hello World Example
- JAXB2 Helloworld Example
- Spring Batch- Read a CSV file and write to an XML file
Following technologies being used:
- Spring 4.1.6.RELEASE
- Spring Security 4.0.1.RELEASE
- Maven 3
- JDK 1.7
- Tomcat 8.0.21
- Eclipse JUNO Service Release 2
Let’s begin.
Step 1: Project directory structure
Following will be the final project structure:
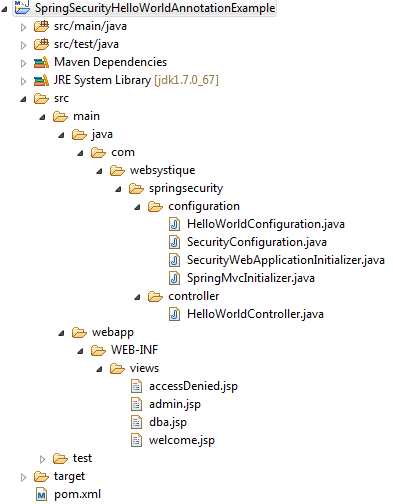
Let’s now add the content mentioned in above structure explaining each in detail.
Step 2: Update pom.xml to include required dependencies
<project xmlns="http://maven.apache.org/POM/4.0.0" xmlns:xsi="http://www.w3.org/2001/XMLSchema-instance"
	xsi:schemaLocation="http://maven.apache.org/POM/4.0.0 http://maven.apache.org/xsd/maven-4.0.0.xsd">
	<modelVersion>4.0.0</modelVersion>

	<groupId>com.websystique.springsecurity</groupId>
	<artifactId>SpringSecurityHelloWorldAnnotationExample</artifactId>
	<version>1.0.0</version>
	<packaging>war</packaging>

	<name>SpringSecurityHelloWorldAnnotationExample</name>

	<properties>
		<springframework.version>4.1.6.RELEASE</springframework.version>
		<springsecurity.version>4.0.1.RELEASE</springsecurity.version>
	</properties>

	<dependencies>
		<!-- Spring -->
		<dependency>
			<groupId>org.springframework</groupId>
			<artifactId>spring-core</artifactId>
			<version>${springframework.version}</version>
		</dependency>
		<dependency>
			<groupId>org.springframework</groupId>
			<artifactId>spring-web</artifactId>
			<version>${springframework.version}</version>
		</dependency>
		<dependency>
			<groupId>org.springframework</groupId>
			<artifactId>spring-webmvc</artifactId>
			<version>${springframework.version}</version>
		</dependency>

		<!-- Spring Security -->
		<dependency>
			<groupId>org.springframework.security</groupId>
			<artifactId>spring-security-web</artifactId>
			<version>${springsecurity.version}</version>
		</dependency>
		<dependency>
			<groupId>org.springframework.security</groupId>
			<artifactId>spring-security-config</artifactId>
			<version>${springsecurity.version}</version>
		</dependency>

		<dependency>
			<groupId>javax.servlet</groupId>
			<artifactId>javax.servlet-api</artifactId>
			<version>3.1.0</version>
		</dependency>
		<dependency>
			<groupId>javax.servlet.jsp</groupId>
			<artifactId>javax.servlet.jsp-api</artifactId>
			<version>2.3.1</version>
		</dependency>
		<dependency>
			<groupId>javax.servlet</groupId>
			<artifactId>jstl</artifactId>
			<version>1.2</version>
		</dependency>
	</dependencies>

	<build>
		<pluginManagement>
			<plugins>
				<plugin>
					<groupId>org.apache.maven.plugins</groupId>
					<artifactId>maven-compiler-plugin</artifactId>
					<version>3.2</version>
					<configuration>
						<source>1.7</source>
						<target>1.7</target>
					</configuration>
				</plugin>
				<plugin>
					<groupId>org.apache.maven.plugins</groupId>
					<artifactId>maven-war-plugin</artifactId>
					<version>2.4</version>
					<configuration>
						<warSourceDirectory>src/main/webapp</warSourceDirectory>
						<warName>SpringSecurityHelloWorldAnnotationExample</warName>
						<failOnMissingWebXml>false</failOnMissingWebXml>
					</configuration>
				</plugin>
			</plugins>
		</pluginManagement>
		<finalName>SpringSecurityHelloWorldAnnotationExample</finalName>
	</build>
</project>
First thing to notice here is the maven-war-plugin declaration. As we are using full annotation configuration, we don’t even use web.xml, so we will need to configure this plugin in order to avoid maven failure to build war package. We are using latest versions(at time of writing) of Spring and Spring Security.
Along with that, we have also included JSP/Servlet/Jstl dependencies which we will be needing as we are going to use servlet api’s and jstl view in our code. In general, containers might already contains these libraries, so we can set the scope as ‘provided’ for them in pom.xml.
Step 3: Add Spring Security Configuration Class
The first and foremost step to add spring security in our application is to create Spring Security Java Configuration. This configuration creates a Servlet Filter known as the springSecurityFilterChain which is responsible for all the security (protecting the application URLs, validating submitted username and passwords, redirecting to the log in form, etc) within our application.
com.websystique.springsecurity.configuration.SecurityConfiguration
package com.websystique.springsecurity.configuration;

import org.springframework.beans.factory.annotation.Autowired;
import org.springframework.context.annotation.Configuration;
import org.springframework.security.config.annotation.authentication.builders.AuthenticationManagerBuilder;
import org.springframework.security.config.annotation.web.builders.HttpSecurity;
import org.springframework.security.config.annotation.web.configuration.EnableWebSecurity;
import org.springframework.security.config.annotation.web.configuration.WebSecurityConfigurerAdapter;

@Configuration
@EnableWebSecurity
public class SecurityConfiguration extends WebSecurityConfigurerAdapter {

	@Autowired
	public void configureGlobalSecurity(AuthenticationManagerBuilder auth) throws Exception {
		auth.inMemoryAuthentication().withUser("bill").password("abc123").roles("USER");
		auth.inMemoryAuthentication().withUser("admin").password("root123").roles("ADMIN");
		auth.inMemoryAuthentication().withUser("dba").password("root123").roles("ADMIN","DBA");//dba have two roles.
	}

	@Override
	protected void configure(HttpSecurity http) throws Exception {

	  http.authorizeRequests()
	  	.antMatchers("/", "/home").permitAll()
		.antMatchers("/admin/**").access("hasRole('ADMIN')")
		.antMatchers("/db/**").access("hasRole('ADMIN') and hasRole('DBA')")
		.and().formLogin()
		.and().exceptionHandling().accessDeniedPage("/Access_Denied");

	}
}
Method configureGlobalSecurity in above class configures AuthenticationManagerBuilder with user credentials and allowed roles. This AuthenticationManagerBuilder creates AuthenticationManager which is responsible for processing any authentication request. Notice that in above example, we have used in-memory authentication while you are free to choose from JDBC, LDAP and other authentications.
The overridden Method Configure configures HttpSecurity which allows configuring web based security for specific http requests. By default it will be applied to all requests, but can be restricted using requestMatcher(RequestMatcher)/antMathchers or other similar methods.
In above configuration, we say that URL’s ‘/’ & ‘/home’ are not secured, anyone can access them. URL ‘/admin/**’ can only be accessed by someone who have ADMIN role. URL ‘/db/**’ can only be accessed by someone who have both ADMIN and DBA roles.
Method formLogin provides support for form based authentication and will generate a default form asking for user credentials. You are allowed to configure your own login form.We will see examples for the same in subsequent posts.
We have also used exceptionHandling().accessDeniedPage() which in this case will catch all 403 [http access denied] exceptions and display our user defined page instead of showing default HTTP 403 page [ which is not so helpful anyway].
Above security configuration in XML configuration format would be:
<beans:beans xmlns="http://www.springframework.org/schema/security"
    xmlns:beans="http://www.springframework.org/schema/beans"
    xmlns:xsi="http://www.w3.org/2001/XMLSchema-instance"
    xsi:schemaLocation="http://www.springframework.org/schema/beans http://www.springframework.org/schema/beans/spring-beans-4.1.xsd
    http://www.springframework.org/schema/security http://www.springframework.org/schema/security/spring-security-4.0.xsd">

    <http auto-config="true" >
        <intercept-url pattern="/" access="permitAll" />
        <intercept-url pattern="/home" access="permitAll" />
        <intercept-url pattern="/admin**" access="hasRole('ADMIN')" />
        <intercept-url pattern="/dba**" access="hasRole('ADMIN') and hasRole('DBA')" />
        <form-login  authentication-failure-url="/Access_Denied" />
    </http>

    <authentication-manager >
        <authentication-provider>
            <user-service>
                <user name="bill"  password="abc123"  authorities="ROLE_USER" />
                <user name="admin" password="root123" authorities="ROLE_ADMIN" />
                <user name="dba"   password="root123" authorities="ROLE_ADMIN,ROLE_DBA" />
            </user-service>
        </authentication-provider>
    </authentication-manager>


</beans:beans>
Step 4: Register the springSecurityFilter with war
Below specified initializer class registers the springSecurityFilter [created in Step 3] with application war.
com.websystique.springsecurity.configuration.SecurityWebApplicationInitializer
package com.websystique.springsecurity.configuration;

import org.springframework.security.web.context.AbstractSecurityWebApplicationInitializer;

public class SecurityWebApplicationInitializer extends AbstractSecurityWebApplicationInitializer {

}
Above setup in XML configuration format would be:
<filter>
    <filter-name>springSecurityFilterChain</filter-name>
    <filter-class>org.springframework.web.filter.DelegatingFilterProxy</filter-class>
</filter>

<filter-mapping>
    <filter-name>springSecurityFilterChain</filter-name>
    <url-pattern>/*</url-pattern>
</filter-mapping>
Step 5: Add Controller
com.websystique.springsecurity.controller.HelloWorldController
package com.websystique.springsecurity.controller;

import javax.servlet.http.HttpServletRequest;
import javax.servlet.http.HttpServletResponse;

import org.springframework.security.core.Authentication;
import org.springframework.security.core.context.SecurityContextHolder;
import org.springframework.security.core.userdetails.UserDetails;
import org.springframework.security.web.authentication.logout.SecurityContextLogoutHandler;
import org.springframework.stereotype.Controller;
import org.springframework.ui.ModelMap;
import org.springframework.web.bind.annotation.RequestMapping;
import org.springframework.web.bind.annotation.RequestMethod;

@Controller
public class HelloWorldController {


	@RequestMapping(value = { "/", "/home" }, method = RequestMethod.GET)
	public String homePage(ModelMap model) {
		model.addAttribute("greeting", "Hi, Welcome to mysite. ");
		return "welcome";
	}

	@RequestMapping(value = "/admin", method = RequestMethod.GET)
	public String adminPage(ModelMap model) {
		model.addAttribute("user", getPrincipal());
		return "admin";
	}

	@RequestMapping(value = "/db", method = RequestMethod.GET)
	public String dbaPage(ModelMap model) {
		model.addAttribute("user", getPrincipal());
		return "dba";
	}

	@RequestMapping(value="/logout", method = RequestMethod.GET)
	   public String logoutPage (HttpServletRequest request, HttpServletResponse response) {
	      Authentication auth = SecurityContextHolder.getContext().getAuthentication();
	      if (auth != null){
	         new SecurityContextLogoutHandler().logout(request, response, auth);
	      }
	      return "welcome";
	   }

	@RequestMapping(value = "/Access_Denied", method = RequestMethod.GET)
	public String accessDeniedPage(ModelMap model) {
		model.addAttribute("user", getPrincipal());
		return "accessDenied";
	}

	private String getPrincipal(){
		String userName = null;
		Object principal = SecurityContextHolder.getContext().getAuthentication().getPrincipal();

		if (principal instanceof UserDetails) {
			userName = ((UserDetails)principal).getUsername();
		} else {
			userName = principal.toString();
		}
		return userName;
	}
}
Methods in controller class are trivial. Method getPrincipal is a generic function which returns the logged in user name from Spring SecurityContext. Method logoutPage handles the logging out with a simple call to SecurityContextLogoutHandler().logout(request, response, auth);. It’s handy and saves you from putting cryptic logout logic in your JSP’s which is not really manageable. You might have noticed that ‘/login’ is missing, it is because it will be generated and handled by default by Spring Security.
Step 6: Add SpringMVC Configuration Class
com.websystique.springsecurity.configuration.HelloWorldConfiguration
package com.websystique.springsecurity.configuration;

import org.springframework.context.annotation.Bean;
import org.springframework.context.annotation.ComponentScan;
import org.springframework.context.annotation.Configuration;
import org.springframework.web.servlet.ViewResolver;
import org.springframework.web.servlet.config.annotation.EnableWebMvc;
import org.springframework.web.servlet.view.InternalResourceViewResolver;
import org.springframework.web.servlet.view.JstlView;

@Configuration
@EnableWebMvc
@ComponentScan(basePackages = "com.websystique.springsecurity")
public class HelloWorldConfiguration {

	@Bean
	public ViewResolver viewResolver() {
		InternalResourceViewResolver viewResolver = new InternalResourceViewResolver();
		viewResolver.setViewClass(JstlView.class);
		viewResolver.setPrefix("/WEB-INF/views/");
		viewResolver.setSuffix(".jsp");

		return viewResolver;
	}

}
Step 7: Add Initializer class
com.websystique.springsecurity.configuration.HelloWorldConfiguration
package com.websystique.springsecurity.configuration;

import org.springframework.web.servlet.support.AbstractAnnotationConfigDispatcherServletInitializer;

public class SpringMvcInitializer extends AbstractAnnotationConfigDispatcherServletInitializer {

	@Override
	protected Class<?>[] getRootConfigClasses() {
		return new Class[] { HelloWorldConfiguration.class };
	}

	@Override
	protected Class<?>[] getServletConfigClasses() {
		return null;
	}

	@Override
	protected String[] getServletMappings() {
		return new String[] { "/" };
	}

}
Notice that above initializer class extends AbstractAnnotationConfigDispatcherServletInitializer which is the base class for all WebApplicationInitializer implementations. Implementations of WebApplicationInitializer configures ServletContext programatically, for Servlet 3.0 environments. It means we won’t be using web.xml and we will deploy the app on Servlet 3.0 container.
Step 8: Add Views
welcome.jsp
<%@ page language="java" contentType="text/html; charset=ISO-8859-1" pageEncoding="ISO-8859-1"%>
<html>
<head>
	<meta http-equiv="Content-Type" content="text/html; charset=ISO-8859-1">
	<title>HelloWorld page</title>
</head>
<body>
	Greeting : ${greeting}
	This is a welcome page.
</body>
</html>
admin.jsp
<%@ page language="java" contentType="text/html; charset=ISO-8859-1" pageEncoding="ISO-8859-1"%>
<%@ taglib prefix="c" uri="http://java.sun.com/jsp/jstl/core"%>
<html>
<head>
	<meta http-equiv="Content-Type" content="text/html; charset=ISO-8859-1">
	<title>HelloWorld Admin page</title>
</head>
<body>
	Dear <strong>${user}</strong>, Welcome to Admin Page.
	<a href="<c:url value="/logout" />">Logout</a>
</body>
</html>
dba.jsp
<%@ page language="java" contentType="text/html; charset=ISO-8859-1" pageEncoding="ISO-8859-1"%>
<%@ taglib prefix="c" uri="http://java.sun.com/jsp/jstl/core"%>
<html>
<head>
	<meta http-equiv="Content-Type" content="text/html; charset=ISO-8859-1">
	<title>DBA page</title>
</head>
<body>
	Dear <strong>${user}</strong>, Welcome to DBA Page.
	<a href="<c:url value="/logout" />">Logout</a>
</body>
</html>
accessDenied.jsp
<%@ page language="java" contentType="text/html; charset=ISO-8859-1" pageEncoding="ISO-8859-1"%>
<%@ taglib prefix="c" uri="http://java.sun.com/jsp/jstl/core"%>
<html>
<head>
	<meta http-equiv="Content-Type" content="text/html; charset=ISO-8859-1">
	<title>AccessDenied page</title>
</head>
<body>
	Dear <strong>${user}</strong>, You are not authorized to access this page
	<a href="<c:url value="/logout" />">Logout</a>
</body>
</html>
Step 9: Build and Deploy the application
As mentioned in Step 7, we are not using web.xml in our application as the ServletContext is loaded programmatically.
Now build the war (either by eclipse/m2eclipse) or via maven command line( mvn clean install). Deploy the war to a Servlet 3.0 container . Since here i am using Tomcat, i will simply put this war file into tomcat webapps folder and click on start.bat inside tomcat bin directory.
Run the application
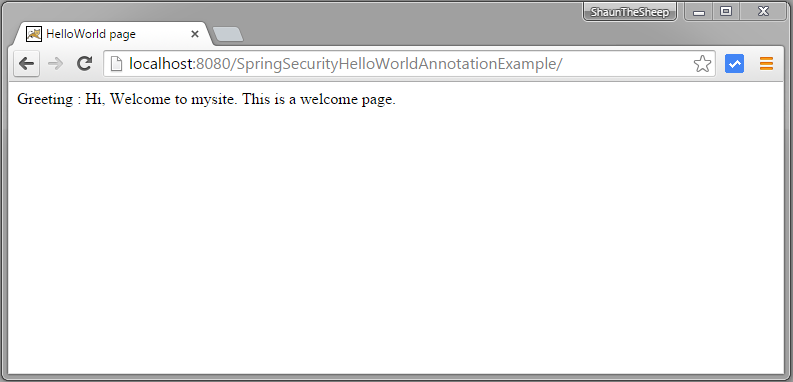
Open browser and goto localhost:8080/SpringSecurityHelloWorldAnnotationExample/
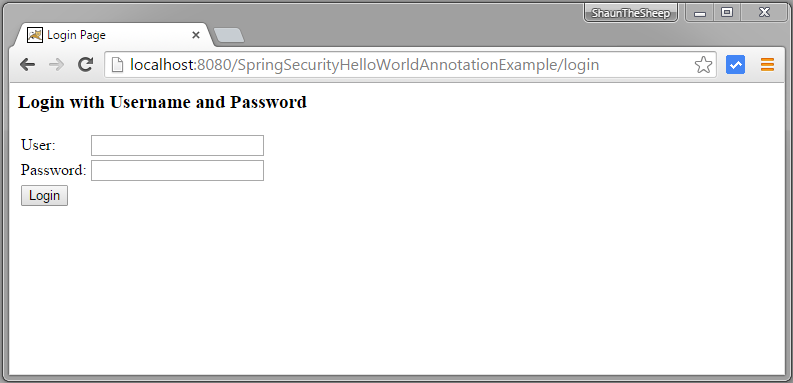
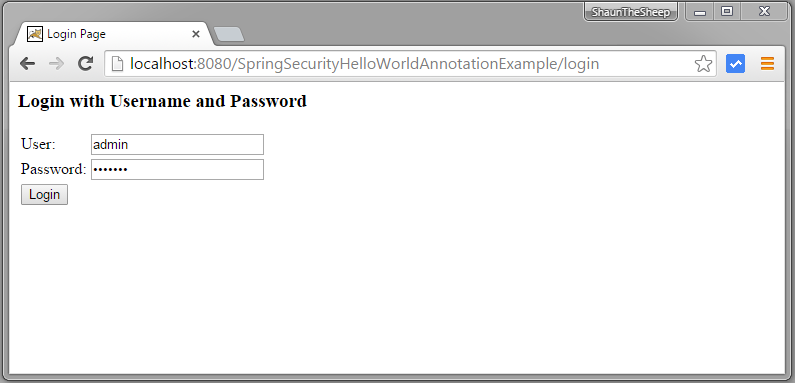
Now try to access admin page on localhost:8080/SpringSecurityHelloWorldAnnotationExample/admin, you will be prompted for login.
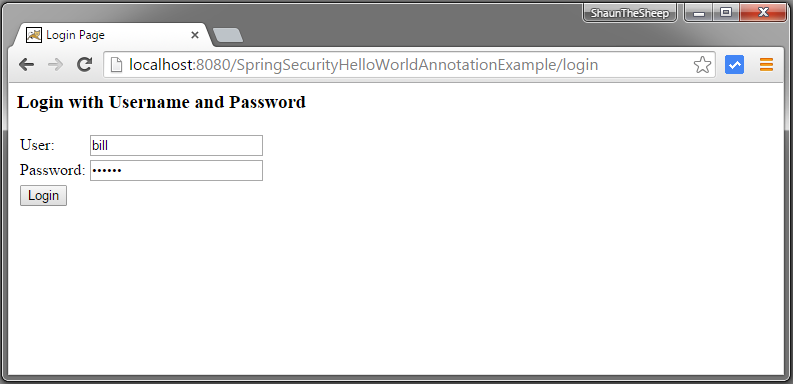
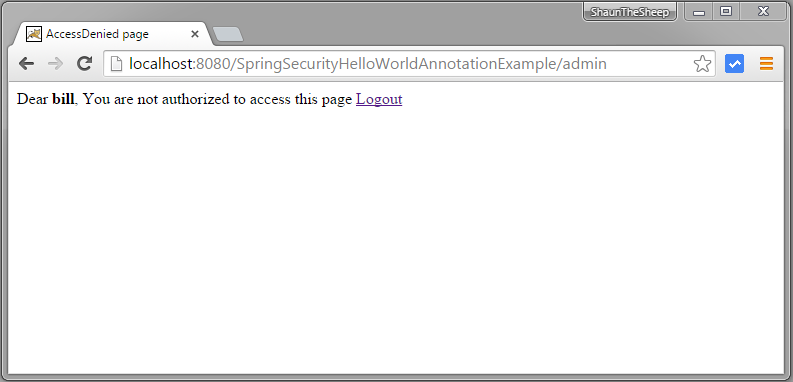
Provide credentials of a ‘USER’ role.
Submit, you will see AccessDenied Page
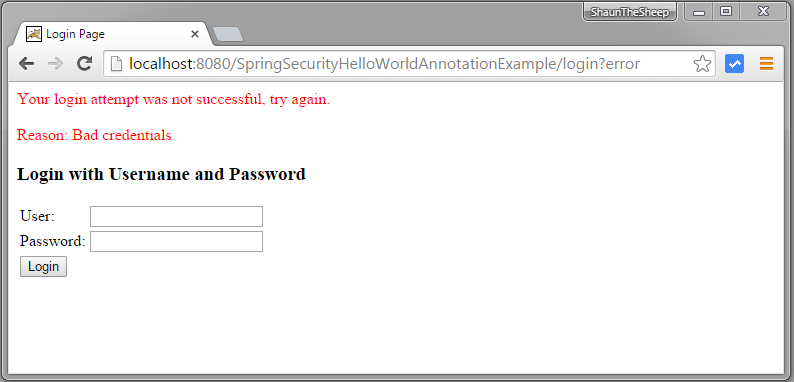
Now logout and try to access admin page again
Provide wrong password
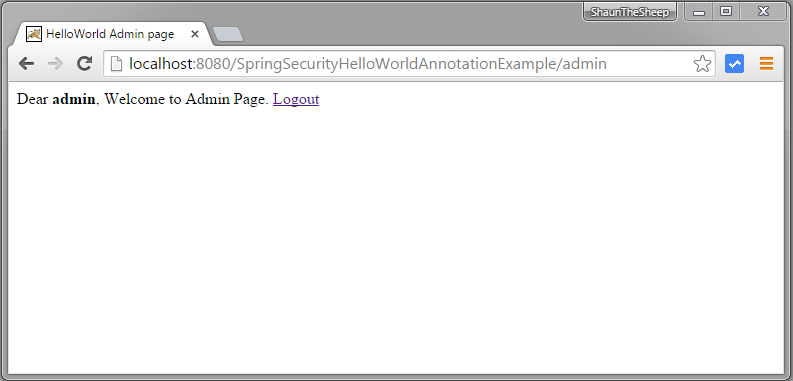
Provide proper admin role credentials and login
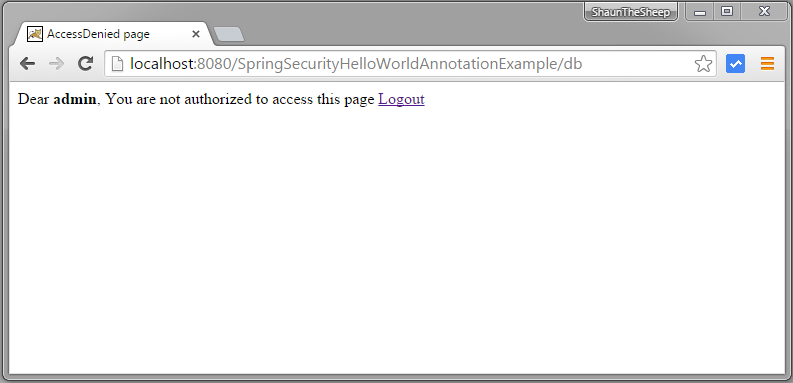
Now try to access db page on localhost:8080/SpringSecurityHelloWorldAnnotationExample/db, you will get AccessDenied page.
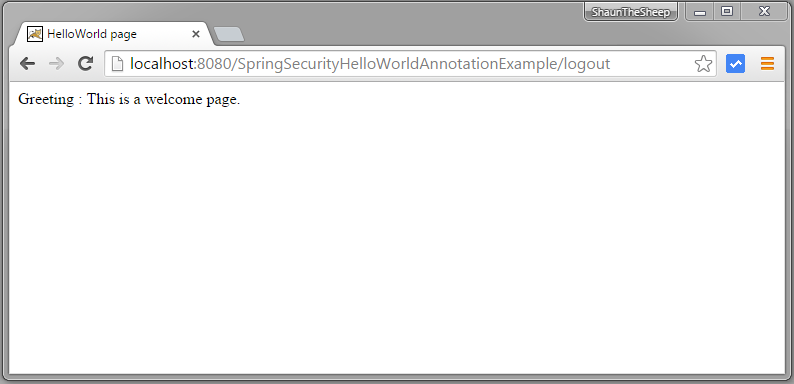
Logout, you will be back at home page.
That’s it for the basic introduction. Next post shows you how we can use our own custom login form iso spring’s auto-generated login form.
Download Source Code
References
If you like tutorials on this site, why not take a step further and connect me on Facebook , Google Plus & Twitter as well? I would love to hear your thoughts on these articles, it will help improve further our learning process.