This tutorial shows Spring 4 Hello world Annotation example using Spring Annotation (aka javaConfig) configuration, explains Spring 4 basic concepts & usage. XML configuration too is provided as well for side-by-side comparison. We will be creating a Maven based project using Spring 4.0.6.RELEASE. Let’s get going.
- Spring Boot+AngularJS+Spring Data+Hibernate+MySQL CRUD App
- Spring Boot REST API Tutorial
- Spring Boot WAR deployment example
- Spring Boot Introduction + Hello World Example
- Secure Spring REST API using OAuth2
- AngularJS+Spring Security using Basic Authentication
- Secure Spring REST API using Basic Authentication
- Spring 4 Cache Tutorial with EhCache
- Spring 4 Caching Annotations Tutorial
- Spring 4 MVC+JPA2+Hibernate Many-to-many Example
- Spring 4 Email Template Library Example
- Spring 4 Email With Attachment Tutorial
- Spring 4 Email Integration Tutorial
- AngularJS Hello World Example
- Spring MVC 4+JMS+ActiveMQ Integration Example
- Spring 4+JMS+ActiveMQ @JmsLister @EnableJms Example
- Spring 4+JMS+ActiveMQ Integration Example
- Spring MVC 4 HelloWorld – XML Example
- Spring MVC 4+AngularJS Example
- Spring 4 MVC HelloWorld – Annotation/JavaConfig Example
- Spring Security 4 Hello World Annotation+XML Example
- Hibernate MySQL Maven Hello World Example (Annotation)
- TestNG Hello World Example
- JAXB2 Helloworld Example
- Spring MVC 4+Hibernate 4+MySQL+Maven integration example
- Spring Batch- Read a CSV file and write to an XML file
Following technologies being used:
- Spring 4.0.6.RELEASE
- Maven 3
- JDK 1.6
- Eclipse JUNO Service Release 2
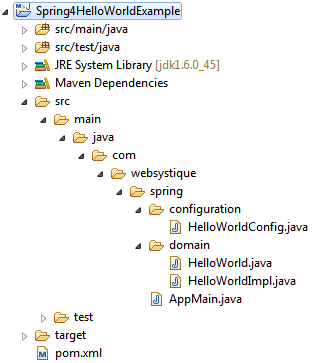
Project directory structure
Following will be the final project directory structure for this example:

For details on how to create a maven project, Our Maven tutorial contains step-by step instruction to help you achieve that.
Let’s add the content as shown in above directory structure.
Step 1: Provide Spring dependencies in Maven pom.xml
Being a maven based project, we will provide all required dependencies via Maven pom.xml.
<project xmlns="http://maven.apache.org/POM/4.0.0" xmlns:xsi="http://www.w3.org/2001/XMLSchema-instance"
  xsi:schemaLocation="http://maven.apache.org/POM/4.0.0 http://maven.apache.org/xsd/maven-4.0.0.xsd">

	<modelVersion>4.0.0</modelVersion>
  	<groupId>com.websystique.spring</groupId>
  	<artifactId>Spring4HelloWorldExample</artifactId>
  	<version>1.0.0</version>
  	<packaging>jar</packaging>

  	<name>Spring4HelloWorldExample</name>

 	<properties>
		<springframework.version>4.0.6.RELEASE</springframework.version>
	</properties>

	<dependencies>
		<dependency>
			<groupId>org.springframework</groupId>
			<artifactId>spring-core</artifactId>
			<version>${springframework.version}</version>
		</dependency>
		<dependency>
			<groupId>org.springframework</groupId>
			<artifactId>spring-context</artifactId>
			<version>${springframework.version}</version>
		</dependency>
  	</dependencies>
	<build>
		<pluginManagement>
			<plugins>
				<plugin>
					<groupId>org.apache.maven.plugins</groupId>
					<artifactId>maven-compiler-plugin</artifactId>
					<version>3.2</version>
					<configuration>
						<source>1.6</source>
						<target>1.6</target>
					</configuration>
				</plugin>
			</plugins>
		</pluginManagement>
	</build>

</project>
We only need Spring core and Spring context dependencies to work with this example. Annotation used in this example belongs to spring-context.
Step 2: Create a POJO class
Spring promotes loose coupling and coding to interfaces. Create a POJO interface and it’s implementation.This POJO will act as spring bean.
package com.websystique.spring.domain;

public interface HelloWorld {

	void sayHello(String name);
}
package com.websystique.spring.domain;

public class HelloWorldImpl implements HelloWorld{

	public void sayHello(String name) {
		System.out.println("Hello "+name);
	}

}
Step 3: Create Spring Configuration Class
Spring configuration class contains bean definitions your application will need. @Configuration declares a class as a Spring Configuration class which can contain @Bean annotated methods generating bean definitions managed by Spring container.
package com.websystique.spring.configuration;

import org.springframework.context.annotation.Bean;
import org.springframework.context.annotation.Configuration;
import org.springframework.context.annotation.Description;

@Configuration
public class HelloWorldConfig {

	@Bean(name="helloWorldBean")
	@Description("This is a sample HelloWorld Bean")
	public HelloWorld helloWorld() {
		return new HelloWorldImpl();
	}

}
@Description is a new annotation introduced in Spring 4 for providing a textual description of the bean which can be useful for monitoring purpose. In this particular example although, it is not making any difference.
Above configuration is same as below Spring XML representaiton(let’s name it helloworld-config.xml):
<beans xmlns="http://www.springframework.org/schema/beans"
	xmlns:xsi="http://www.w3.org/2001/XMLSchema-instance"
	xsi:schemaLocation="http://www.springframework.org/schema/beans http://www.springframework.org/schema/beans/spring-beans-4.0.xsd">

	<bean id="helloWorldBean" class="com.websystique.spring.domain.HelloWorldImpl">

</beans>
Step 4: Create Main to run as Java Application
package com.websystique.spring;

import org.springframework.context.annotation.AnnotationConfigApplicationContext;
import org.springframework.context.support.AbstractApplicationContext;

import com.websystique.spring.configuration.HelloWorldConfig;
import com.websystique.spring.domain.HelloWorld;

public class AppMain {

	public static void main(String args[]) {
		AbstractApplicationContext context = new AnnotationConfigApplicationContext(HelloWorldConfig.class);
		HelloWorld bean = (HelloWorld) context.getBean("helloWorldBean");
		bean.sayHello("Spring 4");
		context.close();
	}

}
AnnotationConfigApplicationContext creates Spring Application Context accepting input as our configuration class annotated with @Configuration, registering all the beans generated by the configuration class in Spring runtime. Once we got the context configured, we can use getBean method to fetch a specific bean from Spring application context and perform some action on that
HelloWorld bean = (HelloWorld) context.getBean("helloWorldBean");
bean.sayHello("Spring 4");
Run above program as Java Application, you should see following output
Hello Spring 4
That’s it. For XML based configuration, above main class can be written as follows:
package com.websystique.spring;

import org.springframework.context.support.AbstractApplicationContext;
import org.springframework.context.support.ClassPathXmlApplicationContext;

import com.websystique.spring.domain.HelloWorld;

public class AppMain {

	public static void main(String args[]) {
		AbstractApplicationContext context = new ClassPathXmlApplicationContext("helloworld-config.xml");
		HelloWorld bean = (HelloWorld) context.getBean("helloWorldBean");
		bean.sayHello("Spring 4");
		context.close();

	}

}
helloworld-config.xml is the file we discussed in step 3 created somewhere in project classpath (/src/main/resources e.g).
In the next post we will see an example of Spring bean auto-detection , feature that helps automatically find the beans in application context with help of Spring annotations, without need of declaring them as Beans in configuration class.
Download Source Code
References
If you like tutorials on this site, why not take a step further and connect me on Facebook , Google Plus & Twitter as well? I would love to hear your thoughts on these articles, it will help improve further our learning process.