Spring provides first class support for developing REST services. In this article, we will be developing a Spring 4 MVC based RESTful JSON service & RESTful XML service using Spring 4 @RestController annotation. Spring, behind the scenes, uses HttpMessageConverters to convert the response into desired format [ JSON/XML/etc..] based on certain libraries available on the classpath and optionally, Accept Headers in request.
In order to serve JSON, we will be using Jackson library [jackson-databind.jar]. For XML, we will use Jackson XML extension [jackson-dataformat-xml.jar]. Mere presence of these libraries in classpath will trigger Spring to convert the output in required format. Additionally, We will go a step further by annotating the domain class with JAXB annotations to support XML in case Jackson’s XML extension library is not available for some reason.
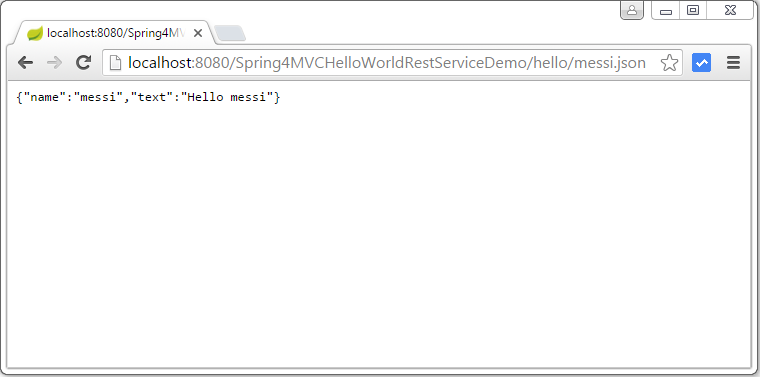
Note: If you are sending the request by just typing the URL in browser, you may add the suffix [.xml/.json] which help spring to determine the type of content to be served.
In case you want to dive bit deeper in details, have a look at Spring MVC 4 RESTFul Web Services CRUD Example+RestTemplate post. Let’s get going.
- Spring Boot+AngularJS+Spring Data+Hibernate+MySQL CRUD App
- Spring Boot REST API Tutorial
- Spring Boot WAR deployment example
- Secure Spring REST API using OAuth2
- Spring Boot Introduction + Hello World Example
- AngularJS+Spring Security using Basic Authentication
- Secure Spring REST API using Basic Authentication
- Spring 4 MVC+JPA2+Hibernate Many-to-many Example
- Spring 4 Caching Annotations Tutorial
- Spring 4 Cache Tutorial with EhCache
- Spring 4 Email With Attachment Tutorial
- Spring 4 Email Template Library Example
- Spring 4 Email Integration Tutorial
- Spring MVC 4+JMS+ActiveMQ Integration Example
- Spring 4+JMS+ActiveMQ @JmsLister @EnableJms Example
- Spring 4+JMS+ActiveMQ Integration Example
- Spring MVC 4+Apache Tiles 3 Integration Example
- Spring MVC 4+Spring Security 4 + Hibernate Integration Example
- Spring MVC 4+AngularJS Example
- Spring MVC 4+AngularJS Routing with ngRoute Example
- Spring MVC 4+AngularJS Routing with UI-Router Example
- Spring MVC 4 RESTFul Web Services CRUD Example with Full REST support + RestTemplate
- Spring MVC @RequestBody, @ResponseBody,HttpMessageConverters Example
Following technologies being used:
- Spring 4.3.0.RELEASE
- jackson-databind 2.7.5
- jackson-dataformat-xml 2.7.5
- Maven 3
- JDK 1.7
- Tomcat 8.0.21
- Eclipse MARS.1
Let’s begin.
Step 1: Create the directory structure
Post Creating a maven web project with eclipse contains step-by-step instruction to create a maven project with eclipse.
Following will be the final project structure:
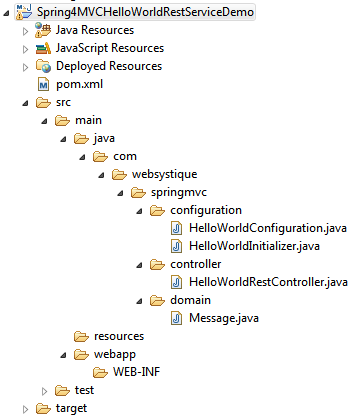
We will be using Spring Java configuration with no xml. Now let’s add/update the content mentioned in above project structure.
Step 2: Update pom.xml with required dependencies
<?xml version="1.0"?>
<project
	xsi:schemaLocation="http://maven.apache.org/POM/4.0.0 http://maven.apache.org/xsd/maven-4.0.0.xsd"
	xmlns="http://maven.apache.org/POM/4.0.0" xmlns:xsi="http://www.w3.org/2001/XMLSchema-instance">

	<modelVersion>4.0.0</modelVersion>
	<groupId>com.websystique.springmvc</groupId>
	<artifactId>Spring4MVCHelloWorldRestServiceDemo</artifactId>
	<packaging>war</packaging>
	<version>1.0.0</version>
	<name>Spring4MVCHelloWorldRestServiceDemo Maven Webapp</name>

	<properties>
		<springframework.version>4.3.0.RELEASE</springframework.version>
		<jackson.library>2.7.5</jackson.library>
	</properties>

	<dependencies>
		<dependency>
			<groupId>org.springframework</groupId>
			<artifactId>spring-core</artifactId>
			<version>${springframework.version}</version>
		</dependency>
		<dependency>
			<groupId>org.springframework</groupId>
			<artifactId>spring-web</artifactId>
			<version>${springframework.version}</version>
		</dependency>
		<dependency>
			<groupId>org.springframework</groupId>
			<artifactId>spring-webmvc</artifactId>
			<version>${springframework.version}</version>
		</dependency>

		<dependency>
			<groupId>javax.servlet</groupId>
			<artifactId>javax.servlet-api</artifactId>
			<version>3.1.0</version>
		</dependency>
		<dependency>
		    <groupId>com.fasterxml.jackson.core</groupId>
		    <artifactId>jackson-databind</artifactId>
		    <version>${jackson.library}</version>
		</dependency>
		<dependency>
    		<groupId>com.fasterxml.jackson.dataformat</groupId>
    		<artifactId>jackson-dataformat-xml</artifactId>
    		<version>${jackson.library}</version>
		</dependency>
	</dependencies>


	<build>
		<pluginManagement>
			<plugins>
				<plugin>
                    <groupId>org.apache.maven.plugins</groupId>
                    <artifactId>maven-compiler-plugin</artifactId>
                    <version>3.2</version>
                    <configuration>
                        <source>1.7</source>
                        <target>1.7</target>
                    </configuration>
                </plugin>
				<plugin>
					<groupId>org.apache.maven.plugins</groupId>
					<artifactId>maven-war-plugin</artifactId>
					<version>2.4</version>
					<configuration>
						<warSourceDirectory>src/main/webapp</warSourceDirectory>
						<warName>Spring4MVCHelloWorldRestServiceDemo</warName>
						<failOnMissingWebXml>false</failOnMissingWebXml>
					</configuration>
				</plugin>
			</plugins>
		</pluginManagement>

		<finalName>Spring4MVCHelloWorldRestServiceDemo</finalName>
	</build>
</project>
Main dependencies to be noticed here are Jackson library (jackson-databind) which will be used to convert the response data into JSON string, and Jackson XML Extension library (jackson-dataformat-xml) which will help to provide XML converted response. Again, if the jackson-dataformat-xml is not included, only JSON response will be served, unless the domain object is annotated explicitly with JAXB annotations.
Step 3: Add a Pojo/domain object
package com.websystique.springmvc.domain;

public class Message {

	String name;
	String text;

	public Message(String name, String text) {
		this.name = name;
		this.text = text;
	}

	public String getName() {
		return name;
	}

	public String getText() {
		return text;
	}

}
Above object will be returned from controllers and converted by Jackson into JSON format. If the jackson-dataformat-xml is present, then it can also be converted into XML.
Step 4: Add a Controller
Add a controller class under src/main/java with mentioned package as shown below.
package com.websystique.springmvc.controller;
import org.springframework.web.bind.annotation.PathVariable;
import org.springframework.web.bind.annotation.RequestMapping;
import org.springframework.web.bind.annotation.RestController;
import com.websystique.springmvc.domain.Message;
@RestController
public class HelloWorldRestController {
@RequestMapping("/")
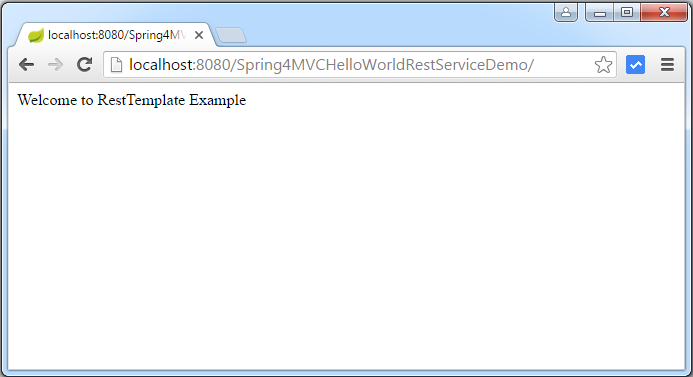
public String welcome() {//Welcome page, non-rest
return "Welcome to RestTemplate Example.";
}
@RequestMapping("/hello/{player}")
public Message message(@PathVariable String player) {//REST Endpoint.
Message msg = new Message(player, "Hello " + player);
return msg;
}
}
@PathVariable indicates that this parameter will be bound to variable in URI template. More interesting thing to note here is that here we are using @RestController annotation, which marks this class as a controller where every method returns a domain object/pojo instead of a view. It means that we are no more using view-resolvers, we are no more directly sending the html in response but we are sending domain object converted into format understood by the consumers. In our case, due to jackson library included in class path, the Message object will be converted into JSON format[ or in XML if either the jackson-dataformat-xml.jar is present in classpath or Model class i annotated with JAXB annotations].
Step 5: Add Configuration Class
package com.websystique.springmvc.configuration;

import org.springframework.context.annotation.ComponentScan;
import org.springframework.context.annotation.Configuration;
import org.springframework.web.servlet.config.annotation.EnableWebMvc;

@Configuration
@EnableWebMvc
@ComponentScan(basePackages = "com.websystique.springmvc")
public class HelloWorldConfiguration {


}
Here this class is mainly providing the component-scanning and annotation support.Note that we don’t have any view-resolvers configured as we don’t need one in Rest case.
Step 6: Add Initialization class
Add an initializer class as shown below(which in this case acts as replacement of any spring configuration defined in web.xml). During Servlet 3.0 Container startup, this class will be loaded and instantiated.
package com.websystique.springmvc.configuration;

import org.springframework.web.servlet.support.AbstractAnnotationConfigDispatcherServletInitializer;

public class HelloWorldInitializer extends AbstractAnnotationConfigDispatcherServletInitializer {

	@Override
	protected Class<?>[] getRootConfigClasses() {
		return new Class[] { HelloWorldConfiguration.class };
	}

	@Override
	protected Class<?>[] getServletConfigClasses() {
		return null;
	}

	@Override
	protected String[] getServletMappings() {
		return new String[] { "/" };
	}

}
Step 7: Build and Deploy the application
Now build the war (either by eclipse using m2e plugin) or via maven command line( mvn clean install). Deploy the war to a Servlet 3.x container . Since here i am using Tomcat, i will simply put this war file into tomcat webapps folder and click on startup.bat inside tomcat bin directory.
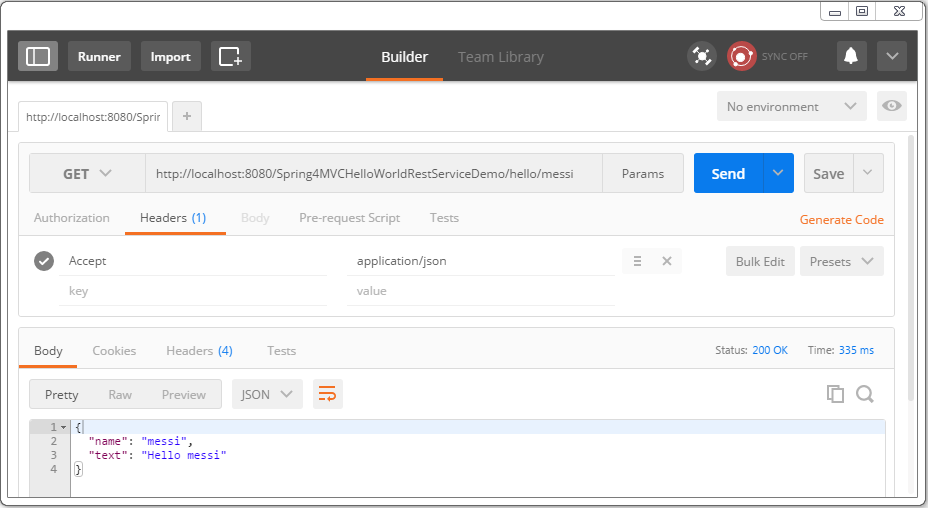
In order to test it, you can use either the browser or a true-client.POSTMAN is a nice tool to test your REST Endpoints as in a real scenario. Advantage of Postman is that you can send the “Accept” header along with request which will then be used by Spring while sending the response in required format. With browsers it is not so straight-forward to send the “Accept” Header but you can suffix the URL with format[.json/.xml] to get similar results.
Let’s start with the browser.
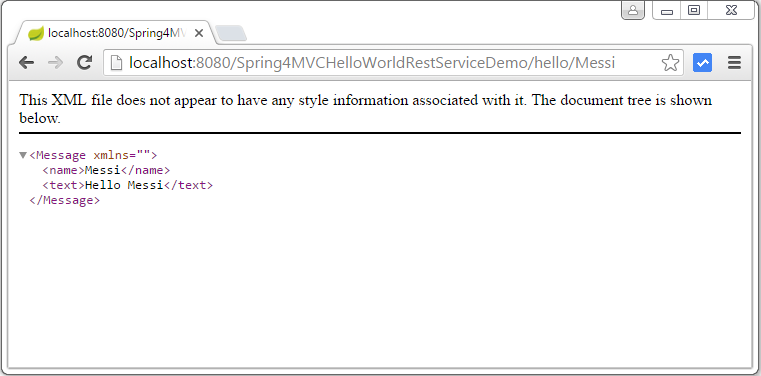
Now let’s access the REST Endpoint. Please note that since we have included the jackson-dataformat-xml.jar in classpath, the response you will get will be XML.
If you want Spring to serve JSON response instead, you can either
– remove the jackson-dataformat-xml.jar [comment it in pom.xml, build and deploy it again].
– Or Suffix the URL with .json
Had you redeployed the app with removing the dataformat dependency, you would have seen the following:
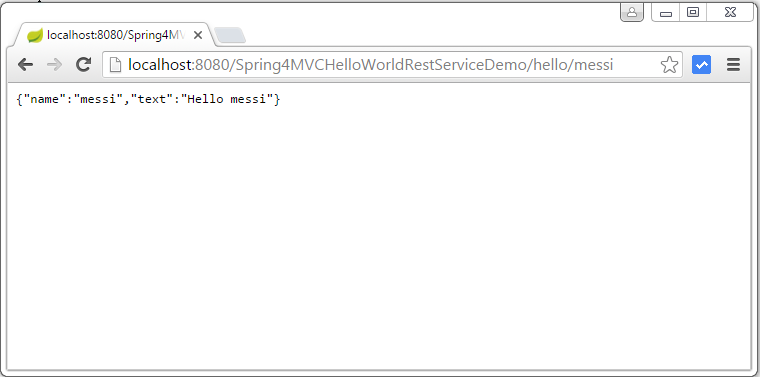
Without redeployment, you can get the same result by suffixing url with format.
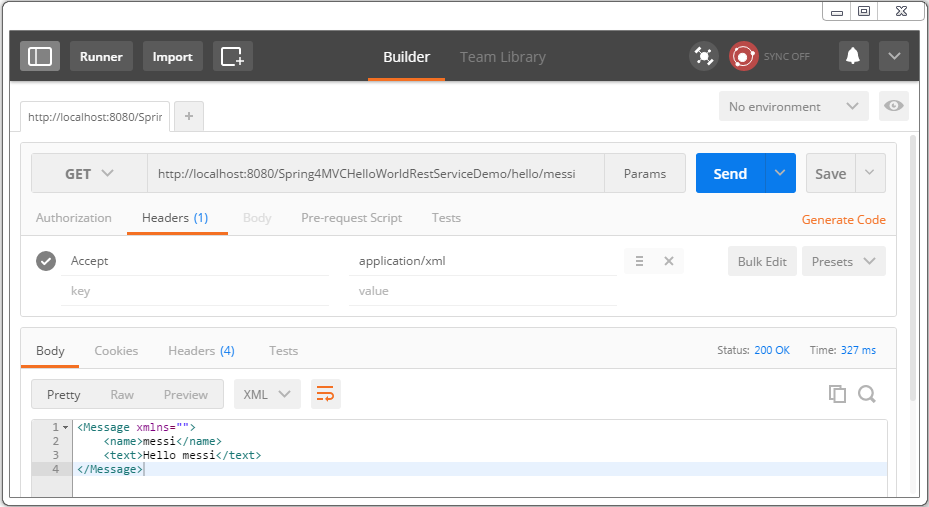
Using Postman:
Set the ‘Accept’ request header [to appliction/json or application/xml ] and send the request. Check the response body:
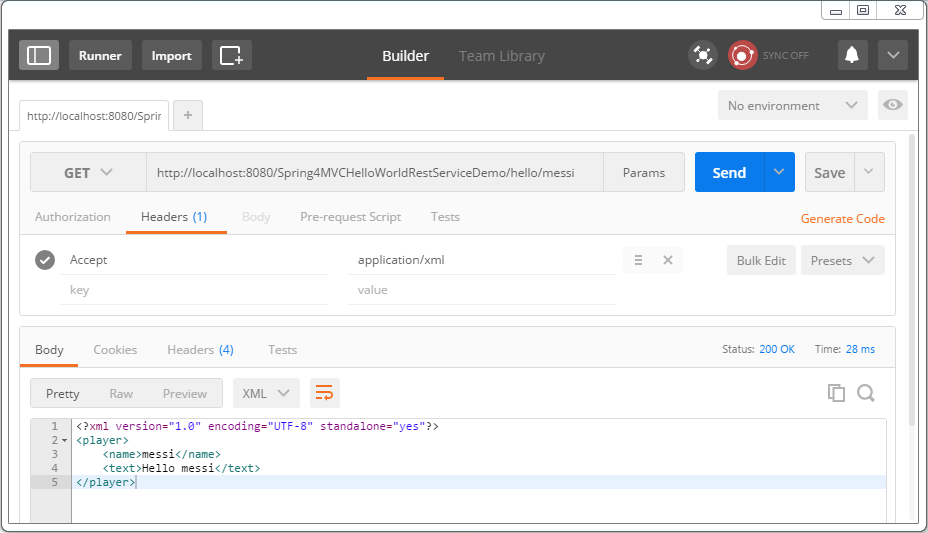
With JAXB
In case jackson-dataformat-xml.jar is not available, and you still want to get the XML response, just by adding JAXB annotations on model class (Message), we can enable XML output support. Below is the demonstration of same :
package com.websystique.springmvc.domain;

import javax.xml.bind.annotation.XmlElement;
import javax.xml.bind.annotation.XmlRootElement;

@XmlRootElement(name = "player")
public class Message {

	String name;
	String text;

	public Message(){

	}

	public Message(String name, String text) {
		this.name = name;
		this.text = text;
	}

	@XmlElement
	public String getName() {
		return name;
	}

	@XmlElement
	public String getText() {
		return text;
	}

}
Remove dataformat dependency[jackson-dataformat-xml.jar], Compile, deploy and run it again, Send the request, you should see following response:

That’s it. Check out Spring MVC 4 RESTFul Web Services CRUD Example+RestTemplate post for more advanced example.
Download Source Code
References
If you like tutorials on this site, why not take a step further and connect me on Facebook , Google Plus & Twitter as well? I would love to hear your thoughts on these articles, it will help improve further our learning process.