In this post we will see how to Schedule a job in Spring using Spring Task Scheduler with XML configuration. Annotation based configuration is explained in Annotation based scheduling configuration post. Let’s get going.
- Spring Boot+AngularJS+Spring Data+Hibernate+MySQL CRUD App
- Spring Boot REST API Tutorial
- Spring Boot WAR deployment example
- Spring Boot Introduction + Hello World Example
- Secure Spring REST API using OAuth2
- AngularJS+Spring Security using Basic Authentication
- Secure Spring REST API using Basic Authentication
- Spring MVC 4+AngularJS Example
- Spring 4 Caching Annotations Tutorial
- Spring 4 Cache Tutorial with EhCache
- Spring 4 MVC+JPA2+Hibernate Many-to-many Example
- Spring 4 Email Template Library Example
- Spring 4 Email With Attachment Tutorial
- Spring MVC 4+JMS+ActiveMQ Integration Example
- Spring 4 Email Integration Tutorial
- Spring 4+JMS+ActiveMQ @JmsLister @EnableJms Example
- Spring 4+JMS+ActiveMQ Integration Example
- Spring MVC 4+Hibernate 4 Many-to-many JSP Example
- Spring MVC 4+Hibernate 4+MySQL+Maven integration example using annotations
- Spring MVC4 FileUpload-Download Hibernate+MySQL Example
- TestNG Mockito Integration Example Stubbing Void Methods
- Maven surefire plugin and TestNG Example
- Spring MVC 4 Form Validation and Resource Handling
Following technologies being used:
- Spring 4.0.6.RELEASE
- Maven 3
- JDK 1.6
- Eclipse JUNO Service Release 2
Project directory structure:
Following will be the final project directory structure for this example:
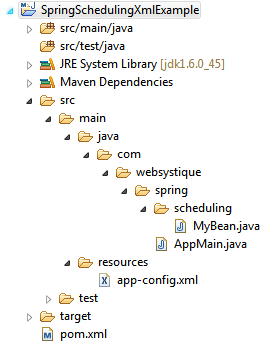
Let’s now add the content mentioned in above structure explaining each in detail.
Step 1: Provide Spring dependencies in Maven pom.xml
<project xmlns="http://maven.apache.org/POM/4.0.0" xmlns:xsi="http://www.w3.org/2001/XMLSchema-instance"
	xsi:schemaLocation="http://maven.apache.org/POM/4.0.0 http://maven.apache.org/xsd/maven-4.0.0.xsd">
	<modelVersion>4.0.0</modelVersion>

	<groupId>com.websystique.spring</groupId>
	<artifactId>SpringSchedulingXmlExample</artifactId>
	<version>1.0.0</version>
	<packaging>jar</packaging>
	<name>SpringSchedulingXmlExample</name>

	<properties>
		<springframework.version>4.0.6.RELEASE</springframework.version>
	</properties>

	<dependencies>
		<dependency>
			<groupId>org.springframework</groupId>
			<artifactId>spring-core</artifactId>
			<version>${springframework.version}</version>
		</dependency>
		<dependency>
			<groupId>org.springframework</groupId>
			<artifactId>spring-context</artifactId>
			<version>${springframework.version}</version>
		</dependency>
	</dependencies>
	<build>
		<pluginManagement>
			<plugins>
				<plugin>
					<groupId>org.apache.maven.plugins</groupId>
					<artifactId>maven-compiler-plugin</artifactId>
					<version>3.2</version>
					<configuration>
						<source>1.6</source>
						<target>1.6</target>
					</configuration>
				</plugin>
			</plugins>
		</pluginManagement>
	</build>

</project>
Step 2: Create Scheduler Task Bean
Scheduler Task bean is ordinary POJO bean whose method will be called via Scheduler.
package com.websystique.spring.scheduling;

import org.springframework.stereotype.Component;

@Component("myBean")
public class MyBean {

	public void printMessage() {
		System.out.println("I am called by Spring scheduler");
	}
}
Note that the method which will be called via scheduler (printMessage in this example) must return void and must not have any parameters. Of course you can inject another bean in above bean to get some external functionality called in printMessage.
Step 3: Configure Spring Scheduling
<?xml version="1.0" encoding="UTF-8"?>
<beans xmlns="http://www.springframework.org/schema/beans"
	xmlns:xsi="http://www.w3.org/2001/XMLSchema-instance" xmlns:context="http://www.springframework.org/schema/context"
	xmlns:task="http://www.springframework.org/schema/task"
	xsi:schemaLocation="http://www.springframework.org/schema/beans http://www.springframework.org/schema/beans/spring-beans-4.0.xsd
        					http://www.springframework.org/schema/context http://www.springframework.org/schema/context/spring-context-4.0.xsd
        					http://www.springframework.org/schema/task http://www.springframework.org/schema/task/spring-task-4.0.xsd">


	<context:component-scan base-package="com.websystique.spring.scheduling" />

	<task:scheduled-tasks scheduler="myScheduler">
		<task:scheduled ref="myBean" method="printMessage" fixed-delay="5000" />
	</task:scheduled-tasks>

	<task:scheduler id="myScheduler"/>

</beans>
Let’s understand each configuration step in detail
Firstly we need to configure a scheduler itself which schedules some tasks to run at some point in the future.
<task:scheduler id="myScheduler"/>
Above configuration creates Scheduler with default thread pool having only single thread. In case you have tasks which can take long time to complete, and are frequent, you can configure thread-pool with specified pool-size to handle each tasks in separate thread.
<task:scheduler id="myScheduler" pool-size="10"/>
Next, we configure the tasks to be scheduled.
	<task:scheduled-tasks scheduler="myScheduler">
		<task:scheduled ref="myBean" method="printMessage" fixed-delay="5000" />
	</task:scheduled-tasks>
task:scheduled defines a new task. Attribute ‘ref’ refers to the bean whose method (referred by attribute ‘method’) will be called on specific time condition. fixed-delay specifies the time in milliseconds between the completion of first task and start of next task.
Here we are saying that myBean.printMessage() will be by scheduler periodically, with 5 seconds delay between completion of first task and start of next task.
Periodicity of scheduler can be defined in other ways as well. For example:
	<task:scheduled-tasks scheduler="myScheduler">
		<task:scheduled ref="myBean" method="printMessage" fixed-delay="5000" initial-delay="1000"/>
		<task:scheduled ref="Bean2" method="method2" fixed-rate="5000" />
		<task:scheduled ref="Bean3" method="method3" cron="*/5 * * * * MON-FRI"/>
	</task:scheduled-tasks>
In above config, we have specified there scheduled tasks with different periodicity.
initial-delay parameter specifies the number of milliseconds to wait before the first execution of the method.
fixed-rate specifies the number of milliseconds between each method start , regardless of how long method takes to complete.
cron provides more fine-grained control on task execution. Here we have configured task3 to run every 5 seconds but only on weekdays.
Step 4: Create Main and Run it
package com.websystique.spring;

import org.springframework.context.support.AbstractApplicationContext;
import org.springframework.context.support.ClassPathXmlApplicationContext;

public class AppMain {

	public static void main(String args[]){
		AbstractApplicationContext context = new ClassPathXmlApplicationContext("app-config.xml");
	}

}
Note that we are not calling any explicit scheduling class or method here. As we have configured the context in app-config.xml, context will be loaded and scheduling will be setup.
Run above program as Java Application, you will see following output
Aug 23, 2014 4:52:27 PM org.springframework.scheduling.concurrent.ThreadPoolTaskScheduler initialize
INFO: Initializing ExecutorService  'myScheduler'
I am called by Spring scheduler
I am called by Spring scheduler
I am called by Spring scheduler
I am called by Spring scheduler
I am called by Spring scheduler
I am called by Spring scheduler
...
You can see that method printMessage of Bean MyBean gets called periodically.
That’s it. In the next tutorial , we will see same example using Annotation based configuration.
Download Source Code
References
If you like tutorials on this site, why not take a step further and connect me on Facebook , Google Plus & Twitter as well? I would love to hear your thoughts on these articles, it will help improve further our learning process.