In this tutorial, we will learn about how to use Hibernate One-To-One Unidirectional Foreign Key association mapping using annotation based configuration.
In One-To-One Unidirectional with Foreign Key association mapping, one table has a foreign key column that references the primary key of associated table.By Unidirectional relationship means only one side navigation is possible (STUDENT to ADDRESS in this example). Let’s get going.

We are discussing an example of Student and Address relationship. A student lives on one Address. And one address can be occupied by only one student.
- Spring Boot+AngularJS+Spring Data+Hibernate+MySQL CRUD App
- Spring Boot REST API Tutorial
- Spring Boot WAR deployment example
- Spring Boot Introduction + Hello World Example
- Secure Spring REST API using OAuth2
- Spring 4 MVC+JPA2+Hibernate Many-to-many Example
- AngularJS+Spring Security using Basic Authentication
- Secure Spring REST API using Basic Authentication
- Spring 4 Caching Annotations Tutorial
- Spring 4 Cache Tutorial with EhCache
- Spring 4 Email Template Library Example
- Spring 4 Email With Attachment Tutorial
- Spring 4 Email Integration Tutorial
- Spring MVC 4+JMS+ActiveMQ Integration Example
- Spring 4+JMS+ActiveMQ @JmsLister @EnableJms Example
- Spring 4+JMS+ActiveMQ Integration Example
- Hibernate One-To-One Unidirectional with Shared Primary Key (Annotation)
- Hibernate One To One Annotation Bidirectional with Shared Primary Key
- Hibernate Many To One Annotation Unidirectional
- Hibernate Many To One Annotation Bidirectional
- Hibernate Many To Many Annotation Unidirectional
- Hibernate Many To Many Annotation Bidirectional
- Spring MVC 4+AngularJS Example
- Spring MVC 4+Hibernate 4+MySQL+Maven integration example
- Spring 4 + Hibernate 4 + MySQL+ Maven Integration example (Annotations+XML)
- Spring Security 4 Hello World Annotation+XML Example
- Spring Batch- MultiResourceItemReader & HibernateItemWriter example
Following technologies being used:
- Hibernate 4.3.6.Final
- MySQL Server 5.6
- Maven 3.1.1
- JDK 1.6
- Eclipse JUNO Service Release 2
Let’s begin.
Step 1: Create required Database Table
Open MySQL terminal / workbench terminal and execute following MySQL script :
create table ADDRESS (
   address_id BIGINT NOT NULL AUTO_INCREMENT,
   street VARCHAR(30) NOT NULL,
   city  VARCHAR(30) NOT NULL,
   country  VARCHAR(30) NOT NULL,
   PRIMARY KEY (address_id)
);

create table STUDENT (
   student_id BIGINT NOT NULL AUTO_INCREMENT,
   home_address_id BIGINT NOT NULL,
   first_name VARCHAR(30) NOT NULL,
   last_name  VARCHAR(30) NOT NULL,
   section    VARCHAR(30) NOT NULL,
   PRIMARY KEY (student_id),
   CONSTRAINT student_address FOREIGN KEY (home_address_id) REFERENCES ADDRESS ( address_id)
);
Here we have first created Address table followed by student table as student table contains a foreign key referring to Address table.
Please visit MySQL installation on Local PC in case you are finding difficulties in setting up MySQL locally.
Step 2: Create project directory structure
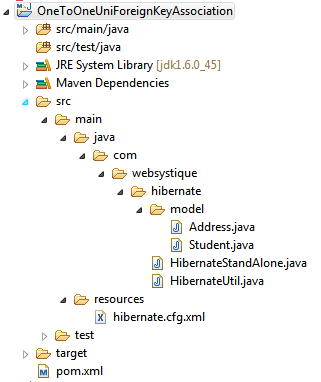
Following will be the final project structure:

Now let’s add/update the content mentioned in above project structure.
Step 3: Update pom.xml to include required Hibernate and MySQL dependency
Following is the updated minimalistic pom.xml
<project xmlns="http://maven.apache.org/POM/4.0.0" xmlns:xsi="http://www.w3.org/2001/XMLSchema-instance"
	xsi:schemaLocation="http://maven.apache.org/POM/4.0.0 http://maven.apache.org/xsd/maven-4.0.0.xsd">
	<modelVersion>4.0.0</modelVersion>

	<groupId>com.websystique.hibernate</groupId>
	<artifactId>OneToOneUniForeignKeyAssociation</artifactId>
	<version>1.0.0</version>
	<packaging>jar</packaging>

	<name>OneToOneUniForeignKeyAssociation</name>

	<properties>
		<hibernate.version>4.3.6.Final</hibernate.version>
		<mysql.connector.version>5.1.31</mysql.connector.version>
	</properties>

	<dependencies>
		<!-- Hibernate -->
		<dependency>
			<groupId>org.hibernate</groupId>
			<artifactId>hibernate-core</artifactId>
			<version>${hibernate.version}</version>
		</dependency>

		<!-- MySQL -->
		<dependency>
			<groupId>mysql</groupId>
			<artifactId>mysql-connector-java</artifactId>
			<version>${mysql.connector.version}</version>
		</dependency>
	</dependencies>
	<build>
		<pluginManagement>
			<plugins>
				<plugin>
					<groupId>org.apache.maven.plugins</groupId>
					<artifactId>maven-compiler-plugin</artifactId>
					<version>3.2</version>
					<configuration>
						<source>1.6</source>
						<target>1.6</target>
					</configuration>
				</plugin>
			</plugins>
		</pluginManagement>
	</build>

</project>
On saving pom.xml with above content, Eclipse will download all the dependencies.
Step 4: Create Model classes
Model class Student & Address are simple POJO class which is annotated with JPA annotations to map it to a database tables(created in step 1).
package com.websystique.hibernate.model;

import javax.persistence.Column;
import javax.persistence.Entity;
import javax.persistence.GeneratedValue;
import javax.persistence.Id;
import javax.persistence.JoinColumn;
import javax.persistence.OneToOne;
import javax.persistence.Table;

@Entity
@Table(name = "STUDENT")
public class Student {

	@Id
	@GeneratedValue
	@Column(name = "STUDENT_ID")
	private long id;

	@Column(name = "FIRST_NAME")
	private String firstName;

	@Column(name = "LAST_NAME")
	private String lastName;

	@Column(name = "SECTION")
	private String section;

	@OneToOne
	@JoinColumn(name="HOME_ADDRESS_ID")
	private Address address;


	public Student() {

	}

	public Student(String firstName, String lastName, String section) {
		this.firstName = firstName;
		this.lastName = lastName;
		this.section = section;
	}

	public long getId() {
		return id;
	}

	public void setId(long id) {
		this.id = id;
	}

	public String getFirstName() {
		return firstName;
	}

	public void setFirstName(String firstName) {
		this.firstName = firstName;
	}

	public String getLastName() {
		return lastName;
	}

	public void setLastName(String lastName) {
		this.lastName = lastName;
	}

	public String getSection() {
		return section;
	}

	public void setSection(String section) {
		this.section = section;
	}

	public Address getAddress() {
		return address;
	}

	public void setAddress(Address address) {
		this.address = address;
	}

	@Override
	public String toString() {
		return "Student [id=" + id + ", firstName=" + firstName + ", lastName="
				+ lastName + ", section=" + section + ", address=" + address
				+ "]";
	}

}
package com.websystique.hibernate.model;

import javax.persistence.Column;
import javax.persistence.Entity;
import javax.persistence.GeneratedValue;
import javax.persistence.Id;
import javax.persistence.Table;

@Entity
@Table(name = "ADDRESS")
public class Address {

	@Id @GeneratedValue
	@Column(name = "ADDRESS_ID")
	private long id;

	@Column(name = "STREET")
	private String street;

	@Column(name = "CITY")
	private String city;

	@Column(name = "COUNTRY")
	private String country;

	public Address() {

	}

	public Address(String street, String city, String country) {
		this.street = street;
		this.city = city;
		this.country = country;
	}

	public long getId() {
		return id;
	}

	public void setId(long id) {
		this.id = id;
	}

	public String getStreet() {
		return street;
	}

	public void setStreet(String street) {
		this.street = street;
	}

	public String getCity() {
		return city;
	}

	public void setCity(String city) {
		this.city = city;
	}

	public String getCountry() {
		return country;
	}

	public void setCountry(String country) {
		this.country = country;
	}

	@Override
	public String toString() {
		return "Address [id=" + id + ", street=" + street + ", city=" + city
				+ ", country=" + country + "]";
	}

}
Difference between Student class define here and in the previous tutorial(shared primary key) is that we have replaced @PrimaryKeyJoinColumn with @joinColumn which maps on a seperate column in database but will still point to primary key of address table, thanks to the foreign key constrained we have declared during table creation time. Address class is completly independent of Student table.
Step 5: Create Hibernate configuration file
We need to inform hibernate about how to connect to database, which database dialect we will be using so that hibernate can generate the instruction specific to that database.
We define all these information in hibernate.cfg.xml. Create this file with below content and save it in src/main/resources folder.
<?xml version="1.0" encoding="utf-8"?>
<!DOCTYPE hibernate-configuration SYSTEM "http://www.hibernate.org/dtd/hibernate-configuration-3.0.dtd">


<hibernate-configuration>
    <session-factory>
        <property name="hibernate.dialect">org.hibernate.dialect.MySQLDialect</property>
        <property name="hibernate.connection.driver_class">com.mysql.jdbc.Driver</property>
        <property name="hibernate.connection.username">myuser</property>
        <property name="hibernate.connection.password">mypassword</property>
        <property name="hibernate.connection.url">jdbc:mysql://localhost:3306/websystique</property>
        <property name="show_sql">true</property>
        <property name="format_sql">false</property>
        <mapping class="com.websystique.hibernate.model.Student"/>
        <mapping class="com.websystique.hibernate.model.Address"/>
    </session-factory>
</hibernate-configuration>
dialect property informs hibernate to generate database specific (MySQL here) instructions. driver_class defines the database specific driver hibernate will use to make connection. next 3 properties corresponds to database connection. show_sql will instruct hibernate to log all the statements on console and format_sql instructs it to display properly formatted sql. mapping tag instructs hibernate to perform mapping for classes refereed by class attribute.
Step 6: Create Hibernate Utility class
This class is well-known in hibernate community, and used for configuring hibernate on startup and managing session factory.
package com.websystique.hibernate;

import org.hibernate.SessionFactory;
import org.hibernate.cfg.AnnotationConfiguration;

public class HibernateUtil {

	private static final SessionFactory sessionFactory;

	static{
		try{
			sessionFactory = new AnnotationConfiguration().configure().buildSessionFactory();

		}catch (Throwable ex) {
			System.err.println("Session Factory could not be created." + ex);
			throw new ExceptionInInitializerError(ex);
		}
	}

	public static SessionFactory getSessionFactory() {
		return sessionFactory;
	}

}
Step 7: Create executable class to Run and perform operations on Database
package com.websystique.hibernate;

import java.util.List;

import org.hibernate.Session;

import com.websystique.hibernate.model.Address;
import com.websystique.hibernate.model.Student;

public class HibernateStandAlone {

	@SuppressWarnings("unchecked")
	public static void main(String[] args) {

		Student student = new Student("Sam","Disilva","Maths");
		Address address = new Address("10 Silver street","NYC","USA");


		Session session = HibernateUtil.getSessionFactory().openSession();
		session.beginTransaction();

		session.persist(address);
		student.setAddress(address);
		session.persist(student);

		List<Student> students = (List<Student>)session.createQuery("from Student ").list();
		for(Student s: students){
			System.out.println("Details : "+s);
		}

		session.getTransaction().commit();
		session.close();
	}

}
Here we have persisted Address class firstly in order to meet foreign key constraint(not null), then we have set student’s address property followed by persisting student.
Execute above class as Java application. You will see following output
Hibernate: insert into ADDRESS (CITY, COUNTRY, STREET) values (?, ?, ?)
Hibernate: insert into STUDENT (HOME_ADDRESS_ID, FIRST_NAME, LAST_NAME, SECTION) values (?, ?, ?, ?)
Hibernate: select student0_.STUDENT_ID as STUDENT_1_1_, student0_.HOME_ADDRESS_ID as HOME_ADD5_1_, student0_.FIRST_NAME as FIRST_NA2_1_, student0_.LAST_NAME as LAST_NAM3_1_, student0_.SECTION as SECTION4_1_ from STUDENT student0_
Details : Student [id=1, firstName=Sam, lastName=Disilva, section=Maths, address=Address [id=1, street=10 Silver street, city=NYC, country=USA]]
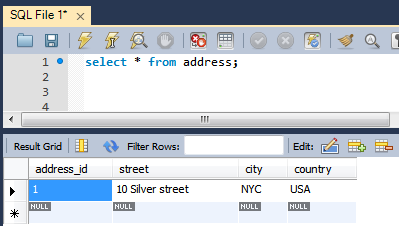
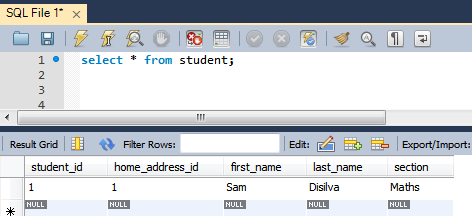
Below is the snapshot of MySQL database after execution of above program.


That’s it.
Download Source Code
References
If you like tutorials on this site, why not take a step further and connect me on Facebook , Google Plus & Twitter as well? I would love to hear your thoughts on these articles, it will help improve further our learning process.