In this post we will learn about TestNG Suite test. A Suite in TestNG is commonly represented by one XML file, usually named as testng.xml. <suite> tag is the first tag in XML file which represents a suite and it may contains one or more <test> tags. Each <test> tag in turn may contain one or more <classes>, <packages>, <groups> tags and more. Let’s begin.
When TestNG runs a suite, it basically reads the content of this file and executes the tests based on conditions defined in this XML file.
Let’s take following testng.xml for example:
<?xml version="1.0" encoding="UTF-8"?>
<!DOCTYPE suite SYSTEM "http://testng.org/testng-1.0.dtd" >
<suite name="tests" parallel="tests" thread-count="2">

    <test name="front-end">
        <packages>
            <package name="com.websystique.testng.frontend.*" />
        </packages>
    </test>

    <test name="back-end">
        <packages>
            <package name="com.websystique.testng.backend.*" />
        </packages>
    </test>

</suite>
Above Suite defines two <test> tags namely ‘front-end’ & ‘back-end’. Each <test> tag contains packages with specific package names. When TestNG will run this suite, it will look into all these packages to look for test classes and methods to run. In this particular example, it also says that front-end and back-end tests can be run in parallel. Note that tests within one category (front-end e.g.) will still be executed in single thread.
More Suite Examples
1) Execute all tests :
<?xml version="1.0" encoding="UTF-8"?>
<!DOCTYPE suite SYSTEM "http://testng.org/testng-1.0.dtd" >
<suite name="tests">

    <test name="full">
        <packages>
            <package name="com.websystique.*" />
        </packages>
    </test>

</suite>
2) Execute all tests but not the ones within group ui :
<?xml version="1.0" encoding="UTF-8"?>
<!DOCTYPE suite SYSTEM "http://testng.org/testng-1.0.dtd" >
<suite name="tests">

    <test name="backend">
        <groups>
            <run>
                <exclude name="ui" />
            </run>
        </groups>
        <packages>
            <package name="com.websystique.*" />
        </packages>
    </test>

</suite>
3) Execute all tests but not the ones within group ui [using classes instead of packages]:
<?xml version="1.0" encoding="UTF-8"?>
<!DOCTYPE suite SYSTEM "http://testng.org/testng-1.0.dtd" >
<suite name="tests">

    <test name="backend">
        <groups>
            <run>
                <exclude name="ui" />
            </run>
        </groups>
        <classes>
            <class name="com.websystique.testng.TestCalculator" />
        </classes>
    </test>

</suite>
Even more information on testng.xml is available on Maven Surefire Plugin & TestNG post.
suite & test tag level annotations:
Following are the annotations used at <suite> and <test> level:
@BeforeSuite, @AfterSuite
Method annotated with @BeforeSuite is executed only once, before any of the tests method execution in a given suite. It is an ideal place to do some setup/initialization for environments which will be shared among all tests of this suite. Method annotated with @AfterSuite gets executed only once for a suite only after all of the tests of that suite finished execution.
@BeforeTest, @AfterTest
Method annotated with @BeforeTest is executed only once, before any of the tests method execution in a given <test> tags which may contain multiple classes and packages. It is an ideal place to do some setup/initialization for environments which will be shared among all tests defined in this <test> tag. Method annotated with @AfterTest gets executed only once for a given <test> tag, and only after all of the tests of that <test> tag finished execution.
Complete Example
Let’s create following testNG.xml ( preferably at src/test/resources/testNG.xml):
<?xml version="1.0" encoding="UTF-8"?>
<!DOCTYPE suite SYSTEM "http://testng.org/testng-1.0.dtd" >
<suite name="fulltests">

    <test name="front-end">
        <classes>
            <class name="com.websystique.testng.TestUI" />
        </classes>
    </test>

    <test name="back-end">
        <classes>
            <class name="com.websystique.testng.TestSecurity" />
            <class name="com.websystique.testng.TestDataBase" />
            <class name="com.websystique.testng.TestBackendConfig" />
        </classes>
    </test>

</suite>
What we see here that there are two <test> tags categorized as front-end & back-end. Front-end contains only one class and the back-end contains three classes. So it makes sense to define one @BeforeTest/@AfterTest Methods pair in front-end <test> tag and another @BeforeTest/@AfterTest methods pair in back-end <test> tag to provide separate setup for these two categories.
About @BeforeSuite & @AfterSuite, we can define them in any of the 4 classes as all 4 belongs to one suite only.
Let’s create the classes mentioned in above xml:
package com.websystique.testng;

import org.testng.annotations.AfterTest;
import org.testng.annotations.BeforeTest;
import org.testng.annotations.Test;

public class TestUI {

	@BeforeTest
	public void beforeTest() {
		System.out.println("@BeforeTest");
	}

	@AfterTest
	public void afterTest() {
		System.out.println("@AfterTest\n");
	}

	@Test(groups= "ui")
	public void openConfirmationDialog() {
		System.out.println("openConfirmationDialog()");
	}

	@Test(groups= "ui")
	public void openFileDialog() {
		System.out.println("openFileDialog()");
	}

}
package com.websystique.testng;

import org.testng.annotations.Test;

public class TestSecurity {

	@Test(groups= "security")
	public void accessHomePage() {
		System.out.println("accessHomePage()");
	}

	@Test(groups= "security")
	public void accessAdminPage() {
		System.out.println("accessAdminPage()");
	}

}
package com.websystique.testng;

import org.testng.annotations.Test;

public class TestDataBase {

	@Test(groups= "database")
	public void testInsert(){
		System.out.println("testInsert()");
	}

	@Test(groups= "database")
	public void testUpdate(){
		System.out.println("testUpdate()");
	}

	@Test(groups= "database")
	public void testDelete(){
		System.out.println("testDelete()");
	}

}
package com.websystique.testng;

import org.testng.annotations.AfterSuite;
import org.testng.annotations.AfterTest;
import org.testng.annotations.BeforeSuite;
import org.testng.annotations.BeforeTest;

public class TestBackendConfig {

	@BeforeSuite
	public void beforeSuite() {
		System.out.println("@BeforeSuite\n");
	}

	@AfterSuite
	public void afterSuite() {
		System.out.println("@AfterSuite");
	}

	@BeforeTest
	public void beforeTest() {
		System.out.println("@BeforeTest");
	}

	@AfterTest
	public void afterTest() {
		System.out.println("@AfterTest\n");
	}

}
It does make sense to define the @BeforeTest/@AfterTest methods in a separate config class for each <test> tag containing more than one class. It makes things manageable as @BeforeTest and @AfterTest logic is common among all test methods of all classes/packages defined under that <test> tag. Otherwise whenever you might need to change the logic of @BeforeTest, @AfterTest, you need to look in all classes to find one which contain these methods. For @BeforeSuite/@AfterSuite, you can place them anywhere. Usually, the config class of one of the <test> tag is an ideal candidate for these methods.
Right click testng.xml, Run As–>TestNG Suites. Or perform mvn clean test
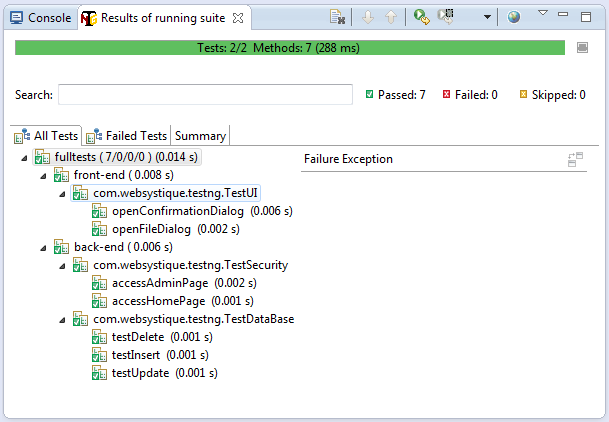
Following is the result of execution:
@BeforeSuite

@BeforeTest
openConfirmationDialog()
openFileDialog()
@AfterTest

@BeforeTest
accessAdminPage()
accessHomePage()
testDelete()
testInsert()
testUpdate()
@AfterTest

@AfterSuite

===============================================
fulltests
Total tests run: 7, Failures: 0, Skips: 0
===============================================
That’s it.
References
If you like tutorials on this site, why not take a step further and connect me on Facebook , Google Plus & Twitter as well? I would love to hear your thoughts on these articles, it will help improve further our learning process.