In this post we will learn about how to use Spring Batch to read an XML file using StaxEventItemReader and write to a Flat CSV file using FlatFileItemWriter. We will also witness the usage of JobExecutionListener and itemProcessor. Let’s get going.
- Spring Boot+AngularJS+Spring Data+Hibernate+MySQL CRUD App
- Spring Boot REST API Tutorial
- Spring Boot WAR deployment example
- Secure Spring REST API using OAuth2
- Spring Boot Introduction + Hello World Example
- AngularJS+Spring Security using Basic Authentication
- Secure Spring REST API using Basic Authentication
- Spring 4 Caching Annotations Tutorial
- Spring 4 Cache Tutorial with EhCache
- Spring 4 MVC+JPA2+Hibernate Many-to-many Example
- Spring 4 Email Template Library Example
- Spring 4 Email With Attachment Tutorial
- Spring 4 Email Integration Tutorial
- Spring MVC 4+JMS+ActiveMQ Integration Example
- Spring 4+JMS+ActiveMQ @JmsLister @EnableJms Example
- Spring 4+JMS+ActiveMQ Integration Example
- Spring MVC 4+Apache Tiles 3 Integration Example
- Spring MVC 4+Spring Security 4 + Hibernate Integration Example
- Spring MVC 4+AngularJS Example
- Spring MVC 4+AngularJS Routing with UI-Router Example
- Spring MVC 4 HelloWorld – Annotation/JavaConfig Example
- Spring MVC 4+Hibernate 4+MySQL+Maven integration example
- Spring 4 Hello World Example
- Spring Security 4 Hello World Annotation+XML Example
- Hibernate MySQL Maven Hello World Example (Annotation)
- TestNG Hello World Example
- JAXB2 Helloworld Example
- Spring Batch- Read a CSV file and write to an XML file
Following technologies being used:
- Spring Batch 3.0.1.RELEASE
- Spring core 4.0.6.RELEASE
- Spring oxm 4.0.6.RELEASE
- Joda Time 2.3
- JDK 1.6
- Eclipse JUNO Service Release 2
Let’s begin.
Step 1: Create project directory structure
Following will be the final project structure:
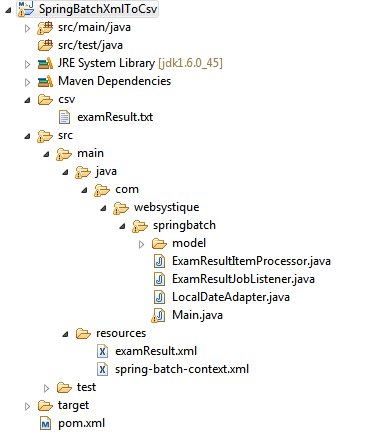
We will be reading the XML file (src/main/resources/examResult.xml) and writing to a flat/CSV file (project/csv/ExamResult.txt)
Now let’s add all contents mentioned in above figure.
Step 2: Update pom.xml to include required dependencies
Following is the updated minimalistic pom.xml
<project xmlns="http://maven.apache.org/POM/4.0.0" xmlns:xsi="http://www.w3.org/2001/XMLSchema-instance"
  xsi:schemaLocation="http://maven.apache.org/POM/4.0.0 http://maven.apache.org/xsd/maven-4.0.0.xsd">
  <modelVersion>4.0.0</modelVersion>

  <groupId>com.websystique.springbatch</groupId>
  <artifactId>SpringBatchXmlToCsv</artifactId>
  <version>1.0.0</version>
  <packaging>jar</packaging>

  <name>SpringBatchXmlToCsv</name>

  	<properties>
		<springframework.version>4.0.6.RELEASE</springframework.version>
		<springbatch.version>3.0.1.RELEASE</springbatch.version>
		<joda-time.version>2.3</joda-time.version>
	</properties>

	<dependencies>
		<dependency>
			<groupId>org.springframework</groupId>
			<artifactId>spring-core</artifactId>
			<version>${springframework.version}</version>
		</dependency>
		<dependency>
			<groupId>org.springframework</groupId>
			<artifactId>spring-oxm</artifactId>
			<version>${springframework.version}</version>
		</dependency>
		<dependency>
			<groupId>org.springframework.batch</groupId>
			<artifactId>spring-batch-core</artifactId>
			<version>${springbatch.version}</version>
		</dependency>
		<dependency>
			<groupId>org.springframework.batch</groupId>
			<artifactId>spring-batch-infrastructure</artifactId>
			<version>${springbatch.version}</version>
		</dependency>
		<dependency>
  			<groupId>joda-time</groupId>
  			<artifactId>joda-time</artifactId>
  			<version>${joda-time.version}</version>
  		</dependency>
	</dependencies>
	<build>
		<pluginManagement>
			<plugins>
				<plugin>
					<groupId>org.apache.maven.plugins</groupId>
					<artifactId>maven-compiler-plugin</artifactId>
					<version>3.2</version>
					<configuration>
						<source>1.6</source>
						<target>1.6</target>
					</configuration>
				</plugin>
			</plugins>
		</pluginManagement>
	</build>

</project>
Note that here we will be using joda-time api for any date-time processing we might need.
Step 3: Prepare the input XML file and corresponding domain object /mapped POJO
Below is the input xml whose data we will be converting in flat file format.
<?xml version="1.0" encoding="UTF-8"?>
<UniversityExamResultList>
	<ExamResult>
		<dob>1985-02-01</dob>
		<percentage>76.0</percentage>
		<studentName>Brian Burlet</studentName>
	</ExamResult>
	<ExamResult>
		<dob>1970-02-01</dob>
		<percentage>61.0</percentage>
		<studentName>Renard konig</studentName>
	</ExamResult>
	<ExamResult>
		<dob>1993-02-01</dob>
		<percentage>92.0</percentage>
		<studentName>Rita Paul</studentName>
	</ExamResult>
	<ExamResult>
		<dob>1965-02-01</dob>
		<percentage>83.0</percentage>
		<studentName>Han Yenn</studentName>
	</ExamResult>
</UniversityExamResultList>
If you are following along, you might have notice that this file was the output from SpringBatch CSV to XML Post
And the mapped POJO with fields corresponding to the row content of above file:
package com.websystique.springbatch.model;

import javax.xml.bind.annotation.XmlElement;
import javax.xml.bind.annotation.XmlRootElement;
import javax.xml.bind.annotation.adapters.XmlJavaTypeAdapter;

import org.joda.time.LocalDate;

@XmlRootElement(name = "ExamResult")
public class ExamResult {

	private String studentName;

	private LocalDate dob;

	private double percentage;

	@XmlElement(name = "studentName")
	public String getStudentName() {
		return studentName;
	}

	public void setStudentName(String studentName) {
		this.studentName = studentName;
	}

	@XmlElement(name = "dob")
	@XmlJavaTypeAdapter(type = LocalDate.class, value = com.websystique.springbatch.LocalDateAdapter.class)
	public LocalDate getDob() {
		return dob;
	}

	public void setDob(LocalDate dob) {
		this.dob = dob;
	}

	@XmlElement(name = "percentage")
	public double getPercentage() {
		return percentage;
	}

	public void setPercentage(double percentage) {
		this.percentage = percentage;
	}

	@Override
	public String toString() {
		return "ExamResult [studentName=" + studentName + ", dob=" + dob
				+ ", percentage=" + percentage + "]";
	}

}
Also note that we have used JAXB annotations in order to map the class properties to XML tags.Since we are using Joda-Time LocalDate API, we need to tell JAXB about how to perform the conversion.Below is the Adpater class for the same:
package com.websystique.springbatch;

import javax.xml.bind.annotation.adapters.XmlAdapter;

import org.joda.time.LocalDate;

public class LocalDateAdapter extends XmlAdapter<String, LocalDate>{

	public LocalDate unmarshal(String v) throws Exception {
		return new LocalDate(v);
	}

	public String marshal(LocalDate v) throws Exception {
		return v.toString();
	}

}
Step 4: Create an ItemProcessor
ItemProcessor is Optional, and called after item read but before item write. It gives us the opportunity to perform a business logic on each item.In our case, for example, we will filter out all the items whose percentage is less than 75.So final result will only have records with percentage >= 75.
package com.websystique.springbatch;

import org.springframework.batch.item.ItemProcessor;

import com.websystique.springbatch.model.ExamResult;

public class ExamResultItemProcessor implements ItemProcessor<ExamResult, ExamResult>{

	@Override
	public ExamResult process(ExamResult result) throws Exception {
		System.out.println("Processing result :"+result);

		/*
		 * Only return results which are equal or more than 75%
		 *
		 */
		if(result.getPercentage() < 75){
			return null;
		}

		return result;
	}

}
Step 5: Add a Job listener(JobExecutionListener)
Job listener is Optional and provide the opportunity to execute some business logic before job start and after job completed.For example setting up environment can be done before job and cleanup can be done after job completed.
package com.websystique.springbatch;

import java.util.List;

import org.joda.time.DateTime;
import org.springframework.batch.core.BatchStatus;
import org.springframework.batch.core.JobExecution;
import org.springframework.batch.core.JobExecutionListener;

public class ExamResultJobListener implements JobExecutionListener{

	private DateTime startTime, stopTime;

	@Override
	public void beforeJob(JobExecution jobExecution) {
		startTime = new DateTime();
		System.out.println("ExamResult Job starts at :"+startTime);
	}

	@Override
	public void afterJob(JobExecution jobExecution) {
		stopTime = new DateTime();
		System.out.println("ExamResult Job stops at :"+stopTime);
		System.out.println("Total time take in millis :"+getTimeInMillis(startTime , stopTime));

		if(jobExecution.getStatus() == BatchStatus.COMPLETED){
			System.out.println("ExamResult job completed successfully");
			//Here you can perform some other business logic like cleanup
		}else if(jobExecution.getStatus() == BatchStatus.FAILED){
			System.out.println("ExamResult job failed with following exceptions ");
			List<Throwable> exceptionList = jobExecution.getAllFailureExceptions();
			for(Throwable th : exceptionList){
				System.err.println("exception :" +th.getLocalizedMessage());
			}
		}
	}

	private long getTimeInMillis(DateTime start, DateTime stop){
		return stop.getMillis() - start.getMillis();
	}

}
Step 6: Create Spring Context with job configuration
<beans xmlns="http://www.springframework.org/schema/beans"
	xmlns:batch="http://www.springframework.org/schema/batch" xmlns:xsi="http://www.w3.org/2001/XMLSchema-instance"
	xsi:schemaLocation="http://www.springframework.org/schema/batch	http://www.springframework.org/schema/batch/spring-batch-3.0.xsd
		http://www.springframework.org/schema/beans http://www.springframework.org/schema/beans/spring-beans-4.0.xsd">

	<!-- JobRepository and JobLauncher are configuration/setup classes -->
	<bean id="jobRepository" class="org.springframework.batch.core.repository.support.MapJobRepositoryFactoryBean" />

	<bean id="jobLauncher" 	class="org.springframework.batch.core.launch.support.SimpleJobLauncher">
		<property name="jobRepository" ref="jobRepository" />
	</bean>

	<!-- ItemWriter write a line into output flat file -->
	<bean id="flatFileItemWriter" class="org.springframework.batch.item.file.FlatFileItemWriter" scope="step">

		<property name="resource" value="file:csv/examResult.txt" />

		<property name="lineAggregator">

			<!-- An Aggregator which converts an object into delimited list of strings -->
			<bean class="org.springframework.batch.item.file.transform.DelimitedLineAggregator">

				<property name="delimiter" value="|" />

				<property name="fieldExtractor">

					<!-- Extractor which returns the value of beans property through reflection -->
					<bean class="org.springframework.batch.item.file.transform.BeanWrapperFieldExtractor">
						<property name="names" value="studentName, percentage, dob" />
					</bean>
				</property>
			</bean>
		</property>
	</bean>

	<!-- ItemReader which reads data from XML file -->
	<bean id="xmlItemReader" class="org.springframework.batch.item.xml.StaxEventItemReader">

		<property name="resource" value="classpath:examResult.xml" />

		<property name="fragmentRootElementName" value="ExamResult" />

		<property name="unmarshaller">
			<bean class="org.springframework.oxm.jaxb.Jaxb2Marshaller">
				<property name="classesToBeBound">
					<list>
						<value>com.websystique.springbatch.model.ExamResult</value>
					</list>
				</property>
			</bean>
		</property>
	</bean>


	<!-- Optional ItemProcessor to perform business logic/filtering on the input records -->
	<bean id="itemProcessor" class="com.websystique.springbatch.ExamResultItemProcessor" />

	<!-- Optional JobExecutionListener to perform business logic before and after the job -->
	<bean id="jobListener" class="com.websystique.springbatch.ExamResultJobListener" />

	<!-- Step will need a transaction manager -->
	<bean id="transactionManager" class="org.springframework.batch.support.transaction.ResourcelessTransactionManager" />

	<!-- Actual Job -->
	<batch:job id="examResultJob">
		<batch:step id="step1">
			<batch:tasklet transaction-manager="transactionManager">
				<batch:chunk reader="xmlItemReader" writer="flatFileItemWriter"
					processor="itemProcessor" commit-interval="10" />
			</batch:tasklet>
		</batch:step>
		<batch:listeners>
			<batch:listener ref="jobListener" />
		</batch:listeners>
	</batch:job>

</beans>
As you can see, we have setup a job with only one step. Step uses StaxEventItemReader to read the records, itemProcessor to process the record & FlatFileItemWriter to write the records. commit-interval specifies the number of items that can be processed before the transaction is committed/ before the write will happen.Grouping several record in single transaction and write them as chunk provides performance improvement. We have also shown the use of jobListener which can contain any arbitrary logic you might need to run before and after the job.
Step 7: Create Main application to finally run the job
Create a Java application to run the job.
package com.websystique.springbatch;

import org.springframework.batch.core.Job;
import org.springframework.batch.core.JobExecution;
import org.springframework.batch.core.JobExecutionException;
import org.springframework.batch.core.JobParameters;
import org.springframework.batch.core.launch.JobLauncher;
import org.springframework.context.ApplicationContext;
import org.springframework.context.support.ClassPathXmlApplicationContext;

public class Main {
	@SuppressWarnings("resource")
	public static void main(String areg[]){

		ApplicationContext context = new ClassPathXmlApplicationContext("spring-batch-context.xml");

		JobLauncher jobLauncher = (JobLauncher) context.getBean("jobLauncher");
		Job job = (Job) context.getBean("examResultJob");

		try {
			JobExecution execution = jobLauncher.run(job, new JobParameters());
			System.out.println("Job Exit Status : "+ execution.getStatus());

		} catch (JobExecutionException e) {
			System.out.println("Job ExamResult failed");
			e.printStackTrace();
		}
	}

}
Running above program as java application, you will see following output
INFO: Job: [FlowJob: [name=examResultJob]] launched with the following parameters: [{}]
ExamResult Job starts at :2014-08-03T15:28:14.388+02:00
Aug 3, 2014 3:28:14 PM org.springframework.batch.core.job.SimpleStepHandler handleStep
INFO: Executing step: [step1]
Processing result :ExamResult [studentName=Brian Burlet, dob=1985-02-01, percentage=76.0]
Processing result :ExamResult [studentName=Renard konig, dob=1970-02-01, percentage=61.0]
Processing result :ExamResult [studentName=Rita Paul, dob=1993-02-01, percentage=92.0]
Processing result :ExamResult [studentName=Han Yenn, dob=1965-02-01, percentage=83.0]
ExamResult Job stops at :2014-08-03T15:28:14.419+02:00
Total time take in millis :131
ExamResult job completed successfully
Aug 3, 2014 3:28:14 PM org.springframework.batch.core.launch.support.SimpleJobLauncher run
INFO: Job: [FlowJob: [name=examResultJob]] completed with the following parameters: [{}] and the following status: [COMPLETED]
Job Exit Status : COMPLETED
You can see that we have processed all input records. Below is the generated flat file (txt) found in project/csv folder
Brian Burlet|76.0|1985-02-01
Rita Paul|92.0|1993-02-01
Han Yenn|83.0|1965-02-01
Only the records which are meeting specific condition ( >=75) are included here, thanks to itemProcessor filtering logic.
That’s it.
Download Source Code
References
If you like tutorials on this site, why not take a step further and connect me on Facebook , Google Plus & Twitter as well? I would love to hear your thoughts on these articles, it will help improve further our learning process.